OSSのサーバテスト自動化ツール徹底検証 2016年版 〜Infrataster編――手間取るテストエビデンス作成をどう自動化するか〜:実際に検証済み!OSS徹底比較(6)サーバテスト自動化【後編】(4/6 ページ)
各種オープンソースソフトウェアのうち、特に人気の高いOSSをピックアップ。実際の検証結果をまとめた本連載。前編で解説したサーバテスト自動化ツール「Serverspec」に続き、今回は「Infrataster」を紹介する。
InfratasterのTIPS
Infratasterのインストール方法や、設定ファイルの編集方法、テストスクリプトの作成方法は公式サイトのREADME.mdにまとまった形で解説されている。以下では今回の検証に使用したコマンドの用法や注意点などをまとめた。
Infratasterは、外部のサーバからテストサーバに接続することで、Webサイト(http)やMariaDB(MySQL)への接続、ファイアウォールのポート解放などを検証する製品である。そのため、Serverspecに存在する、describe service/file/port/packageなどのコマンドは提供されていない。describe commandに相当するcurrent_server.ssh_execが提供されているため、current_server.ssh_execを活用して機能を補っている。
1.パッケージのインストールの有無
パッケージをインストールしたかどうかの確認には、rpmコマンドを実行して、その結果出力にチェック対象のパッケージ名が含まれているか否かを検出する方法で行っている。以下の記述例は、複数のパッケージをループ処理で確認するものとなっている。
# mariadb-server/httpd/php/php-mysql insall check
%w{ mariadb-server httpd php php-mysql }.each do |pkg|
  it "#{pkg} install check" do
    result = current_server.ssh_exec("rpm -qa | grep -e '#{pkg}-[0-9]'")
    expect(result.chomp).to match /#{pkg}/
  end
end
rpmでインストールしたもの以外には対応できておらず、バージョン指定でチェックする場合は、機能の改修が必要である。
2.サービスの起動と自動起動設定の確認
サービスが起動していることと、自動起動が設定されていることの確認にはsystemctlコマンドでサービスのステータス確認を実行して、その結果出力にrunnning/enableが含まれているか否かを検出する方法で行っている。記述例は以下の通り。
# mariadb service running/enable check
it 'mariadb service running/enable check' do
  result = current_server.ssh_exec('systemctl status mariadb')
  expect(result).to match /service; enabled/
  expect(result).to match /active \(running\)/
end
3.指定ポートの待ち受け(LISTEN)確認
Infratasterでは、実際に起動しているサービスにリクエストする形で確認ができるため、今回のサンプルでは実装していないが、実装することも可能である。その場合の記述例は以下の通り。
 httpd LISTEN port check
it 'httpd LISTEN port check' do
  result = current_server.ssh_exec("netstat -antp | grep LISTEN")
  expect(result.chomp).to match /:80 /
end
4.ファイルの存在、内容、権限の確認
(1)ファイルの権限のチェック
ファイルのuser/groupをチェックする記述例は以下となる。findコマンドを実行し、指定ユーザー以外、または指定グループ以外の権限のファイル、ディレクトリを検索し、件数をカウントしている。0件であれば正常と判定している。
# WordPress file user/group check
it 'WordPress file user/group check' do
  result = current_server.ssh_exec("find #{wp_dir} -not -user #{wp_os_user} -or -not -group #{wp_os_group} | wc -l")
  expect(result.chomp).to eq('0')
end
(2)ファイルの記述内容のチェック
ファイル内の指定の文字列が記述されているか否かをチェックする記述例は以下の通り。ファイルの内容をいったん変数に格納して、変数の中に指定文字列が存在するか否かチェックしている。ただこの記述の場合、ファイル中に指定された文字列が存在することは確認できるが、位置までは確認できないので注意が必要である。
# wp-config.php paramaters check
it 'wp-config.php paramaters check' do
  result = current_server.ssh_exec("cat #{wp_dir}/wp-config.php")
  expect(result).to match /define\('DB_NAME',.*'#{wp_db_name}'\);/
  expect(result).to match /define\('DB_USER',.*'#{wp_db_user}'\);/
  expect(result).to match /define\('DB_PASSWORD',.*'#{wp_db_pass}'\);/
  expect(result).to match /define\('AUTH_KEY',.*'#{wp_uniqe_phrse}'\);/
 end
(3)ファイルの完全一致のチェック
ファイルの記述内容が完全に想定通りになっているかチェックする記述例は以下の通り。
変数にファイルの内容を全て登録し、読み込んだファイルと完全に一致するかを比較している。<<"EOT"からEOTまでが前方の空白も含めて一致している必要があり、スクリプトのnestは無視する必要がある(比較対象のファイルの行がそのままコピーされている形に近い)。
# wordpress.conf check
it 'wordpress.conf check' do
wordpress_conf = <<"EOT"
<VirtualHost *:80>
  ServerName #{hostname}
  DocumentRoot #{wp_dir}
  <Directory "#{wp_dir}">
    AllowOverride All
    Options -Indexes
  </Directory>
  <Files wp-config.php>
    order allow,deny
    deny from all
  </Files>
</VirtualHost>
EOT
  result = current_server.ssh_exec("cat /etc/httpd/conf.d/wordpress.conf")
  expect(result).to match "#{wordpress_conf}"
end
5.コマンドの実行確認
(1)コマンドの実行結果(exit code)のチェック
コマンドの実行結果をチェックする記述例は以下の通り。記述例はyum check-updateでupdate対象がない場合、exit code=0となることを利用して判定している。そのままでは実行結果が変数に格納できないため、コマンド実行直後にecho $?を実行する。
# yum update check
it 'yum update check' do
  result = current_server.ssh_exec('yum check-update 2>&1 > /dev/null; echo $?')
  expect(result.chomp).to eq('0')
end
(2)コマンド実行結果でチェック処理自体を分岐する
ファイルの有無やシステムの状態によってチェック処理自体を変更する必要がある場合の記述例は以下の通り。
# mariadb logrotation check
before :all do
  @already_rotate = current_server.ssh_exec('su root -c "ls -1 /var/log/mariadb/*.gz | wc -l"').to_i
end
it 'mariadb logrotation check' do
  if @already_rotate == 0 then
    check_cmd = '/sbin/logrotate -vf /etc/logrotate.d/mariadb'
    match_prm = 'running postrotate script'
  else
    check_cmd = '/sbin/logrotate -vd /etc/logrotate.d/mariadb'
    match_prm = 'log does not need rotating'
  end
  result = current_server.ssh_exec("su root -c \"#{check_cmd}\"")
  expect(result).to match /#{match_prm}/
end
after :all do
  @already_rotate = nil
end
Infratasterのcurrent_server.ssh_execをroot以外のユーザーでsudoを用いて利用する場合、rootのみがアクセスできるファイルに対する処理がエラーとなる場合がある。そのため、本例では "/var/log/mariadb/*.gz" が展開されず対象ファイルなしになってしまう。
※echo /var/log/mariadb/*.gzのようにファイル名を表示する処理をrootとroot以外で実行してみると状況が分かりやすい。
$ echo /var/log/mariadb/*.gz
/var/log/mariadb/*.gz
$ sudo echo /var/log/mariadb/*.gz
/var/log/mariadb/*.gz
$ su root -c "echo /var/log/mariadb/*.gz"
/var/log/mariadb/mariadb.log.1.gz
$ ls -l /var/log/mariadb/*.gz
ls: /var/log/mariadb/*.gz にアクセスできません: 許可がありません
$ su root -c "ls -l /var/log/mariadb/*.gz"
-rw-r----- 1 mysql mysql 782  5月 27 19:11 /var/log/mariadb/mariadb.log.1.gz
そのため、su root -cで明示的にrootユーザーで実行させるようにしている。Infratasterの内部では先にsu rootが実行され、その後にコマンドが実行される形となり、正しく処理が行われる。同様の事象はログローテーションでも発生するため、こちらもsu root -cを使用している。
このテストケースでは、mariadb-serverのログローテーションを実際に行うことで検証している。ただ、ログローテーションが正常に行われている(すでにgzファイルが存在する)場合は、再実行しないよう制御している。
current_server.ssh_execは、最後に.to_iを追加することで、取得結果を文字列から数値に変換できる。これで取得件数を数値として比較できるようになる。before内にコマンドを記述することで、各itの処理より前に実行される。afterでは使用した変数を初期化し、領域を解放している(コマンド終了時にプロセスとしても終了し、メモリは解放されるため、afterは特になくても問題はない)。
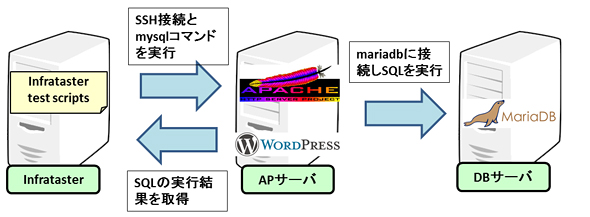
ここまではサーバ内部の設定確認であるため、本来は前回記事で紹介したServerspecを適用すべき機能であり、以降で紹介するサーバ外部からのHTTP接続やRDBへの接続などの処理結果を確認することこそ、Infrataster本来の機能だといえるだろう。
6.Webサイトへのアクセス確認
Webサイトにアクセスできるか否かについては、describe httpを使用してチェックする。URLを指定することで、そのレスポンスコードや、返却されたHTML文などをチェックすることができる。チェックできる項目は前述したReadme.mdのhttpの個所に詳細に記載されている。本機能は、管理サーバからテスト対象サーバへの外部からのアクセスになるため、より確実なテストになると考えられる。
# WordPress site access check
describe http("http://#{hostname}/wp-admin/install.php") do
  it 'WordPress site access check' do
    expect(response.body).to match /WordPress/
  end
end
7.MariaDB(MySQL)へのアクセス確認
MariaDB(MySQL)への接続やSQL文の実行結果の確認には、describe mysql_queryを使用する。使用方法は、infrataster-plugin-mysqlのgitリポジトリのReadme.mdに記載されている。
infrataster-plugin-mysqlの取得結果の判定処理はbrianmario/mysql2に依存しているため、必要であれば、gitリポジトリのbrianmario/mysql2のReadme.mdを参照する必要がある。
例では、show databasesを実行し、取得されたテーブルの中から、Databaseというカラムにmysqlが登録されているレコードを抽出している。そのレコードにある「Database」カラムの値がmysqlなら正常に処理できていると判定している。
# mariadb remote login check
describe mysql_query('show databases') do
  it 'mariadb remote login check' do
    row = results.find {|r| r['Database'] == 'mysql' }
    expect(row['Database']).to eq('mysql')
  end
end
ただ、このテストでは「管理サーバ⇒テスト対象サーバへの接続」で実施しているが、本来は管理サーバからAPサーバに接続して、「APサーバ⇒DBサーバへの接続」テストに使用するべき機能だと考えられる。
8.ファイアウォールの設定確認
(1) 標準のdescribe firewallを使用する方法
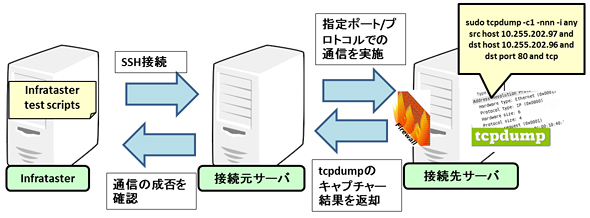
ファイアウォールの設定確認にはdescribe firewallを使用する。最初のdescribe server()が接続元ホスト名、describe firewall(server())が接続先ホスト名になる。本機能を検証するためには、管理サーバからssh接続できるサーバが2台必要ということになる。今回は、接続元ホストを管理サーバにして、管理サーバから管理サーバにssh接続する形で検証を行っている。
describe server(:tissvv097) do
  # firewall open port check
  describe firewall(server(:tissvv096)) do
    it { is_expected.to be_reachable }
    it { is_expected.to be_reachable.dest_port(80).ack(:only) }
    it { is_expected.to be_reachable.dest_port(80) }
  end
end
it { is_expected.to be_reachable }はpingによる疎通確認、it { is_expected.to be_reachable.dest_port(80) }は80/tcpにポート解放確認、it { is_expected.to be_reachable.dest_port(80).ack(:only) }は80/tcpにポート解放のackのみを確認する機能となっている。
筆者注
※2016年10月28日追記:最新バージョンで以下のissueは対応が行われており、以下の事象は発生しません。
実際に動作をさせてみると、pingは成功するのだが、it { is_expected.to be_reachable.dest_port(80) }のテストは処理が止まってしまう。
server 'tissvv097'
  via firewall
    should reach to server 'tissvv096'
    should reach to server 'tissvv096' dest_port: 80 (FAILED - 1)
it { is_expected.to be_reachable.dest_port(80) }をコメントアウトすると、処理は終了するが、it { is_expected.to be_reachable.dest_port(80).ack(:only) }で以下のエラーメッセージが出力される。
server 'tissvv097'
  via firewall
    should reach to server 'tissvv096'
    should reach to server 'tissvv096' dest_port: 80 (FAILED - 1)
Failures:
  1) server 'tissvv097' via firewall should reach to server 'tissvv096' dest_port: 80
     Failure/Error: it { is_expected.to be_reachable.dest_port(80).ack(:only) }
       expected to reach to server 'tissvv096' dest_port: 80, but did not.
     # ./spec/tissvv096_w_fw_spec.rb:175:in `block (3 levels) in <top (required)>'
/usr/local/share/gems/gems/infrataster-plugin-firewall-0.1.4/lib/infrataster/plugin/firewall/capture.rb中でtcpdumpを実行しており、そこで送信元サーバからの通信パケットをキャプチャーすることで指定ポートの通信可否を判定している。
ソースに手を入れるなどして確認してみたが、どうも接続先サーバでキャプチャを行うtcpdumpの起動が行えていないようである。筆者の設定不備の可能性もあるのだろうが、Gitリポジトリのinfrataster-plugin-firewallのissues/6でも同様の事象が報告されているので、こちらの進展を待ちたい。
(2) 内部からファイアウォールの設定を確認する方法
今回は別の手段でテストを実施している。Serverspec同様に、内部からファイアウォールの設定を確認する方法は以下の通りだ。
# firewall http/ssh/mysql port open check
it 'firewall http/ssh/mysql port open check' do
  result = current_server.ssh_exec('firewall-cmd --list-all --zone=public')
  expect(result).to match /services:.*http/
  expect(result).to match /services:.*ssh/
  expect(result).to match /services:.*mysql/
  expect(result).to match /ports: $/
end
(3) tcpdumpを使用して、httpの通信を確認する方法
さらにtcpdumpを使用する方法も検証してみた。まず、以下のようなテストスクリプトを作成する。
$ vi ~/infrataster/spec/tissvv096_tcpdump_spec.rb
require 'spec_helper'
describe server(:tissvv096) do
  mng_host='tissvv097'
  hostname='tissvv096'
  chk_port='80'
  # firewall open port check(tcpdump)
 it 'firewall open port check(tcpdump)' do
    result = current_server.ssh_exec("su root -c '/usr/sbin/tcpdump -c1 -nnn -i any src host #{mng_host} and dst host #{hostname} and dst port #{chk_port} and tcp'")
    expect(result).to match /1 packet captured/
  end
end
このテストスクリプトを実行し、別のターミナルからcurlコマンドなどでhttpリクエストを送信することでテストを実施できる。
$ rspec spec/tissvv096_tcpdump_spec.rb
Run options: include {:focus=>true}
All examples were filtered out; ignoring {:focus=>true}
server 'tissvv096'
  firewall open port check(tcpdump)
Finished in 1.66 seconds (files took 0.42656 seconds to load)
1 example, 0 failures
matchをチェックする文字列を/hoge/など不一致になるように変更しておくと、エラーにはなるが、何が返却されているのかを見ることができる。
Run options: include {:focus=>true}
All examples were filtered out; ignoring {:focus=>true}
server 'tissvv096'
  firewall open port check(tcpdump) (FAILED - 1)
Failures:
  1) server 'tissvv096' firewall open port check(tcpdump)
     Failure/Error: expect(result).to match /[+]1 packet captured/
       expected "tcpdump: verbose output suppressed, use -v or -vv for full protocol decode\nlistening on any, link-type LINUX_SLL (Linux cooked), capture size 65535 bytes\n09:30:55.307557 IP 10.255.202.97.59340 > 10.255.202.96.80: Flags [S], seq 821787478, win 29200, options [mss 1460,sackOK,TS val 256647081 ecr 0,nop,wscale 7], length 0\n1 packet captured\n3 packets received by filter\n0 packets dropped by kernel\n" to match /[+]1 packet captured/
       Diff:
       @@ -1,2 +1,7 @@
       -/hoge/
       +tcpdump: verbose output suppressed, use -v or -vv for full protocol decode
       +listening on any, link-type LINUX_SLL (Linux cooked), capture size 65535 bytes
       +09:30:55.307557 IP 10.255.202.97.59340 > 10.255.202.96.80: Flags [S], seq 821787478, win 29200, options [mss 1460,sackOK,TS val 256647081 ecr 0,nop,wscale 7], length 0
       +1 packet captured
       +3 packets received by filter
       +0 packets dropped by kernel
     # ./spec/tissvv096_tcpdump_spec.rb:13:in `block (2 levels) in <top (required)>'
Finished in 2.39 seconds (files took 0.42021 seconds to load)
1 example, 1 failure
Failed examples:
rspec ./spec/tissvv096_tcpdump_spec.rb:11 # server 'tissvv096' firewall open port check(tcpdump)
実行された結果そのものが出力されるため、エビデンスを残すためには、意図的にエラーを発生させ、結果を表示させる手も有効だといえるかもしれない。
Copyright © ITmedia, Inc. All Rights Reserved.

