障害の兆候を見逃さないためのサーバ監視:Linux管理者への道(7)(3/3 ページ)
サーバの構築は難しいが、それ以上に困難なのがそれを動かし続けること、そしてトラブルに迅速に対応することだ。サーバの動作状況を監視し、障害の予兆や発生をより早く検知できる体制を整えよう。(編集局)
SNMPによるネットワークシステムの監視
ネットワークを構成するすべての機器の状態を把握し、ネットワークが正常に機能しているか否かを監視するにはSNMPというプロトコルを利用するのが便利です。このプロトコルはもともとネットワークの構成を管理するために開発されたもので、スイッチやルータなどの多くのネットワーク機器がSNMPに対応しています(注)。
SNMPの要素:マネージャ/エージェント/MIB
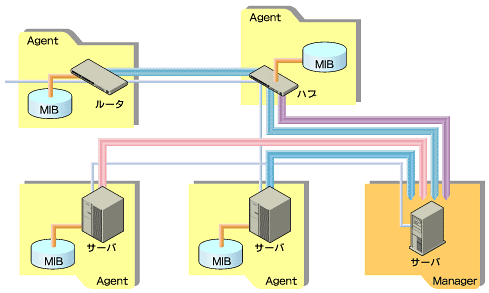
SNMPは、マネージャ(NMS:Network Management Station)とエージェントという2種類の機器あるいはソフトウェアがネットワークを通じて情報のやりとりを行います。マネージャはネットワーク上に存在するエージェントに対して情報提供を要求し、情報を収集・管理します。エージェントはマネージャの要求を解釈し、必要な情報を提供します。
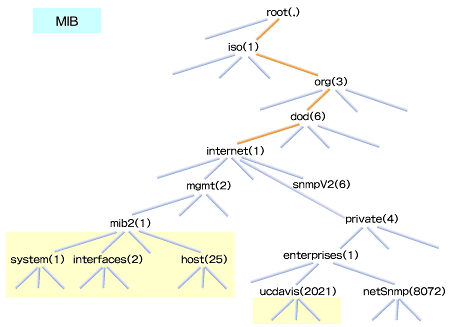
このエージェントとマネージャでやりとりする情報は、MIB(Management Information Base)と呼ばれる管理データベースを基にしています。エージェントが持っている情報は機器の種類によって標準的なMIBが定義されていますが、各ベンダ独自のMIBも定義されています。MIBによるデータはツリー構造で分類されています。SNMPが利用するのは.iso.org.dod.internetから広がる情報で、特に.iso.org.dod.internet.mgmt.mib2および.iso.org.dod.internet.mgmt.private.enterprise.ucdavis以下の情報が有用です。
net-snmpのインストール
Linuxの場合、net-snmp(注)というソフトウェアをインストールしてSNMPを実装するのが一般的です。
ここではnet-snmpのWebサイト(http://net-snmp.sourceforge.net/)よりnet-snmp-5.07.tar.gzを入手し、インストールします。ダウンロードしたアーカイブを展開し、作成されるnet-snmp-5.07ディレクトリに移動してconfigureスクリプトを実行します。
# tar zxvf net-snmp-5.07.tar.gz
# cd net-snmp-5.07
# ./configure
(略)
configureスクリプトを実行すると、その処理の1つとしてソフトウェアの基本構成や管理者のアドレスなどを対話的に入力し、include/net-snmp/net-snmp-config.hを作成するためのメッセージが表示されます。
************** Configuration Section **************
You are about to be prompted with a series of questions. Answer
them carefully, as they determine how the SNMP agent and related
applications are to function.
After the configure script finishes, you can browse the newly
created config.h file for further - less important - parameters to
modify. Be careful if you re-run configure though, since config.h will
be overwritten.
-Press return to continue-
disabling above prompt for future runs... yes
checking Default version of SNMP to use...
ここではSNMPのデフォルトバージョンを選択します。
*** Default SNMP Version:
Starting with Net-SNMP 5.0, you can choose the default version of
the SNMP protocol to use when no version is given explicitly on the
command line, or via an 'snmp.conf' file. In the past this was set to
SNMPv1, but you can use this to switch to SNMPv3 if desired. SNMPv3
will provide a more secure management environment (and thus you're
encouraged to switch to SNMPv3), but may break existing scripts that
rely on the old behaviour. (Though such scripts will probably need to
be changed to use the '-c' community flag anyway, as the SNMPv1
command line usage has changed as well.).
At this prompt you can select "1", "2" (for SNMPv2c), or "3" as
the default version for the command tools (snmpget, ...) to use. This
can always be overridden at runtime using the -v flag to the tools, or
by using the "defVersion" token in your snmp.conf file.
Default version of SNMP to use (3):
setting Default version of SNMP to use to... 3
checking System Contact Information...
連絡先として、管理者のメールアドレスを指定します。
*** System Contact Information:
Describes who should be contacted about the host the agent is
running on. This information is available in the MIB-II tree. This
can also be over-ridden using the "syscontact" syntax in the agent's
configuration files.
System Contact Information (root@): admin@itboost.co.jp
setting System Contact Information to... admin@itboost.co.jp
checking System Location...
システムのロケーションを指定します。管理するシステムに対して区別しやすい文字を入力すれば構いません。
*** System Location:
Describes the location of the system. This information is
available in the MIB-II tree. this can also be over-ridden using the
"syslocation" syntax in the agent's configuration files.
System Location (Unknown): RedHat Linux 8.0 in Osaka
setting System Location to... RedHat Linux 8.0 in Osaka
checking Location to write logfile...
ログファイルの場所を指定します。デフォルトは/var/log/snmpd.logです。
*** Logfile location:
Enter the default location for the snmpd agent to dump
information & errors to. If not defined (enter the keyword "none"
at the prompt below) the agent will use stdout and stderr instead.
(Note: This value can be over-ridden using command line options.)
Location to write logfile (/var/log/snmpd.log):
setting Location to write logfile to... /var/log/snmpd.log
checking Location to write persistent information...
設定ファイルの場所を指定します。デフォルトは/var/net-snmp/snmpd.confです。
*** snmpd persistent storage location:
Enter a directory for the SNMP library to store persistent
data in the form of a configuration file. This default location is
different than the old default location (which was for ucd-snmp). If
you stay with the new path, I'll ask you in a second if you wish to
copy your files over to the new location (once only). If you pick
some other path than the default, you'll have to copy them yourself.
There is nothing wrong with picking the old path (/var/ucd-snmp) if
you'd rather.
Location to write persistent information (/var/net-snmp):
setting Location to write persistent information to... /var/net-snmp
updating cache ./config.cache
creating ./config.status
creating Makefile
creating snmplib/Makefile
creating apps/Makefile
creating apps/snmpnetstat/Makefile
creating agent/Makefile
creating agent/helpers/Makefile
creating agent/mibgroup/Makefile
creating local/Makefile
creating testing/Makefile
creating man/Makefile
creating mibs/Makefile
creating net-snmp-config
creating include/net-snmp/net-snmp-config.h
---------------------------------------------------------
Net-SNMP configuration summary:
---------------------------------------------------------
Net-SNMP Version: 5.0.7
Building for: linux
Network transport support: Callback Unix TCP UDP
SNMPv3 Security Modules: usm
Agent MIB code: mibII ucd_snmp snmpv3mibs notification
target agent_mibs agentx agent_mibs utilities
Authentication support: MD5 SHA1
Encryption support: DES
---------------------------------------------------------
(略)
configureスクリプトが終了したら、make、make installを実行します。
# make
# make install
net-snmpの設定
上記のようにインストールした場合、設定ファイルは/usr/local/share/snmp/snmpd.confになります。しかし、このファイルはデフォルトでは存在しないので、新規にファイルを作成することになります。
設定内容は比較的複雑です。セキュリティに関する設定は下記の4つからなります。
com2sec:セキュリティ名
group:グループ名
view:取得を許可する情報の範囲
access:グループに対するアクセス権
com2sec
com2sec行は、ネットワークの範囲とコミュニティ名という2つの値を「セキュリティ名」という形で定義します。コミュニティ名は特定のネットワークに付ける名前のことですが、SNMPではこれが情報にアクセスするためのパスワードとなります。そのため、デフォルトのコミュニティ名は絶対に使用しないようにしましょう。
以下の例では、セキュリティ名local(localhost:127.0.0.1)に対してprivate、セキュリティ名securenet(192.168.0.0/24)に対してsecureというコミュニティ名の設定を行っていますが、実際はもっと分かりにくいコミュニティ名にすることを推奨します。
# セキュリティ名 ネットワーク コミュニティ名
com2sec local localhost private
com2sec securenet 192.168.0.0/24 secure
group
group行は、セキュリティ名とSNMPのセキュリティモデルをグループ名で定義します。セキュリティモデルとしては「v1」「v2」「usm」が存在し、それぞれSNMPバージョン1、2、3に対応しています。
書式は以下のとおりですが、先に指定したlocalとsecurenetという2つのセキュリティ名をlocal_group、secure_groupとして定義しています。
このグループ名は後述するaccess行でのアクセス許可の設定で使用されます。
グループ名 モデル名 セキュリティ名
group local_group v1 local
group local_group v2c local
group local_group usm local
group secure_group v1 securenet
group secure_group v2c securenet
group secure_group usm securenet
view
view行はSNMPで取得可能な情報の範囲を指定します。第4フィールドのMIBのオブジェクトIDと第5フィールドのマスクによって範囲を指定できます。
下記の例では、.iso(1)以下の全情報(実質的には.iso(1).org(3).dod(6).internet(1))を取得できるview_allと、.iso(1).org(3).dod(6).internet(1).mgmt(2).mib2(1)以下の全情報を取得できるview_mib2、.iso(1).org(3).dod(6).internet(1).private(4).enterprises(1).ucdavis(2021)以下の全情報を取得できるview_ucdavisというviewを定義しています。このview名は、後述するaccess行でアクセス許可の設定に使用します。
タイプ
include:指定した範囲
exclude:指定範囲外 MIBのオブジェクトID マスク(16進数)
view view_all included .1 80
view view_mib2 included .1.3.6.1.2.1 fc
view view_ucdavis included .1.3.6.1.4.1.2021 fe
access
access行はアクセス許可のための設定です。書式は以下のとおりです(2行になっていますが、実際は1行で記述します)。
access グループ名 Context モデル 認証設定 Contextマッチの方法 read権限
write権限 通知
下記の例では、local_groupに対してすべてのMIBの読み込み、secure_groupはview_mib2で定義されている情報の読み込みを許可する設定を行っています。
access local_group "" any noauth exact view_all
none none
access secure_group "" any noauth exact view_mib2
none none
そのほかの設定
上記以外に必要な設定として、syscontactとsyslocationがあります。syslocation行はSNMPエージェントの基本情報を表す任意の文字列を入力します。例えば、ホスト名やサーバの設置場所など、サーバを識別しやすい名前にしておきましょう。
syscontact行は連絡先なので、システム管理者のメールアドレスを入れておきます。
syslocation Red Hat Linux 8.0
syscontact root
すべてを設定したファイルの内容は、下記のようになります。
com2sec local localhost private
com2sec securenet 192.168.0.0/24 secure
group local_group v1 local
group local_group v2c local
group local_group usm local
group secure_group v1 securenet
group secure_group v2c securenet
group secure_group usm securenet
view all included .1 80
view view_mib2 included .1.3.6.1.2.1 fc
view view_ucdavis included .1.3.6.1.4.1.2021 fe
access local_group "" any noauth exact view_all
none none
access secure_group "" any noauth exact view_mib2
none none
syslocation Red Hat Linux 8.0
syscontact Asano
なお、SNMPの設定ファイル(/etc/snmp/snmpd.conf)にはパスワードに相当するコミュニティ名が記述されるため、セキュリティを考慮してパーミッションを600としておきます。
# chmod 600 /etc/snmp/snmpd.conf
設定ファイルを作成したら、以下のようにSNMPデーモン(snmpd)を起動します。
# /usr/local/sbin/snmpd -s -l /dev/null -P /var/run/snmpd -a
| オプション | 機能 |
|---|---|
| -s | syslogを有効にする |
| -P ファイル名 | プロセスIDを保存するファイル名 |
| -l | snmpdの出力を送るファイル名の指定 |
| -a | 送信元IPアドレス(NMS)をログに記録する |
| 表3 snmpdのオプション | |
SNMPエージェントからの情報取得
●MIB情報の検索
net-snmpdパッケージには簡易SNMPマネージャとしてsnmpwalkやsnmpgetなどのコマンドが用意されています。これらを使用して、リモートのシステムからSNMPで情報を取得することができます。
snmpwalkの書式は以下のとおりです。コミュニティ名の個所には、設定ファイルのcom2sec行で指定したコミュニティ名を入力します。
# snmpwalk -c <コミュニティ名> <ホスト名> [ 検索範囲 ]
以下のように実行すると、SNMPの情報一覧が取得できます。動作しない場合はログを確認してみましょう。
# snmpwalk -c private localhost
# snmpwalk -v1 -c private localhost | head
SNMPv2-MIB::sysDescr.0 = STRING: Linux testsv.ldomain 2.4.18-3 #1 Thu Apr 18 07:37:53 EDT 2002 i686
SNMPv2-MIB::sysObjectID.0 = OID: NET-SNMP-MIB::netSnmpAgentOIDs.10
SNMPv2-MIB::sysUpTime.0 = Timeticks: (29059) 0:04:50.59
SNMPv2-MIB::sysContact.0 = STRING: Asano
SNMPv2-MIB::sysName.0 = STRING: testsv.ldomain
SNMPv2-MIB::sysLocation.0 = STRING: Red Hat Linux 8.0 testsv
SNMPv2-MIB::sysORLastChange.0 = Timeticks: (0) 0:00:00.00
SNMPv2-MIB::sysORID.1 = OID: IF-MIB::ifMIB
SNMPv2-MIB::sysORID.2 = OID: SNMPv2-MIB::snmpMIB
SNMPv2-MIB::sysORID.3 = OID: TCP-MIB::tcpMIB
(略)
●MIBの名前解決
SNMPを利用するうえで、MIBシンボル名⇔オブジェクトID名の変換が必要な場合があります。その際に利用するのがsnmptranslateコマンドです。これは、どのようなMIBシンボル名があるのかを一覧したい場合にも利用できます。
# snmptranslate 1.3.6.1.2.1.25.3
HOST-RESOURCES-MIB::hrDevice
# snmptranslate -On HOST-RESOURCES-MIB::hrDevice
.1.3.6.1.2.1.25.3
# snmptranslate -On -IR hrDevice
.1.3.6.1.2.1.25.3
# snmptranslate -Td .1.3.6.1.2.1.1.1
SNMPv2-MIB::sysDescr
sysDescr OBJECT-TYPE
-- FROM SNMPv2-MIB, RFC1213-MIB
-- TEXTUAL CONVENTION DisplayString
SYNTAX OCTET STRING (0..255)
DISPLAY-HINT "255a"
MAX-ACCESS read-only
STATUS current
DESCRIPTION "A textual description of the entity. This value should
include the full name and version identification of the
system's hardware type, software operating-system, and
networking software."
::= { iso(1) org(3) dod(6) internet(1) mgmt(2) mib-2(1) system(1) 1 }
# snmptranslate -Tp
+--iso(1)
|
+--org(3)
|
+--dod(6)
|
+--internet(1)
|
+--directory(1)
|
(略)
今回は、システムに関するさまざまな情報の取得方法を紹介しました。次回は、具体的にどのような情報を取得し、どのようにデータを活用していけばいいのかを紹介していきます。
Copyright © ITmedia, Inc. All Rights Reserved.

