Spring Frameworkを使ったサンプル
■Spring Frameworkとは
Spring Frameworkは『Expert One-on-One J2EE Design and Development』(邦題『実践 J2EEシステムデザイン』)の著者であるRod Johnson氏が作成したオープンソースのJavaアプリケーションフレームワークです。Spring FrameworkにはDIを実装した「DIコンテナ」がSpringCoreとして実装されています。Spring Frameworkは、商用利用可能なApache License Ver 2.0で提供されています。
■プロパティ値の設定サンプル
それではSpring Frameworkを使用した、「設定と利用を分離」するサンプルを作成しましよう。まず初めはプロパティの初期値を設定ファイルから読み込んで設定するシンプルなサンプルを作成します。サンプルのクラス構成は以下のようになります。

これは、SpringTestクラスのmainメソッドが呼ばれるとTargetクラスに注入された「message」を表示するだけの簡単なサンプルです。まずはSpring Frameworkの配布アーカイブをダウンロードしましょう(http://www.springframework.org/)。
次に、必要なJarファイルをクラスパスに通します。最低限必要なライブラリは以下の2つで、ダウンロードしたSpring Frameworkのアーカイブにも含まれています。
- spring.jar
- commons-logging.jar
さて準備が整ったら、以下のクラスを作成してください。
import org.springframework.context.ApplicationContext;
import org.springframework.context.support.
ClassPathXmlApplicationContext;

public class SpringTest  {
   public static void main(String args[]){
      // アプリケーションコンテキストの取得
      ApplicationContext contxt =
         new ClassPathXmlApplicationContext("applicationContext.xml");

      // Beanの取得
      Target target = (Target)contxt.getBean("target");

      System.out.println( target.getMessage());
   }
}
public class Target {
   public Target() {}

   private String message;
   public String getMessage() { return this.message; }
   public void setMessage(String message) { this.message = message; }
}
クラスが作成できたら、以下のapplicationContext.xmlというファイルを作成します。このapplicationContext.xmlはアプリケーションのクラスパス上に配置してください。
<?xml version="1.0" encoding="UTF-8"?>
<!DOCTYPE beans PUBLIC "-//SPRING//DTD BEAN//EN" "http://www.springframework.org/dtd/spring-beans.dtd">
<beans>
   <bean id="target" class="Target" >
      <property name="message" >
         <value>Hello World!</value>
      </property>
   </bean>
</beans>
これでサンプルは完成です。このサンプルを実行すると以下のように表示されます。
Hello World!
applicationContext.xmlで定義された依存情報の注入されたオブジェクトが取得され、「Hello World!」という文字列が表示されたのが確認できましたね。
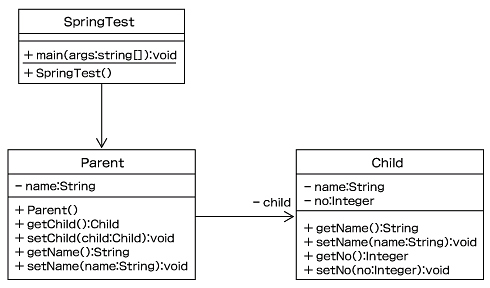
■関連オブジェクトの注入サンプル
さて、次にもう1つサンプルを作成します。次はSpring Frameworkによって「依存オブジェクト」を注入するところを確認するサンプルです。DIでは「オブジェクト同士の関連」も「設定」であると見なして実装から切り離すことができます。今回のクラス構成は以下のようになっています。
import org.springframework.context.ApplicationContext;
import org.springframework.context.support.
ClassPathXmlApplicationContext;

public class SpringTest  {
   public static void main(String args[]){
      ApplicationContext contxt =
         new ClassPathXmlApplicationContext("applicationContext.xml");
      Parent parent = (Parent)contxt.getBean("parent");
      System.out.println( "親オブジェクトの設定情報:"+
 parent.getName());

      Child child = parent.getChild();
      System.out.println( "子オブジェクトの設定情報:" +
 child.getName());
   }
}
public class Child{
   private String name;
   private Integer no;
   public String getName() { return name; }
   public void setName(String name) { this.name = name; }
   public Integer getNo() { return no; }
   public void setNo(Integer no) { this.no = no; }
}
public class Parent {
   public Parent() {}
   private Child child;
   private String name;

   public Child getChild() { return child; }
   public void setChild(Child child) { this.child = child; }
   public String getName() { return name; }
   public void setName(String name) { this.name = name; }
}
<?xml version="1.0" encoding="UTF-8"?>
<!DOCTYPE beans PUBLIC "-//SPRING//DTD BEAN//EN" "http://www.springframework.org/dtd/spring-beans.dtd">
<beans>
   <bean id="child" class="Child">
      <property name="name" >
         <value>子供</value>
      </property>
      <property name="no" >
         <value>1</value>
      </property>
   </bean>

   <bean id="parent" class="Parent" >
      <property name="child" >
         <ref bean="child" />
      </property>
      <property name="name">
         <value>親</value>
      </property>
   </bean>
</beans>
Springのコンテナが、外部ファイルapplicationContext.xmlに従ってParentオブジェクトとChildオブジェクトを組み立てます。そしてSpring FrameworkのApplicationContextが、SpringTestというアプリケーションからの呼び出しに応じて、組み立てられたオブジェクトを返し、親と子のオブジェクトに設定した値を表示します。実行結果は以下のようになります。
親オブジェクトの設定情報:親
子オブジェクトの設定情報:子供
■「1対多」の関連を持つオブジェクトの注入
最後に「1対多」の多重度を持つ関連を注入するサンプルを作成してみましょう。例えば、自動車クラスを作成するには1つの「自動車」オブジェクトに対して、4つの「タイヤ」オブジェクトを作成しなくてはなりません。Spring Framworkではこういった多重度を持つ関連を、java.util.Listインターフェイスを使って注入します。
サンプルではListをループして値を取り出し、標準出力に書き出します。
import org.springframework.context.ApplicationContext;
import org.springframework.context.support.
ClassPathXmlApplicationContext;
public class SpringTest  {
        public static void main(String args[]){
                ApplicationContext contxt =
                        new ClassPathXmlApplicationContext("applicationContext.xml");
                Parent parent = (Parent)contxt.getBean("parent");

                for(int i=0;i<parent.getManyValues().size();i++){
                        System.out.println( "1対多の情報:"
                                + parent.getManyValues().get(i));
                }
        }
}
import java.util.List;
public class Parent {
        public Parent() {}

        private List manyValues;
        private String name;

        public String getName() { return name; }
        public void setName(String name) { this.name = name; }
        public List getManyValues() {
                return manyValues;
        }
        public void setManyValues(List manyValues) {
                this.manyValues = manyValues;
        }
}
<?xml version="1.0" encoding="UTF-8"?>
<!DOCTYPE beans PUBLIC "-//SPRING//DTD BEAN//EN" "http://www.springframework.org/dtd/spring-beans.dtd">
<beans>
        <bean id="child" class="Child">
                <property name="name" >
                        <value>子供</value>
                </property>
                <property name="no" >
                        <value>1</value>
                </property>
        </bean>

        <bean id="parent" class="Parent" >
                <property name="manyValues">
                        <list>
                                <value>1番目の値</value>
                                <value>2番目の値</value>
                        </list>
                </property>
                <property name="name">
                        <value>親</value>
                </property>
        </bean>
</beans>
このサンプルの実行結果は以下のようになりました。
1対多の情報:1番目の値
1対多の情報:2番目の値
このようにしてSpring FrameworkではDIの原則である「設定を利用から分離する」ことを実現できます。ほかにもSpring Frameworkの機能はたくさんありますが、それらはこの連載の中で追って説明していくことにします。
Copyright © ITmedia, Inc. All Rights Reserved.