| 連載:Windowsフォーム開発入門【Visual Studio 2010対応】
Windowsフォーム・コントロールの基礎(その3)
初音 玲
2010/10/19 |
 |
|
●DirectoryEntryコンポーネント
DirectoryEntryコンポーネント(以下、DirectoryEntry)は、「Directory」という名称からファイル関連のコンポーネントのように思う人もいるかもしれないが、ここでいうDirectoryは「Active Directory」のことである。DirectoryEntryを使えば、ADSI(Active Deirectory Services Interfaces)により、Active Directoryサービスに接続してネットワーク上のリソースを管理できる。
ADSIのサービス・プロバイダとしては、IIS、LDAP、NDS、WinNTなどがある。WinNTを選べば、ローカル・リソースについての情報が得られる。
下記のコードはDirectoryEntryの利用例だ。なおWindowsフォーム上には、「Get_Button」「Add_Button」という名前の2つのButtonコントロールと、「Result_ListBox」という名前のListBoxコントロール、「DirectoryEntry1」という名前のDirectoryEntryを配置している。
Public Class Directory_Form


  Private Sub Get_Button_Click( _

      ByVal sender As Object, ByVal e As EventArgs) _

          Handles Get_Button.Click

    Me.Cursor = Cursors.WaitCursor

    Me.Refresh()

    Try

      Call DisplayEntry()

    Catch ex As Exception

      MessageBox.Show(ex.Message, _

                      Me.Text, _

                      MessageBoxButtons.OK, _

                      MessageBoxIcon.Exclamation)

    Finally

      Me.Cursor = Cursors.Default

    End Try

  End Sub


  Private Sub DisplayEntry()

    Me.DirectoryEntry1.Path = _

      "WinNT://" & My.Computer.Name & ",computer"

    Me.Result_ListBox.Items.Clear()

    For Each child As DirectoryServices.DirectoryEntry _

                                 In Me.DirectoryEntry1.Children

      If child.SchemaClassName = "User" Then

        Me.Result_ListBox.Items.Add(child.Name)

      End If

    Next

  End Sub


  Private Sub Add_Button_Click( _

      ByVal sender As Object, ByVal e As EventArgs) _

          Handles Add_Button.Click

    Me.Cursor = Cursors.WaitCursor

    Me.Refresh()

    Try

      Me.DirectoryEntry1.Path = _

        "WinNT://" & My.Computer.Name & ",computer"

      Using user As DirectoryServices.DirectoryEntry = _

        Me.DirectoryEntry1.Children.Add("hogehoge", "user")

        user.Invoke("SetPassword", "hoge#123")

        user.CommitChanges()

      End Using

      Call DisplayEntry()

    Catch ex As Exception

      MessageBox.Show(ex.Message, _

                      Me.Text, _

                      MessageBoxButtons.OK, _

                      MessageBoxIcon.Exclamation)

    Finally

      Me.Cursor = Cursors.Default

    End Try

  End Sub


End Class |
using System;

using System.Windows.Forms;


namespace WindowsDirectoryCs

{

  public partial class Directory_Form : Form

  {

    public Directory_Form()

    {

      InitializeComponent();

    }


    private void Get_Button_Click(object sender, EventArgs e)

    {

      this.Cursor = Cursors.WaitCursor;

      this.Refresh();

      try

      {

        DisplayEntry();

      }

      catch (Exception ex)

      {

        MessageBox.Show(ex.Message,

                        this.Text,

                        MessageBoxButtons.OK,

                        MessageBoxIcon.Exclamation);

      }

      finally

      {

        this.Cursor = Cursors.Default;

      }

    }


    private void DisplayEntry()

    {

      this.DirectoryEntry1.Path =

        "WinNT://" + Environment.MachineName + ",computer";

      this.Result_ListBox.Items.Clear();

      foreach (System.DirectoryServices.DirectoryEntry child

                               in this.DirectoryEntry1.Children)

      {

        if (child.SchemaClassName == "User")

        {

          this.Result_ListBox.Items.Add(child.Name);

        }

      }

    }


    private void Add_Button_Click(object sender, EventArgs e)

    {

      this.Cursor = Cursors.WaitCursor;

      this.Refresh();

      try

      {

        this.DirectoryEntry1.Path = "WinNT://" +

          Environment.MachineName + ",computer";

        using (System.DirectoryServices.DirectoryEntry user =

          this.DirectoryEntry1.Children.Add("hogehoge", "user"))

        {

          user.Invoke("SetPassword", "hoge#123");

          user.CommitChanges();

        }

        DisplayEntry();

      }

      catch (Exception ex)

      {

        MessageBox.Show(ex.Message,

          this.Text,

          MessageBoxButtons.OK,

          MessageBoxIcon.Exclamation);

      }

      finally

      {

        this.Cursor = Cursors.Default;

      }

    }

  }

} |
|
| リスト2 DirectryEntryの使用例(上:VB、下:C#) |
| ButtonコントロールのClickイベント・プロシージャ(=Get_Button_ClickメソッドとAdd_Button_Clickメソッド)は、Windowsフォーム・デザイナのフォーム画面上に配置したButtonコントロールをダブルクリックすると、そのひな型コードが自動的に生成される。 |
今回のサンプルでは、DirectoryEntryを使ってローカル・ユーザーの追加を行っている。この処理を実行するときには管理者権限が必要となるので、UAC(ユーザー・アカウント制御)による管理者への昇格をサポートしなければならない。これを実現するには、app.manifestファイルを作成し、<requestedExecutionLevel>要素のlevel属性に「requireAdministrator」を指定する。
<?xml version="1.0" encoding="utf-8"?>

<asmv1:assembly manifestVersion="1.0"

    xmlns="urn:schemas-microsoft-com:asm.v1"

    xmlns:asmv1="urn:schemas-microsoft-com:asm.v1"

    xmlns:asmv2="urn:schemas-microsoft-com:asm.v2"

    xmlns:xsi="http://www.w3.org/2001/XMLSchema-instance">

  <assemblyIdentity version="1.0.0.0" name="MyApplication.app"/>

  <trustInfo xmlns="urn:schemas-microsoft-com:asm.v2">

    <security>

      <requestedPrivileges

          xmlns="urn:schemas-microsoft-com:asm.v3">

        <requestedExecutionLevel

            level="requireAdministrator"

            uiAccess="false" />

      </requestedPrivileges>

    </security>

  </trustInfo>


  <compatibility

      xmlns="urn:schemas-microsoft-com:compatibility.v1">

    <application>

    </application>

  </compatibility>

</asmv1:assembly> |
|
| リスト3 app.manifestファイルの内容(VB、C#共通) |
●DirectorySearcherコンポーネント
DirectroySearcherコンポーネント(以下、DirectorySearcher)は、LDAP(Lightweight Directory Access Protocol)を使ってActive Directoryを検索できる。
●ErrorProviderコンポーネント
ErrorProviderコンポーネント(以下、ErrorProvider)は、Windowsフォーム上にエラー・アイコンを表示ために使用するためのコンポーネントだ。そのアイコンにマウス・カーソルを重ねると、エラー・メッセージを表示する。例えば、入力が必須のテキストボックスに入力を行わなかったときに、テキストボックスの横にエラー・アイコンを表示するといった場面で使用する。
●EventLogコンポーネント
EventLogコンポーネント(以下、EventLog)は、Windowsのイベント・ログにログを記録したり、ログを取得したりするためのコンポーネントだ。Windowsフォーム・アプリケーションに限らず、検出したエラーなどをイベント・ログに残すことは、不具合の原因究明にとって非常に重要なことだ。
EventLogを[ツールボックス]からドラッグ&ドロップすると、Windowsフォーム・デザイナのデザイン・サーフェイスの下にあるコンポーネント・トレイに[EventLog]アイコンが配置される(なお、コンポーネント・トレイに表示されているコンポーネントは、実行時に表示されない)。
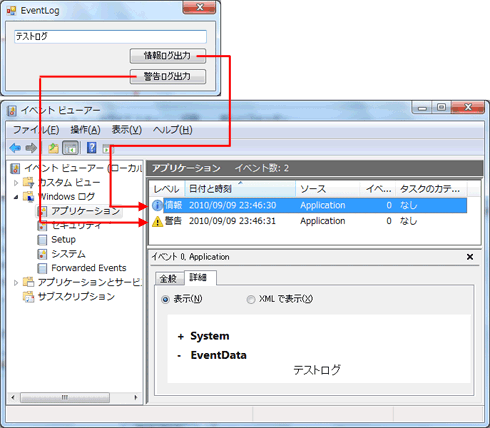
次の画面は、EventLogを利用するサンプル・アプリケーションの実行例である。ボタンをクリックすると、イベント・ログが出力される。出力されたログは、イベント・ビューアで参照できる。
 |
| 図4 EventLogの実行例 |
今回のサンプルでは、イベント・ログへの出力が「情報」となる[情報ログ出力]ボタンと、「警告」になる[警告ログ出力]ボタンを用意した。この両者の違いをソース・コードで確認する。
なおWindowsフォーム上には、「Entry_TextBox」という名前のTextBoxコントロールと、「Entry_Button」「Warning_Button」という名前の2つのButtonコントロール(=[情報ログ出力]ボタンと[警告ログ出力]ボタン)、「EventLog1」という名前のEventLogを配置している。
Public Class EventLog_Form

  Private Sub Entry_Button_Click( _

      ByVal sender As Object, ByVal e As EventArgs) _

          Handles Entry_Button.Click

    If Me.Entry_TextBox.Text.Length > 0 Then

      Me.EventLog1.Source = "Application"

      Me.EventLog1.WriteEntry(Me.Entry_TextBox.Text)

    End If

  End Sub


  Private Sub Warning_Button_Click( _

      ByVal sender As Object, ByVal e As EventArgs) _

          Handles Warning_Button.Click

    If Me.Entry_TextBox.Text.Length > 0 Then

      EventLog.WriteEntry("Application", _

                          Me.Entry_TextBox.Text, _

                          EventLogEntryType.Warning)

    End If

  End Sub

End Class |
using System;

using System.Windows.Forms;

using System.Diagnostics;


namespace WindowsEventLogCs

{

  public partial class EventLog_Form : Form

  {

    public EventLog_Form()

    {

      InitializeComponent();

    }


    private void Entry_Button_Click(object sender, EventArgs e)

    {

      if (this.Entry_TextBox.Text.Length > 0)

      {

        this.EventLog1.Source = "Application";

        this.EventLog1.WriteEntry(this.Entry_TextBox.Text);

      }

    }


    private void Warning_Button_Click(object sender, EventArgs e)

    {

      if (this.Entry_TextBox.Text.Length > 0)

      {

        EventLog.WriteEntry("Application",

                            this.Entry_TextBox.Text,

                            EventLogEntryType.Warning);

      }

    }

  }

} |
|
| リスト4 EventLogの使用例(上:VB、下:C#) |
| ButtonコントロールのClickイベント・プロシージャ(=Entry_Button_ClickメソッドとWarning_Button_Clickメソッド)は、Windowsフォーム・デザイナのフォーム画面上に配置したButtonコントロールをダブルクリックすると、そのひな型コードが自動的に生成される。 |
Entry_ButtonコントロールのClickイベントのイベント・プロシージャでは、EventLogのSourceプロパティを設定することでログの種類を「アプリケーション」に指定して、WriteEntryメソッドを呼び出して「情報」イベント・ログを出力している。EventLogのWriteEntryメソッドでは、使用方法を容易にするためか、「情報」以外のイベント・ログは出力できない。
そこでWarning_ButtonコントロールのClickイベントのイベント・プロシージャでは、「警告」イベント・ログを出力するために、EventLogではなく、(インスタンス化されていない)EventLogクラスのWriteEntry静的メソッドを呼び出し、その第3パラメータにEventLogEntryType列挙体の値として「Warning」を指定することで、「警告」イベント・ログを出力している。
このようにコンポーネントで手軽に機能を使うこともできるが、実現したい要件によってはコンポーネントの元となっているクラスを直接使って、細かな制御を行った方がよいときもある。


