| |
|
特集:Silverlight 2
Deep Zoomプログラミング
デジタルアドバンテージ 岸本 真二郎
2009/01/30 |
 |
|
ユーザー・インターフェイスは自分で記述する必要がある
Visual Studioを用いて作成するSilverlight 2アプリケーションに、Deep Zoomを使った拡大可能な画像表示を組み込むには、上述したようにMultiScaleImageコントロールを配置して、そのSourceプロパティを設定すればよいのだが、画像をズームイン/ズームアウトしたり、表示内容を移動したりするユーザー・インターフェイス(以下、UI)は自前で用意しなければならない。
Deep Zoom Composerが生成したプロジェクトのソース・コードをそのまま流用してしまってもよいのだが、基本的なユーザー・インターフェイスの処理をここで確認しておこう。ultiScaleImageコントロールを制御するための基本的な手段は、ZoomAboutLogicalPointメソッドとViewportOriginプロパティだ。
ZoomAboutLogicalPointメソッドは、表示の大きさを決めるスケールと、基準とする位置情報をパラメータとして与えると、指定されたスケールで画像が再描画される。また、ViewportOriginプロパティは、コントロール領域に表示されている画像の左上隅の座標を示すプロパティだ、このプロパティにセットする値を変更することで、表示される画像が平行移動する。
■ボタンによるズームイン/ズームアウト
ここではアプリケーション・ウィンドウに[ズームイン]、[ズームアウト]ボタンを用意し、それぞれのボタンが押されたら、画像を拡大、縮小を行うようにしてみよう。
あらかじめ各ボタンが押された際のイベント・ハンドラを作成しておき、ここに拡大/縮小を行うコードを記述する。ボタンによる操作では、拡大/縮小を行う際の基準となる位置が決まらないので、ここではコントロール領域の中心を基準にして、拡大/縮小を行う。
public partial class Page : UserControl

{

  Point lastMouseDownPos = new Point();

  Point lastMouseViewPort = new Point();

  bool mouseDown = false;

  bool duringDrag = false;

  double scale = 1.0;


  // ズームイン

  private void Button_Click(object sender, RoutedEventArgs e)

  {

    double newscale = scale * 2;

    double y = msi.ActualHeight / 2;

    double x = msi.ActualWidth / 2; // 表示エリアの中心

    Point point = msi.ElementToLogicalPoint(new Point(x, y));

  zoom(newscale, point);

  }


  // ズームアウト

  private void Button_Click_1(object sender, RoutedEventArgs e)

  {

    double newscale = scale / 2;

    double y = msi.ActualHeight / 2;

    double x = msi.ActualWidth / 2; // 表示エリアの中心

    Point point = msi.ElementToLogicalPoint(new Point(x, y));

    zoom(newscale, point);

  }


  // ZoomAboutLogicalPointメソッド

  private void zoom(double newscale, Point p)

  {

    msi.ZoomAboutLogicalPoint(newscale / scale, p.X, p.Y);

    scale = newscale;

  }

}
|
Imports System

Imports System.Collections.Generic

Imports System.Linq

Imports System.Net

Imports System.Windows

Imports System.Windows.Controls

Imports System.Windows.Documents

Imports System.Windows.Input

Imports System.Windows.Media

Imports System.Windows.Media.Animation

Imports System.Windows.Shapes


Partial Public Class Page

  Inherits UserControl


  Private lastMouseDownPos As New Point()

  Private lastMouseViewPort As New Point()

  Private mouseDown As Boolean = False

  Private duringDrag As Boolean = False

  Private scale As Double = 1.0


  ' ズームイン

  Private Sub Button_Click(ByVal sender As System.Object, ByVal e As System.Windows.RoutedEventArgs)

    Dim newscale As Double = scale * 2

    Dim y As Double = msi.ActualHeight / 2

    Dim x As Double = msi.ActualWidth / 2 ' 表示エリアの中心

    Dim point As Point = msi.ElementToLogicalPoint(New Point(x, y))

    zoom(newscale, point)

  End Sub


  '  ズームアウト

  Private Sub Button_Click_1(ByVal sender As System.Object, ByVal e As System.Windows.RoutedEventArgs)

    Dim newscale As Double = scale / 2

    Dim y As Double = msi.ActualHeight / 2

    Dim x As Double = msi.ActualWidth / 2 ' 表示エリアの中心

    Dim point As Point = msi.ElementToLogicalPoint(New Point(x, y))

    zoom(newscale, point)

  End Sub


  ' ZoomAboutLogicalPointメソッド

  Private Sub zoom(ByVal newscale As Double, ByVal p As Point)

    msi.ZoomAboutLogicalPoint(newscale / scale, p.X, p.Y)

    scale = newscale

  End Sub

End Class
|
|
| ズームイン/ズームアウト処理(上:C#、下:VB) |
■マウスのドラッグによる表示範囲の移動
マウスのドラッグによる画像の移動は、「マウスの左ボタンが押された」イベント(MouseLeftButtonDown)からドラッグを開始し、「マウスが移動した」イベント(MouseMove)をとらえ、移動位置に応じて画像の表示位置を変更しながら、最後に「マウスの左ボタンが離された」イベント(MouseLeftButtonUp)が発生したら、ドラッグを終了とする。
まず、これらの3つのイベント・ハンドラを、次のようにしてMultiScaleImageコントロールに設定しておく。
<MultiScaleImage x:Name="msi" Width="450"

  Source="./cs_poster/dzc_output.xml"

  MouseLeftButtonDown="msi_MouseLeftButtonDown"

  MouseLeftButtonUp="msi_MouseLeftButtonUp"

  MouseMove="msi_MouseMove">

</MultiScaleImage>
|
|
| MultiScaleImage コントロールのイベントの記述(XAMLファイル) |
そして、それぞれのイベント・ハンドラに、次のような処理を記述する。msi_MouseMoveメソッド内でドラッグ中のマウスの位置を取得して移動距離を計算し、ViewportOriginプロパティに座標を設定することで、画像を移動させている。
// 左クリック

private void msi_MouseLeftButtonDown(object sender,

MouseButtonEventArgs e)

{

  lastMouseDownPos = e.GetPosition(msi);

  lastMouseViewPort = msi.ViewportOrigin;

  mouseDown = true;

  msi.CaptureMouse();

}


// マウスの移動

private void msi_MouseMove(object sender, MouseEventArgs e)

{

  Point lastMousePos = e.GetPosition(msi);


  if (mouseDown && !duringDrag)

  {

    duringDrag = true;

  }


  if (duringDrag)

  {

    // 表示位置を移動

    Point newPoint = lastMouseViewPort;


    newPoint.X +=

     (lastMouseDownPos.X - lastMousePos.X) / msi.ActualWidth

     * msi.ViewportWidth;


    newPoint.Y +=

     (lastMouseDownPos.Y - lastMousePos.Y) / msi.ActualWidth

     * msi.ViewportWidth;


    msi.ViewportOrigin = newPoint;

  }

}


// 左ボタンが離された

private void msi_MouseLeftButtonUp(object sender, MouseButtonEventArgs e)

{

  duringDrag = false;  // ドラッグ終了

  mouseDown = false; // ボタンが押されている状態も終わり

  msi.ReleaseMouseCapture();

}
|
' 左ボタンのクリック

Private Sub msi_MouseLeftButtonDown(ByVal sender As System.Object, ByVal e As System.Windows.Input.MouseButtonEventArgs)

  lastMouseDownPos = e.GetPosition(msi)

  lastMouseViewPort = msi.ViewportOrigin

  mouseDown = True

  msi.CaptureMouse()

End Sub


' マウスの移動

Private Sub msi_MouseMove(ByVal sender As System.Object, ByVal e As System.Windows.Input.MouseEventArgs)

  Dim lastMousePos As Point = e.GetPosition(msi)

  If mouseDown AndAlso Not duringDrag Then

    duringDrag = True

  End If


  If duringDrag Then


    ' 表示位置を移動

    Dim newPoint As Point = lastMouseViewPort


    newPoint.X += (lastMouseDownPos.X - lastMousePos.X) / _

      msi.ActualWidth * msi.ViewportWidth


    newPoint.Y += (lastMouseDownPos.Y - lastMousePos.Y) / _

      msi.ActualWidth * msi.ViewportWidth


    msi.ViewportOrigin = newPoint

  End If

End Sub


' 左ボタンが離された

Private Sub msi_MouseLeftButtonUp(ByVal sender As System.Object, ByVal e As System.Windows.Input.MouseButtonEventArgs)

  duringDrag = False ' ドラッグ終了

  mouseDown = False 'ボタンが押されている状態も終わり

  msi.ReleaseMouseCapture()

End Sub
|
|
| マウスのドラッグによる表示範囲の移動(上:C#、下:VB) |
■画像表示のリセット
画像がロードされた際の表示(表示領域に画像がぴったり表示される)に戻すには、ViewportWidthプロパティを1にセットし、表示位置を表示領域の左上(0,0)に合わせる。
// 初期状態の表示に戻す

private void Button_Click_2(object sender, RoutedEventArgs e)

{

  msi.ViewportWidth = 1;

  msi.ViewportOrigin = new Point(0, 0);

  scale = 1; // 拡大率をリセットする

}
|
' 初期状態の表示に戻す

Private Sub Button_Click_2(ByVal sender As System.Object, ByVal e As System.Windows.RoutedEventArgs)

  Me.msi.ViewportWidth = 1

  Me.msi.ViewportOrigin = New Point(0, 0)

  scale = 1 ' 拡大率をリセットする

End Sub
|
|
| リスト (上がC#、下がVB) |
■別のイメージ・ピラミッドを表示する
現在表示中の画像を別の画像(イメージ・ピラミッド)に変更するには、Sourceプロパティを変更すればよい。具体的には、表示したいイメージ・ピラミッドの情報が記述されたXMLファイルをSourceプロパティに指定する。
XAMLファイル内でMultiScaleImageのSource属性にURIをセットする場合は、URIをそのまま記述すればよいのだが、コードからSourceプロパティにURIをセットするには、次に示すように、DeepZoomImageTileSourceクラスを使用する。
// 画像を切り替える

private void Button_Click_3(object sender, RoutedEventArgs e)

{

  // 現在表示しているイメージ・ピラミッドのURI

  string src = ((DeepZoomImageTileSource)msi.Source)

                              .UriSource.OriginalString;

  if (src.IndexOf("vb") >= 0)

  {

    msi.Source = new DeepZoomImageTileSource(

      new Uri("cs_poster/dzc_output.xml",UriKind.Relative));

  }

  else

  {

    msi.Source = new DeepZoomImageTileSource(

      new Uri("vb_poster/dzc_output.xml",UriKind.Relative));

  }

}
|
Private Sub Button_Click_3(ByVal sender As System.Object, ByVal e As System.Windows.RoutedEventArgs)


  ' 現在表示しているイメージ・ピラミッドのURI

  Dim src As String = CType(msi.Source, DeepZoomImageTileSource).UriSource.OriginalString


  If src.IndexOf("vb") >= 0 Then

    msi.Source = New DeepZoomImageTileSource(_

      New Uri("cs_poster/dzc_output.xml", UriKind.Relative))

  Else

    msi.Source = New DeepZoomImageTileSource(_

      New Uri("vb_poster/dzc_output.xml", UriKind.Relative))

  End If

End Sub
|
|
| イメージ・ピラミッドを切り替える(上:C#、下:VB) |
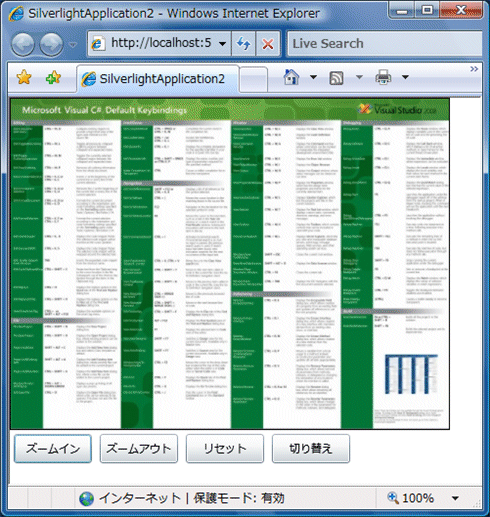
以上の処理を実装することで、画像に対する操作として、拡大/縮小、表示位置の変更などが行えるようになった。プロジェクトからデバッグ実行すると、Webブラウザが起動し、アプリケーションの動作が確認できる。

|
| ブラウザで実行した画面 |
| プロジェクトに含まれるhtmlファイルをWebブラウザで開くとSilverlight 2アプリケーションの実行が確認できる。 |
最後に、このサンプルプログラムのXAMLファイル(Page.xaml)の内容を以下に示す。
<UserControl x:Class="SilverlightApplication2.Page"

   xmlns="http://schemas.microsoft.com/winfx/2006/xaml/presentation"

   xmlns:x="http://schemas.microsoft.com/winfx/2006/xaml"

   Width="450" Height="400">

  <Grid x:Name="LayoutRoot" Background="White" >

    <StackPanel Orientation="Vertical">


      <Border BorderBrush="Black"

            BorderThickness="1,1,1,1" Background="Gray">


        <MultiScaleImage x:Name="msi"  Width="450"

          Source="./cs_poster/dzc_output.xml"

          MouseLeftButtonDown="msi_MouseLeftButtonDown"

          MouseLeftButtonUp="msi_MouseLeftButtonUp"

          MouseMove="msi_MouseMove"></MultiScaleImage>


      </Border>


      <StackPanel Orientation="Horizontal">


        <Button Margin="4,4,4,4" Width="80" Height="30"

          Content="ズームイン" Click="Button_Click"></Button>


        <Button Margin="4,4,4,4" Width="80" Height="30"

          Content="ズームアウト" Click="Button_Click_1"></Button>


        <Button Margin="4,4,4,4" Width="80" Height="30"

          Content="リセット" Click="Button_Click_2"></Button>


        <Button Margin="4,4,4,4" Width="80" Height="30"

          Content="切り替え" Click="Button_Click_3"></Button>


      </StackPanel>

    </StackPanel>

  </Grid>

</UserControl>
|
|
| 今回作成したアプリケーションのxamlファイル(page.xaml)の内容 |
まとめ
ご覧いただいたように、Silverlight 2アプリケーションではDeep Zoomを利用することで、拡大/縮小が可能な画像表示が容易に実装できる。Deep Zoom Composerを使って事前に画像を用意しておけば、拡大しても詳細な画像表示が実現でき、画像の表示時間も軽減できる。
ただし、Deep Zoomを利用するには大量の画像ファイルが必要となるため、結果的にサイト上に配置する画像ファイルの(合計)容量が大きくなってしまう点には注意しておきたい(冒頭で例として表示したポスター画像は、元のファイル・サイズが約3MBytesであるのに対して、生成されたイメージ・ピラミッド全体では約12MBytesになっている)。
また、MultiScaleImageコントロールのUseSpringプロパティがデフォルトでTrueに設定されており、拡大/縮小の際の描画が滑らかに行われるようになっているが、描画処理がもたつくように感じる場合は、これをFalseにして試してみるとよいだろう。


![]()


