ウィンドウにおけるイベントの使われ方
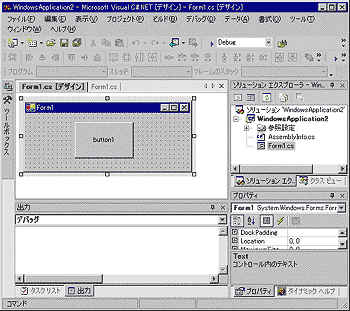
イベントが最も活躍するのはウィンドウのイベント処理だろう。実際の使われ方を見てみよう。以下のサンプルは以下のように作成している。まず、新規プロジェクトで、Windowsアプリケーションを選ぶ。そして、フォーム上にボタンを1個張り付ける。
 |
| Visual Studio .NETにおけるウィンドウの設計画面 |
|
新規プロジェクトでWindowsアプリケーションを選択した後、フォーム上にボタンを1つ配置する。
|
そして、以下のサンプルソースの91行目の内容を書き込めば完成である。
 1: using System;

 2: using System.Drawing;

 3: using System.Collections;

 4: using System.ComponentModel;

 5: using System.Windows.Forms;

 6: using System.Data;

 7:

 8: namespace WindowsApplication2

 9: {

 10:   /// <summary>

 11:   /// Form1 の概要の説明です。

 12:   /// </summary>

 13:   public class Form1 : System.Windows.Forms.Form

 14:   {

 15:     private System.Windows.Forms.Button button1;

 16:     /// <summary>

 17:     /// 必要なデザイナ変数です。

 18:     /// </summary>

 19:     private System.ComponentModel.Container components = null;

 20:

 21:     public Form1()

 22:     {

 23:       //

 24:       // Windows フォーム デザイナ サポートに必要です。

 25:       //

 26:       InitializeComponent();

 27:

 28:       //

 29:       // TODO: InitializeComponent 呼び出しの後に、コンストラクタ コードを追加してください。

 30:       //

 31:     }

 32:

 33:     /// <summary>

 34:     /// 使用されているリソースに後処理を実行します。

 35:     /// </summary>

 36:     protected override void Dispose( bool disposing )

 37:     {

 38:       if( disposing )

 39:       {

 40:         if (components != null)

 41:         {

 42:           components.Dispose();

 43:         }

 44:       }

 45:       base.Dispose( disposing );

 46:     }

 47:

 48:     #region Windows Form Designer generated code

 49:     /// <summary>

 50:     /// デザイナ サポートに必要です。このメソッドの内容を

 51:     /// コード エディタで変更しないでください。

 52:     /// </summary>

 53:     private void InitializeComponent()

 54:     {

 55:       this.button1 = new System.Windows.Forms.Button();

 56:       this.SuspendLayout();

 57:       //

 58:       // button1

 59:       //

 60:       this.button1.Location = new System.Drawing.Point(88, 16);

 61:       this.button1.Name = "button1";

 62:       this.button1.Size = new System.Drawing.Size(104, 64);

 63:       this.button1.TabIndex = 0;

 64:       this.button1.Text = "button1";

 65:       this.button1.Click += new System.EventHandler(this.button1_Click);

 66:       //

 67:       // Form1

 68:       //

 69:       this.AutoScaleBaseSize = new System.Drawing.Size(5, 12);

 70:       this.ClientSize = new System.Drawing.Size(292, 101);

 71:       this.Controls.AddRange(new System.Windows.Forms.Control[] {

 72:                                       this.button1});

 73:       this.Name = "Form1";

 74:       this.Text = "Form1";

 75:       this.ResumeLayout(false);

 76:

 77:     }

 78:     #endregion

 79:

 80:     /// <summary>

 81:     /// アプリケーションのメイン エントリ ポイントです。

 82:     /// </summary>

 83:     [STAThread]

 84:     static void Main()

 85:     {

 86:       Application.Run(new Form1());

 87:     }

 88:

 89:     private void button1_Click(object sender, System.EventArgs e)

 90:     {

 91:       MessageBox.Show(this,"Clicked!");

 92:     }

 93:   }

94: } |
|
| Visual Studio .NETにより作成したサンプル・プログラム10 |
| ボタンがクリックされたときに呼び出されるイベント・ハンドラの内容を追加する(91行目)。 |
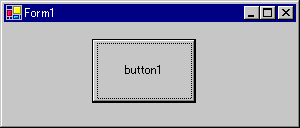
これを実行すると以下のようになる。
 |
| ■サンプル・プログラム10の実行結果 |
| ボタンを押すとイベント・ハンドラが実行される。
|
上記のボタンを押すと、以下のメッセージが出力される。
 |
| ボタンが押されたときに表示されるメッセージ・ボックス |
さて、ソースコードを解説しよう。このソースコードでは、ボタンが押されるということを、イベントを用いて伝達する機能を持っている。イベントは、ボタンの機能を持つSystem.Windows.Forms.Buttonというクラスが持っているので、このソースコード上には記述されていない。15行目の定義により、System.Windows.Forms.Buttonクラスのインスタンスbutton1が用意されている。このbutton1を通じて、イベントにアクセスすることになる。実際にアクセスしているのは65行目である。this.button1.Click += new System.EventHandler(this.button1_Click);というコードが、ボタンのClickイベントに、89〜92行目のbutton1_Clickメソッドをハンドラとして登録している。
 15: private System.Windows.Forms.Button button1;

         ・・・

 65: this.button1.Click+=new System.EventHandler(this.button1_Click);

         ・・・

 89: private void button1_Click(object sender, System.EventArgs e)

 90: {

 91:    MessageBox.Show(this,"Clicked!");

92: } |
ここで注目すべきことは、ボタン(System.Windows.Forms.Buttonクラス)のイベントがフォーム(Form1クラス)のメソッドで処理されていると言う点である。この結果、ユーザー側で記述するコードを、一カ所にコンパクトにまとめることが可能となっている。
Insider.NET 記事ランキング
本日
月間


