複数ボタンに対応するハンドラ
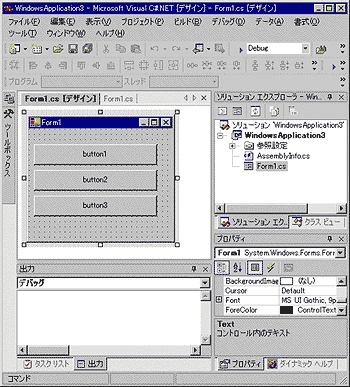
イベントの価値を実感するために、もう1個のサンプルソースを見てみよう。まず、上記のサンプルと同様に新しいWindowsプロジェクトを作り、フォーム上に3個のボタンを貼り付ける。
 |
| Visual Studio .NETにおけるウィンドウの設計画面 |
| 上記サンプルと同様にフォームを作成し、今度はボタンを3つ配置する。
|
そうしたら、下記のサンプルソースの29〜31行目と、112〜116行目を入力する。これで出来上がりである。
   1: using System;

   2: using System.Drawing;

   3: using System.Collections;

   4: using System.ComponentModel;

   5: using System.Windows.Forms;

   6: using System.Data;

   7:

   8: namespace WindowsApplication3

   9: {

  10:   /// <summary>

  11:   /// Form1 の概要の説明です。

  12:   /// </summary>

  13:   public class Form1 : System.Windows.Forms.Form

  14:   {

  15:     private System.Windows.Forms.Button button1;

  16:     private System.Windows.Forms.Button button2;

  17:     private System.Windows.Forms.Button button3;

  18:     /// <summary>

  19:     /// 必要なデザイナ変数です。

  20:     /// </summary>

  21:     private System.ComponentModel.Container components = null;

  22:

  23:     public Form1()

  24:     {

  25:       //

  26:       // Windows フォーム デザイナ サポートに必要です。

  27:       //

  28:       InitializeComponent();

  29:       this.button1.Click += new System.EventHandler(this.all_button_Click);

  30:       this.button2.Click += new System.EventHandler(this.all_button_Click);

  31:       this.button3.Click += new System.EventHandler(this.all_button_Click);

  32:       //

  33:       // TODO: InitializeComponent 呼び出しの後に、コンストラクタ コードを追加してください。

  34:       //

  35:     }

  36:

  37:     /// <summary>

  38:     /// 使用されているリソースに後処理を実行します。

  39:     /// </summary>

  40:     protected override void Dispose( bool disposing )

  41:     {

  42:       if( disposing )

  43:       {

  44:         if (components != null)

  45:         {

  46:           components.Dispose();

  47:         }

  48:       }

  49:       base.Dispose( disposing );

  50:     }

  51:

  52:     #region Windows Form Designer generated code

  53:     /// <summary>

  54:     /// デザイナ サポートに必要です。このメソッドの内容を

  55:     /// コード エディタで変更しないでください。

  56:     /// </summary>

  57:     private void InitializeComponent()

  58:     {

  59:       this.button1 = new System.Windows.Forms.Button();

  60:       this.button2 = new System.Windows.Forms.Button();

  61:       this.button3 = new System.Windows.Forms.Button();

  62:       this.SuspendLayout();

  63:       //

  64:       // button1

  65:       //

  66:       this.button1.Location = new System.Drawing.Point(8, 24);

  67:       this.button1.Name = "button1";

  68:       this.button1.Size = new System.Drawing.Size(192, 32);

  69:       this.button1.TabIndex = 0;

  70:       this.button1.Text = "button1";

  71:       //

  72:       // button2

  73:       //

  74:       this.button2.Location = new System.Drawing.Point(8, 64);

  75:       this.button2.Name = "button2";

  76:       this.button2.Size = new System.Drawing.Size(192, 32);

  77:       this.button2.TabIndex = 1;

  78:       this.button2.Text = "button2";

  79:       //

  80:       // button3

  81:       //

  82:       this.button3.Location = new System.Drawing.Point(8, 104);

  83:       this.button3.Name = "button3";

  84:       this.button3.Size = new System.Drawing.Size(192, 32);

  85:       this.button3.TabIndex = 2;

  86:       this.button3.Text = "button3";

  87:       //

  88:       // Form1

  89:       //

  90:       this.AutoScaleBaseSize = new System.Drawing.Size(5, 12);

  91:       this.ClientSize = new System.Drawing.Size(224, 173);

  92:       this.Controls.AddRange(new System.Windows.Forms.Control[] {

  93:                                       this.button3,

  94:                                       this.button2,

  95:                                       this.button1});

  96:       this.Name = "Form1";

  97:       this.Text = "Form1";

  98:       this.ResumeLayout(false);

  99:

 100:     }

 101:     #endregion

 102:

 103:     /// <summary>

 104:     /// アプリケーションのメイン エントリ ポイントです。

 105:     /// </summary>

 106:     [STAThread]

 107:     static void Main()

 108:     {

 109:       Application.Run(new Form1());

 110:     }

 111:

 112:     private void all_button_Click(object sender, System.EventArgs e)

 113:     {

 114:       System.Windows.Forms.Button button = (System.Windows.Forms.Button)sender;

 115:       MessageBox.Show(this,button.Text + " Clicked!");

 116:     }

 117:   }

118: } |
|
| 複数ボタンを記述したサンプル・プログラム11 |
| イベント・ハンドラの登録個所(29〜31行目)と、イベント・ハンドラ(112〜116行目)を記述する。 |
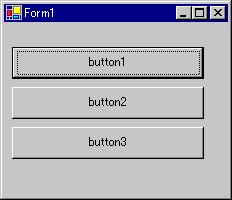
これを実行すると以下のようになる。
 |
| サンプル・プログラム11の実行結果 |
|
どのボタンを押しても同じイベント・ハンドラが実行される。
|
例えば、2番目のボタンを押すと、以下のメッセージが出力される。
 |
| ボタンが押されたときに表示されるメッセージ・ボックス |
| 押されたボタンの文字列をメッセージとして表示する。
|
まず、29〜31行目に注目していただきたい。これは、ボタンにイベント・ハンドラを登録しているコードである。しかし、3つのボタンのインスタンスに対して、all_button_Clickというたった1つのメソッドをハンドラとして登録してしまっていることが分かるだろう。このようなコードを記述しても問題はない。それは、112〜116行目のall_button_Clickメソッドの内容を見れば分かる。114行目で第1引数のsenderをボタンクラス(System.Windows.Forms.Button)にキャストしている。ハンドラの第1引数は、イベントを引き起こしたインスタンスなので、当然ボタンのインスタンスである。だから、キャストは必ずうまく行く。そして、インスタンスへの参照を手に入れれば、ボタンのラベルに書かれた文字列を取得するのは簡単である。Textプロパティを参照するだけでよい。
このように、イベントを使えば、1つのハンドラで異なる複数のインスタンスの処理を引き受けることも容易である。
まとめ
イベントは既存のプログラム言語にはあまり見られない機能である。しかし、C#のイベントは、潜在的な能力と可能性が高く、うまく使いこなせば、込み入ったプログラムをすっきり記述できる可能性を持つ。多くのオブジェクト指向言語に見られるように、何でも継承を使って問題を解決しようとしても、上手く機能しない場合がある。その意味でもイベントの活用は1つの課題と言えるだろう。
さて、次回は一見地味だがC#らしいポイントも多く、強力になった配列について解説したいと思っている。
それでは次回もLet's See Sharp!
Insider.NET 記事ランキング
本日
月間


