[特別企画]
JavaServer Facesを理解する
(後編)
JSFによるWebアプリケーション開発


  モデルとビジネスロジック

モデル、ビジネスロジッククラスの実装

 まず、データを保持するモデルから説明しましょう。データを保持するためのクラスは、選択した車と、車のオプションに関する情報を保持するCurrentOptionServer、クレジットカード番号などの情報を保持するCustomerBeanです。CurrentOptionServerは、初期ページ(Storefront.jsp)で選んだ車種とオプション選択画面(more.jsp)で選択したパッケージ、オプションに関する情報を保持するためのクラスです。このクラス内ではJSFのAPIも使用していますが、このAPIについては後ほど解説します。
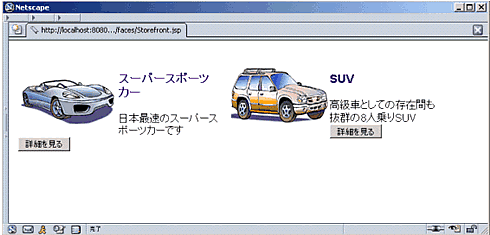
初期ページ(Storefront.jsp)

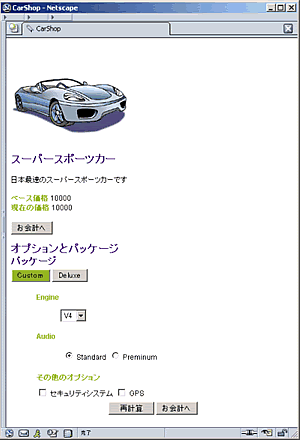
オプション選択画面(more.jsp)

 次にユーザーのアクションに応じたビジネスロジックを実行する2つのクラスを説明しましょう。前回説明したように、JSFはイベントリスナーモデルを使用しており、Actionイベントとvalue-changedイベントの2つのイベントをサポートしています。Actionイベントは、UICommandで表現されるボタンやリンクをユーザーがクリックした場合に発生し、javax.faces.event.ActionListenerの実装クラスにおいてイベントを処理します。CarActionListenerは、このActionListenerをインプリメントしたクラスです。

 また、value-changedイベントは、UIInputやそのサブクラスのコンポーネントの値が変化した場合に発生し、javax.faces.event.ValueChangedListenerの実装クラスにおいてイベントを処理します。

 ActionListenerの実装クラスでは、getPhaseId()とprocessAction(actionEvent)の2つのメソッドを定義します。getPhaseIdメソッドは、ライフサイクルのどの段階でこのイベントが処理されるかの識別子を指定します。リスナーは、この識別子で定義された処理が完了してから処理を実行します。ここでは、「PhaseId.APPLY_REQUEST_VALUES」を指定しており、Apply Requestフェイズが完了した後に、イベントが処理されることを指定しています。

リスト1 getPhaseIdメソッド
public PhaseId getPhaseId() {
    return PhaseId.APPLY_REQUEST_VALUES;
}

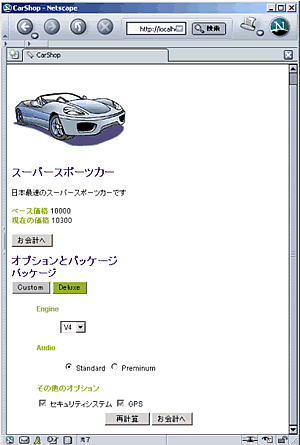
 そして、processActionには発生したイベントに対して行う処理を実装します。CarActionListenerでは、Storefront.jspにおける車の選択、more.jspにおけるパッケージの選択、費用の再計算などに対するイベントを処理します。processActionでは、引数として受け取ったjavax.faces.event.ActionEventからJSFタグ内で指定されたcommandNameを受け取り、このコマンドに応じた処理を呼び出します。例えば、commandNameが「deluxe」の場合(more.jspページにおいて、パッケージとして「Deluxe」を選択)は、processActionからprocessDeluxeを呼び出し、このメソッド内で処理を行っています。

リスト2 processActionメソッド
public void processAction(ActionEvent event) {
    String actionCommand = event.getActionCommand();
    processActionCommand(actionCommand);
    ResourceBundle rb = ResourceBundle.getBundle("carshop/Resources", FacesContext.getCurrentInstance().getLocale());

    if (actionCommand.equals("custom")) {
        processCustom(event, rb);
    } else if (actionCommand.equals("deluxe")) {
        processDeluxe(event, rb);
-- 省略 --
}

パッケージにDeluxeを選択したところ

 次に、processDeluxeメソッド内の処理について説明します。processDeluxeでは、初めにActionEventからこのアクションを生成したUIコンポーネントを取り出しており、このUIコンポーネントを通して、コンポーネントツリー内のほかのUIコンポーネントを取得することができます。

 例えば、component.findComponent("securitySystem")を実行した場合、more.jspにおいて車のオプション「SecuritySystem」を選択するためのチェックボックスとして使用されているコンポーネントを取得します。

private void processDeluxe(ActionEvent event, ResourceBundle rb) {
        UIComponent component = event.getComponent();
-- 省略 --
component.findComponent("securitySystem");

 次の、FacesContext.getCurrentInstance()では、javax.faces.context.FacesContextを取得しています。FacesContextは、1つのRequestとそれに対応するResponseに関する状態を保持しており、検証がエラーとなった場合のメッセージなども、ユーザーへのResponseとしてFacesContextに対して設定します。ここで取得したFacesContextは、この後CurrentOptionServerの値の取り出し、更新のために使用しています。

FacesContext context = FacesContext.getCurrentInstance();

 次にWebアプリケーションを表すjavax.faces.application.Applicationを取得します。Applicationインスタンスは、javax.faces.FactoryFinderのgetFactoryメソッドによりjavax.faces.application.ApplicationFactoryを取得し、このApplicationFactoryのgetApplication()を呼び出すことで取得します。そして、ApplicationクラスのメソッドgetValueBindingの引数に、CurrentOptionServer.engineOptionを指定することにより、CurrentOptionServerのengineOptionプロパティ値を表すjavax.faces.el.ValueBindingオブジェクトを取得します。ValueBindingオブジェクトを取得した後は、FacesContextを通しgetValueメソッドによるモデルプロパティ値の取得、setValueによる値の更新が可能です。

 JSFでは、このように、FacesContext、Applicationを取得後、ValueBindingオブジェクトをApplicationから取得し、モデルのプロパティ値の取得、更新を行います。

ApplicationFactory factory = (ApplicationFactory)FactoryFinder.getFactory(
"javax.faces.application.ApplicationFactory");
Application application = factory.getApplication();
ValueBinding eOptionBinding = application.getValueBinding("CurrentOptionServer.engineOption");
eOptionBinding.setValue(context, engineOption);

 また、このメソッド内では、上記以外に各種UIコンポーネントの取得や特定のUIコンポーネントへのプロパティの設定などを行っていますが、細かい説明については省略します。実際のアプリケーションの動作から、内容を確認してください。

リスト3 processDeluexメソッド全体
    
private void processDeluxe(ActionEvent event, ResourceBundle rb) {
        UIComponent component = event.getComponent();
        UIComponent foundComponent = null;
        UIOutput uiOutput = null;   
        String value = null;
        boolean packageChange = false;
        int i = 0;
        FacesContext context = FacesContext.getCurrentInstance();
        String[] engines = {"V4", "V6", "V8"};
        ArrayList engineOption = new ArrayList(engines.length);
        for (i=0; i<engines.length; i++) {
            engineOption.add(new SelectItem(engines[i], engines[i], engines[i]));
        }
        ApplicationFactory factory = (ApplicationFactory)FactoryFinder.getFactory(
"javax.faces.application.ApplicationFactory");
        Application application = factory.getApplication();
        ValueBinding eOptionBinding = 
application.getValueBinding("CurrentOptionServer.engineOption");
        eOptionBinding.setValue(context, engineOption);
        
        foundComponent = component.findComponent("currentEngine");
        uiOutput = (UIOutput)foundComponent;
        if (!((application.getValueBinding("CurrentOptionServer.currentPackage")
).getValue(context)).equals("deluxe")) {
            value = engines[0];
            packageChange = true;
        } else {
            value = (String)uiOutput.getValue();
        }
        uiOutput.setValue(value);
        ValueBinding currentEOBinding = application.getValueBinding("CurrentOptionServer.currentEngineOption");
        currentEOBinding.setValue(context, value);
        
        ValueBinding currentPBinging = application.getValueBinding("CurrentOptionServer.currentPackage");
        currentPBinging.setValue(context, "deluxe");
        foundComponent = component.findComponent("securitySystem");
        foundComponent.setAttribute("disabled", "true");
        ((UIOutput)foundComponent).setValue(Boolean.TRUE);
        foundComponent.setAttribute("selectbooleanClass", "package-selected");
        ValueBinding securityBinding = application.getValueBinding("CurrentOptionServer.securitySystem");
        securityBinding.setValue(context, Boolean.TRUE);
     -- 省略 --
        foundComponent = component.findComponent("custom");
        foundComponent.setAttribute("commandClass", "package-unselected");

        foundComponent = component.findComponent("deluxe");
        foundComponent.setAttribute("commandClass", "package-selected");
    }
-- 省略 --
}


 次にPackageValueChangedクラスを説明します。ActionListenerの場合と同様に、ValueChangedListenerにおいてもgetPhaseIdを実装し、イベントが処理されるべきフェイズを指定します。また、ValueChangedListenerでは、processValueChanged(valueChangedEvent)メソッドにおいて発生したValueChangedEventに対する処理を実装します。

 processValueChangedでは、初めにValueChangedEventを発生させたコンポーネントのIDを取得し、次にCurrentOptionServerから現在の車の値段を取り出しています。そして、コンポーネントの変更に応じて値段を計算し、結果をCurrentOptionServerに更新します。また、このクラス内でもJSFのAPIを使用していますが、CarActionListener内で説明したものと同様の処理を行っているので説明を省略します。

リスト4 PackageValueChanged.java
public class PackageValueChanged implements ValueChangedListener {
    -- 省略 --
    public PhaseId getPhaseId() {
        return PhaseId.PROCESS_VALIDATIONS;
    }
    
    public void processValueChanged(ValueChangedEvent vEvent) {
        try {
            String componentId = vEvent.getComponent().getComponentId();
            FacesContext context = FacesContext.getCurrentInstance();
            String currentPrice;
            int cPrice = 0;
            ApplicationFactory factory = 
(ApplicationFactory)FactoryFinder.getFactory(
"javax.faces.application.ApplicationFactory");
            Application application = factory.getApplication();
            ValueBinding binding = application.getValueBinding("CurrentOptionServer.carCurrentPrice");
            currentPrice = (String)binding.getValue(context);
            cPrice = Integer.parseInt(currentPrice);
            if ((componentId.equals("currentEngine")) || (componentId.equals("currentAudio"))) {
                cPrice = cPrice - (this.getPriceFor((String)vEvent.getOldValue()));
                cPrice = cPrice + (this.getPriceFor((String)vEvent.getNewValue()));
            } else {
                Boolean optionSet = (Boolean)vEvent.getNewValue();
                cPrice = calculatePrice(componentId, optionSet, cPrice); 
            }
            
            currentPrice = Integer.toString(cPrice);
            ValueBinding resultBinding = application.getValueBinding("CurrentOptionServer.carCurrentPrice");
            resultBinding.setValue(context, currentPrice);
        } catch (NumberFormatException ignored) {
        }
    }
    
    public int calculatePrice(String optionKey, Boolean optionSet, int cPrice) {
        if (optionSet.equals(Boolean.TRUE)) {
            cPrice = cPrice + (this.getPriceFor(optionKey));
        } else {
            cPrice = cPrice - (this.getPriceFor(optionKey));
        }
        return cPrice;
    }
    
    public int getPriceFor(String option) {
     -- 省略 --
        if (option.equals("V4")) {
            return (100);
        }
        else if (option.equals("V6")) {
            return (300);
        }
    }
}

コンフィグレーションファイルの設定

 次に、ここまでで紹介したクラスをJSFアプリケーションとして利用するために必要な定義について説明しましょう。

 JSFでは、ビーンをアプリケーション設定ファイルである「faces-config.xml」に登録することによってインスタンス化することが可能です。JSF実装はアプリケーション起動時にfaces-config.xmlの定義を読み込み、ビーンを初期化し、指定されたスコープ内に保存します。ちょうど、JSP内でuseBeanアクションを使用してインスタンス化するのと同じことが、定義ファイルを使用して行えるわけです。

 アプリケーションにおいて必ず必要なビーンに関しては、従来のようにページからインスタンス化するのではなく、設定ファイルからインスタンス化することにより、意図しないページアクセスにも対応できるでしょう。

 そのほかのクラスについて特に設定の必要はありませんので、設定ファイルの定義は以上です。

<managed-bean>
    <managed-bean-name>CurrentOptionServer</managed-bean-name>
    <managed-bean-class>carshop.CurrentOptionServer</managed-bean-class>
    <managed-bean-scope>session</managed-bean-scope>
    <managed-property>
        <property-name>carImage</property-name>
        <value>current.gif</value>
    </managed-property>
</managed-bean>

2/4

 INDEX

JavaServer Facesを理解する(後編)
  Page1
JSFアプリケーションの構築
 

Page2
モデルとビジネスロジック

  Page3
カスタムコンバータ、カスタムバリデータ、タブハンドラ
Page4
UIコンポーネント、JSFタグライブラリを使用したJSPの作成
ページナビゲーションの定義
まとめ

INDEX
特別企画:JavaServer Facesを理解する
  前編 JSFの構造を理解する
後編 JSFによるWebアプリケーション開発


連載記事一覧


Java Agile フォーラム 新着記事
@ITメールマガジン 新着情報やスタッフのコラムがメールで届きます(無料)

注目のテーマ

Java Agile 記事ランキング

本日 月間