連載
EventKitとiAdでiPhoneアプリにカレンダーと広告を付けるには:SDKで始めるiPad/iPhoneアプリ開発の勘所(6)(2/4 ページ)
初めてiPhone/iPadアプリ開発に挑戦する人が、迷わず短時間でアプリを作れるように、数多くの情報の中から要点をグっと絞った開発の勘所を紹介する入門連載です
EventKitフレームワークを使うには
それでは、実際にEventKitフレームワークを使用してBMI計算アプリからカレンダーイベントの追加を行ってみましょう。
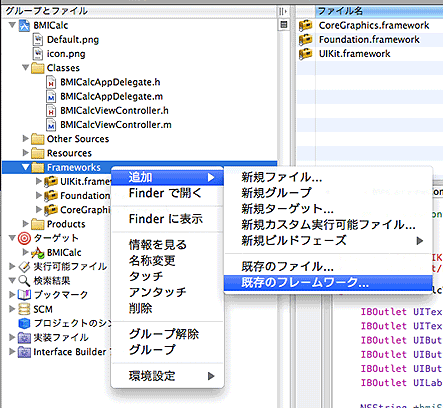
Xcodeのグループとファイルから[Frameworks]を右クリックし、[追加]→[既存のフレームワーク]を選択します。
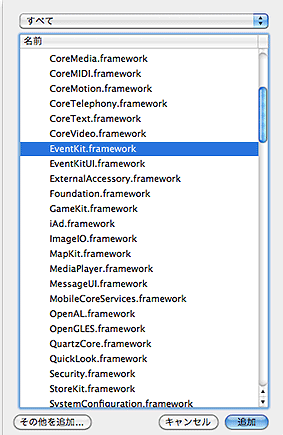
表示されたフレームワークの一覧から[EventKit.framework]を選択し、[追加]をクリックします。
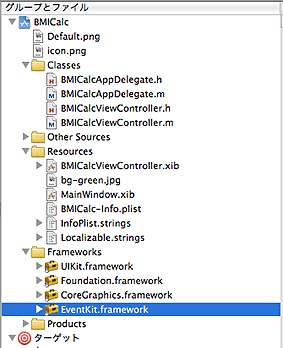
以上でプロジェクトに[EventKit.framework]が追加されました。
BMICalcViewController.h
次に、「BMICalcViewController.h」を以下のように編集します。
#import <UIKit/UIKit.h>
#import <EventKit/EventKit.h>

@interface BMICalcViewController : UIViewController<UITextFieldDelegate> {
    IBOutlet UITextField *heightText; // 身長テキストフィールド
    IBOutlet UITextField *weightText; // 体重テキストフィールド
    IBOutlet UIButton *calcButton;    // 計算ボタン
    IBOutlet UIButton *resetButton;   // リセットボタン
    IBOutlet UILabel *resultLabel;    // 結果ラベル
    IBOutlet UIButton *saveButton;    // 記録ボタン
    NSString *bmiStr; // BMI計算結果保存用の変数
    NSString *result; // 判定結果保存用の変数
    EKEventStore *eventStore; // カレンダーデータベースにアクセスするためのオブジェクト
}

@property (nonatomic, retain) UITextField *heightText;
@property (nonatomic, retain) UITextField *weightText;
@property (nonatomic, retain) UIButton *calcButton;
@property (nonatomic, retain) UIButton *resetButton;
@property (nonatomic, retain) UILabel *resultLabel;
@property (nonatomic, retain) UIButton *saveButton;
@property (nonatomic, retain) NSString *bmiStr;
@property (nonatomic, retain) NSString *result;
@property (nonatomic, retain) EKEventStore *eventStore;

// 計算ボタンを押したときに呼ばれるメソッド
-(IBAction)executeCalc:(id)sender;

// リセットボタンを押したときに呼ばれるメソッド
-(IBAction)executeReset:(id)sender;

// 記録ボタンを押したときに呼ばれるメソッド
-(IBAction)executeSave:(id)sender;

@end
EventKitフレームワークのインポート宣言を追加し、カレンダーデータベースにアクセスするための「EKEventStore」クラスの変数を追加しました。
また、記録ボタン用の変数とメソッド、BMI計算結果と判定結果メッセージを格納しておく変数も追加しています。
BMICalcViewController.m
次に、「BMICalcViewController.m」を以下のように編集します。
……【省略】……

@synthesize bmiStr;
@synthesize result;

……【省略】……

- (void) viewDidLoad {

……【省略】……

    // イベントストアを初期化
    self.eventStore = [[EKEventStore alloc] init];
}

……【省略】……
// BMI計算実行処理
- (IBAction)executeCalc:(id) sender {

……【省略】……

    // BMI計算結果(小数点第1位まで)
    self.bmiStr = [ NSString stringWithFormat: @"%.1f", bmi];

    // 標準体重(kg) = 身長(m) × 身長(m) × BMI標準値(22)
    float stdWeight = (height * height) * 22;

    // 標準体重の計算結果(小数点第1位まで)
    NSString *stdWeightStr = [ NSString stringWithFormat: @"%.1f", stdWeight ];

    // 結果判定を行う
    self.result = @"";

    // BMIが18.5より小さければ「やせ気味」
    if (bmi < 18.5) {
        self.result = NSLocalizedString(@"wei_thin", @"Message for result thin.");
    }
    // BMIが18.5以上、25より小さければ「理想の体重」
    else if (bmi >= 18.5 && bmi < 25) {
        self.result = NSLocalizedString(@"wei_normal", @"Message for result normal.");
    }
    // それ以上の場合は「肥満」
    else {
        self.result = NSLocalizedString(@"wei_fat", @"Message for result fat.");
    }

……【省略】……

}
viewDidLoadメソッドでは、従来のコードに加え、EKEventStoreオブジェクトを初期化しています。
executeCalcメソッドでは、ローカル変数に格納していたBMI計算の結果を、追加したメンバ変数に格納するよう変更しています。
次ページでは、機能追加を完了し、EventKitの機能を試してみます。
Copyright © ITmedia, Inc. All Rights Reserved.


