学習させることで、どんどん賢くなっていくLUISをbotサービスで活用するには:認識系API活用入門(終)(2/3 ページ)
コグニティブサービスのAPIを用いて、「現在のコグニティブサービスでどのようなことができるのか」「どのようにして利用できるのか」「どの程度の精度なのか」を検証していく連載。最終回となる今回は、LUIS(Language Understanding Intelligent Service)とMicrosoft Bot Frameworkを組み合わせてbotサービスを作成します。
LUISに接続する処理の作成
実際にプログラムからLUISを呼び出すところを作成します。プログラムの流れとしては非常にシンプルで、下記のようになります。
- ユーザーの入力内容を受け取る
- LUISのAPIにユーザーの入力内容を渡す
- LUISが解析した結果を受け取る
LUISも連載第5回で紹介したComputer Vision APIと同様に、Tokenを使用しない方式です。LUISでは、Tokenを取得せずに直接Endpoint URLにSubscription-Keyを渡すようになっています(ただし、現在LUISはプレビュー扱いであるため、今後どうなるかは分かりません)。
まず、LUISに処理をお願いしてJSON形式で返ってくるデータを受け取るためのクラスを作成します。
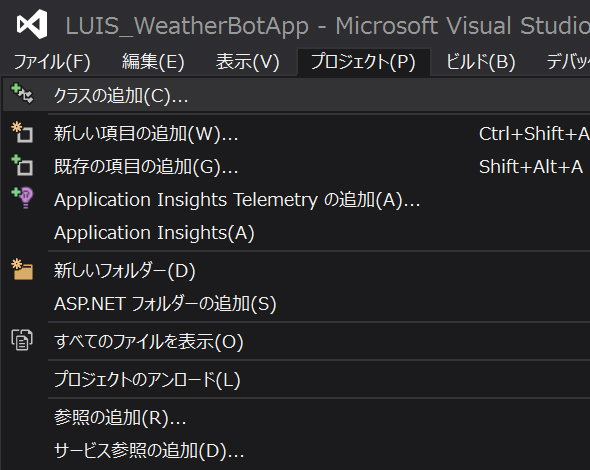
メニューバーの「プロジェクト」から「クラスの追加」をクリックします。
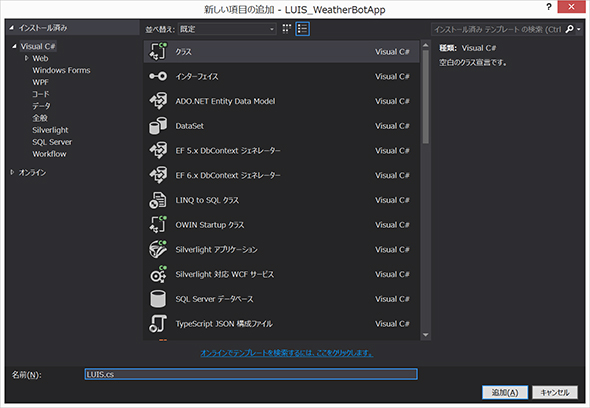
追加するのは通常のクラスです。名前を「LUIS.cs」として「追加」ボタンをクリックします。
クラスが追加されたら、下記コードをコピーしてそのクラスにペーストしてください。また、ソースコード73行目のurlは、前回の連載で取得したエンドポイントURLに適宜置き換えてください
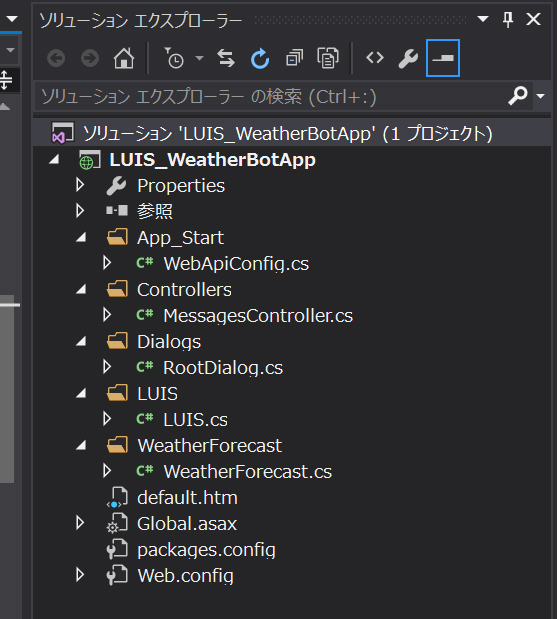
ちなみに「LUIS」という名前のフォルダを作成しその下にクラスを置いたので、名前空間が「LUIS_WeatherBotApp.LUIS」となっています。
using System;
using System.Collections.Generic;
using System.Linq;
using System.Web;
using System.Net;
using System.Runtime.Serialization.Json;

namespace LUIS_WeatherBotApp.LUIS
{
    public class LUIS
    {
        //========================================================
        // LUISのデータを受け取るためのクラスたち
        //========================================================
        public class RootObject
        {
            public string query { get; set; }
            public List<Intents> intents { get; set; }
            public List<Entities> entities { get; set; }
        }
        public class Entities
        {
            public string entity { get; set; }
            public string type { get; set; }
            public string startIndex { get; set; }
            public string endIndex { get; set; }
            public string score { get; set; }
        }

        public class Intents
        {
            public string intent { get; set; }
            public string score { get; set; }
            public List<Actions> actions { get; set; }
        }

        public class Actions
        {
            public string triggered { get; set; }
            public string name { get; set; }
            public List<Parameters> parameters { get; set; }
        }

        public class Parameters
        {
            public string name { get; set; }
            public string required { get; set; }
            public List<Value> value { get; set; }
        }

        public class Value
        {
            public string entity { get; set; }
            public string type { get; set; }
            public string score { get; set; }
        }


        //========================================================
        // LUISの結果が入る
        //========================================================
        public RootObject LUISResult;

        //========================================================
        // コンストラクタ
        //========================================================
        public LUIS(string pMessage)
        {
            try
            {
                // LUISにbotで受信したメッセージを投げる
                // string url にEndpoint URL を記載
                string url = "https://westus.api.cognitive.microsoft.com/luis/v2.0/apps/xxxxxxxxxxxxxxxxxxxxxxxxxxxxxxxxxxxxxx?subscription-key=xxxxxxxxxxxxxxxxxxxxxxxxxxxxxxxxxxxx&staging=true&verbose=true&timezoneOffset=0.0&q=";
                url += System.Web.HttpUtility.UrlEncode(pMessage);

                var request = (HttpWebRequest)WebRequest.Create(url);

                var response = request.GetResponse();
                var responseStream = response.GetResponseStream();
                if (responseStream == null)
                {
                    throw new Exception();
                }

                //受け取ったJsonをデシリアライズ
                DataContractJsonSerializer dcjs = new DataContractJsonSerializer(typeof(RootObject));

                LUISResult = (RootObject)dcjs.ReadObject(responseStream);


            }
            catch
            {

            }
        }
    }
}
天気予報Webサービスに接続する処理の作成
続いて、天気予報を取得する処理です。今回は無料で使用できるLivedoor天気予報のお天気Webサービスを使用します。
APIでは、「city」がパラメーターとして必須になっています。これは都道府県名や県庁所在地が対応しているのですが、名前ではなくIDで渡す必要があります。そのため名前からIDを求める処理が入っています。
LUISと同様に通常のクラスを追加し、名前を「WeatherForecast.cs」とします。
プログラムとしては、こちらのようになります。ちなみに「WeatherForecast」という名前のフォルダを作成しその下にクラスを置いたので、名前空間が「LUIS_WeatherBotApp.WeatherForecast」となっています。
LUISと天気予報を呼び出して応答を返す
続いて、RootDialog.csに、LUISと天気予報を呼び出して応答を返すように変更を加えます。RootDialog.csは以下のようになります。
using System;
using System.Threading.Tasks;
using Microsoft.Bot.Builder.Dialogs;
using Microsoft.Bot.Connector;

namespace LUIS_WeatherBotApp.Dialogs
{
    [Serializable]
    public class RootDialog : IDialog<object>
    {
        public Task StartAsync(IDialogContext context)
        {
            context.Wait(MessageReceivedAsync);

            return Task.CompletedTask;
        }

        private async Task MessageReceivedAsync(IDialogContext context, IAwaitable<object> result)
        {
            try
            {
                var activity = await result as Activity;

                // -----------------------
                // LUIS
                // -----------------------
                string date = "";
                string prefecture = "";

                LUIS.LUIS luis = new LUIS.LUIS(activity.Text);
                if (luis.LUISResult == null)
                {
                    throw new Exception("もう一度お願いしします。");
                }

                foreach(LUIS.LUIS.Entities entities in luis.LUISResult.entities)
                {
                    switch (entities.type)
                    {
                        case "date":
                            date = entities.entity;
                            break;

                        case "prefecture":
                            prefecture = entities.entity;
                            break;
                    }
                }

                if (date == "" || prefecture == "")
                {
                    throw new Exception("もう一度お願いしします。");
                }

                // -----------------------
                // 天気予報の取得
                // -----------------------
                WeatherForecast.WeatherForecast weatherForecast = new WeatherForecast.WeatherForecast(prefecture);

                if (weatherForecast.weatherResult == null)
                {
                    throw new Exception("その場所の天気予報が取得できませんでした。");
                }

                WeatherForecast.WeatherForecast.Forecast forecast = null;
                switch (date)
                {
                    case "今日":
                    case "きょう":
                        forecast = weatherForecast.weatherResult.forecasts[0];
                        break;
                    case "明日":
                    case "あす":
                    case "あした":
                        forecast = weatherForecast.weatherResult.forecasts[1];
                        break;
                    case "明後日":
                    case "あさって":
                        forecast = weatherForecast.weatherResult.forecasts[2];
                        break;
                }

                if (forecast == null)
                {
                    throw new Exception("もう一度お願いしします。");
                }

                string replyMessage = "";
                replyMessage += forecast.dateLabel + "は\r\n";
                replyMessage += forecast.telop;
                if (forecast.temperature.min != null) replyMessage += "\r\n最低気温:" + forecast.temperature.min.celsius + "℃";
                if (forecast.temperature.max != null) replyMessage += "\r\n最高気温:" + forecast.temperature.max.celsius + "℃";

                await context.PostAsync(replyMessage);
                context.Wait(MessageReceivedAsync);
            }

            catch(Exception exception)
            {
                await context.PostAsync(exception.Message);
                context.Wait(MessageReceivedAsync);
            }
        }
    }
}
最終的なプロジェクトの構成は、下記のようになります。
Copyright © ITmedia, Inc. All Rights Reserved.
関連記事
 LUIS(自然言語解析サービス)
LUISはマイクロソフトが提供する自然言語解析サービス。ユーザーが「何をしたいのか」(インテント)とそれに付随する情報(エンティティ)を取り出せる。 LUISを使って頭の悪いLINE Botを作ってみよう!
LUIS(自然言語解析サービス)とロケスマWeb(お店発見Webサービス)とGoogle Geocoding APIを使って、ユーザーが探しているお店を教えてくれるLINE Botを作ってみよう! WebhookやHubotを使ってチャットとSubversion、Redmine、Jenkinsを連携させる基本設定とは
OSSのチャット基盤であり、Dockerコンテナとして簡単に導入できるRocketChatを使った、コミュニケーション基盤の作り方を学ぶ連載。最終回は、RocketChatと他のアプリケーション(Subversion、Redmine、Jenkins、Zabbix、fluentdなど)と連携させる方法を紹介します。


