連載:改造WebアプリケーションUIビフォー/アフター
第1回 ASP.NETによる3階層Webアプリ「ITブック」構築
葛西秋雄
2010/02/05 |
 |
|
プレゼンテーション層
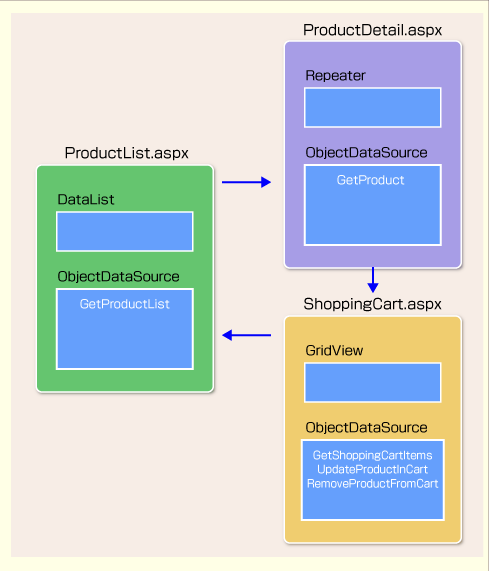
プレゼンテーション層は、ProductList.aspx、ProductDetail.aspx、ShoppingCart.aspxページから構成されます。

|
| 図4 プレゼンテーション層のWebページの流れ |
|
ProductList.aspxには、DataListコントロールを配置して商品リストを表示します。商品リストから商品を選択すると、ProductDetail.aspxに移動します。DataListから選択した商品は、クエリ文字列に商品のIDを指定して、以下のようなURLによりProductDetail.aspxに渡します。
ProductDetail.aspx?id=999
|
|
ProductDetail.aspxには、Repeaterコントロールを配置して商品の詳細を表示します。商品の詳細から[カートに入れる]ボタンをクリックするとShoppingCart.aspxに移動します。
ShoppingCart.aspxでは、ショッピング・カートを表示します。ショッピング・カートに格納されている商品は、個数を変更したり削除したりすることができます。[買い物を続ける]ボタンをクリックすると、ProductList.aspxに移動して商品リストを表示します。
■ProductList.aspxに商品の一覧を表示する
ProductList.aspxには、DataListコントロールを配置してObjectDataSourceをバインドします。DataListのDataSourceIDプロパティにはObjectDataSourceのIDを設定します。RepeaterColumnsプロパティに「3」、RepeatDirectionプロパティに「Horizontal」を設定して商品を横3列で表示します。
<asp:DataList ID="dlProducts" runat="server"

  DataKeyField="ID"

  DataSourceID="odsProduct"

  RepeatColumns="3" RepeatDirection="Horizontal" >

  <ItemTemplate>

    ……

  </ItemTemplate>

</asp:DataList>
|
|
| ProductList.aspxのDataListコントロールの定義 |
DataListの<ItemTemplate>要素には、ProductクラスのID、ImageMedium、Title、PriceプロパティをEvalメソッドでバインドして表示します。
<ItemTemplate>

  <asp:HyperLink ID="hlnkCover" runat="server"

   NavigateUrl='<%# String.Format("ProductDetail.aspx?id={0}", Eval("ID")) %>'

   ImageUrl='<%# Eval("ImageMedium") %>'

   ToolTip="詳細を見る..." />


  <asp:HyperLink ID="hlnkTitle" runat="server"

   NavigateUrl='<%# String.Format("ProductDetail.aspx?id={0}", Eval("ID")) %>'

   ToolTip="詳細を見る..." >

   <asp:Literal ID="litTitle" runat="server" Text='<%# Eval("Title") %>'/>

  </asp:HyperLink>


  価格:

  <asp:Label ID="lblPrice" runat="server"

    Text='<%# String.Format("{0:n0}円", Eval("Price")) %>' />

</ItemTemplate>
|
|
| DataListコントロールにおけるEvalメソッドによるバインド |
一方、ObjectDataSourceのTypeNameプロパティには、ビジネスロジック層のProductManagerクラスを設定します。SelecteMethodプロパティには、ProductManagerクラスのGetProductListメソッドを設定します。GetProductListメソッドは、Productクラスのコレクションを返します。
<asp:ObjectDataSource ID="odsProduct" runat="server"

  TypeName="ProductManager"

  SelectMethod="GetProductList">

</asp:ObjectDataSource>
|
|
| ProductList.aspxのObjectDataSourceの定義 |
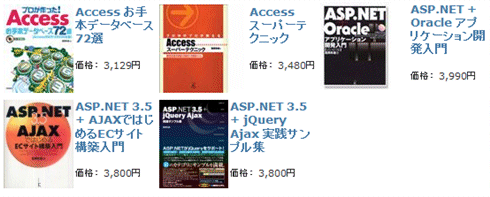
ブラウザを起動してProductList.aspxを表示すると、DataListに商品リストが表示されます。商品のイメージまたは、タイトルをクリックすると「ProductDetail.aspx?id=999」に移動して商品の詳細が表示されます。

|
| 図5 DataListに商品の一覧が表示された |
|
■ProductDetail.aspxに商品の詳細を表示する
ProductDetail.aspxには、Repeaterコントロールを配置してObjectDataSourceをバインドします。RepeaterのDataSourceIDプロパティには、ObjectDataSourceのIDを設定します。
<asp:Repeater ID="rptProduct" runat="server" DataSourceID="odsProduct">

  <ItemTemplate>

    ……

  </ItemTemplate>

</asp:Repeater>
|
|
| ProductDetail.aspxのRepeaterコントロールの定義 |
Repeaterの<ItemTemplate>要素には、ProductクラスのID、Title、Description、Price、ImageLargeプロパティをEvalメソッドでバインドして表示します。
<ItemTemplate>

  <asp:Image ID="Image1" runat="server"

  ImageUrl='<%# Eval("ImageLarge") %>' />

  <asp:Button ID="btnAddToCart" runat="server" Text="カートに入れる"

  OnCommand="btnAddToCart_Command"

  CommandName="AddToCart"

  CommandArgument='<%# Eval("ID") %>' Font-Size="X-Large"  />

  <asp:Literal ID="litTitle" runat="server" Text='<%# Eval("Title") %>'/>

  <asp:Label ID="lblDescription" runat="server" Text='<%# Eval("Description") %>'/>

  <asp:Label ID="lblPrice" runat="server"  Text='<%# String.Format("{0:n0}円",  Eval("Price")) %>' />

  <asp:Button ID="btnAddToCart2" runat="server" Text="カートに入れる"

   OnCommand="btnAddToCart_Command"

   CommandName="AddToCart"

   CommandArgument='<%# Eval("ID") %>' />

  <input type="button" value="戻る" onclick="history.go(-1);" />

</ItemTemplate>
|
|
| RepeaterコントロールにおけるEvalメソッドによるバインド |
ObjectDataSourceのTypeNameプロパティには、ビジネスロジック層のProductManagerクラスを設定します。そして、SelectMethodプロパティには、ProductManagerクラスのGetProductメソッドを設定します。
<asp:ObjectDataSource ID="odsProduct" runat="server"

  TypeName="ProductManager"

  SelectMethod="GetProduct">

  <SelectParameters>

  <asp:QueryStringParameter Name="intProductID" QueryStringField="id" Type="Int32" />

  </SelectParameters>

</asp:ObjectDataSource>
|
|
| ProductDetail.aspxのObjectDataSourceの定義 |
GetProductメソッドの引数には、商品のIDを指定する必要がありますので、<SelectParameters>コレクションに<QueryStringParameter>要素を追加して、QueryStringFieldプロパティにクエリ文字列「ID」を設定します。ProductList.aspxからProductDetail.aspxに移動するときは、次のようなクエリ文字列を渡します。
ProductDetail.aspx?id=999
|
|
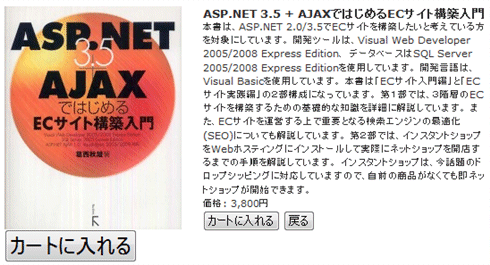
ブラウザを起動してProductList.aspxから商品を選択すると、ProductDetail.aspxに商品の詳細が表示されます。

|
| 図6 Repeaterに商品の詳細が表示された |
|
ProductDetail.aspxで[カートに入れる]ボタンをクリックすると、Webページがポストバックされて、ボタンのOnCommandイベント・ハンドラが実行されます。
このイベント・ハンドラでは、ProductManagerクラスのGetProductメソッドを呼び出してProductクラス生成します。次に、ShopManagerクラスのAddProductToCartメソッドを呼び出してショッピング・カートに商品を追加します。そしてResponseオブジェクトのRedirectメソッドを実行してShoppingCart.aspxに移動します。
Protected Sub btnAddToCart_Command(ByVal sender As Object, ByVal e As System.Web.UI.WebControls.CommandEventArgs) Handles btnAddToCart.Command


  If e.CommandName.Equals("AddToCart") Then


    Dim intID As Integer = Int32.Parse(e.CommandArgument)


    ' 選択した商品のProductクラスを生成する

    Dim clsProduct As Product = ProductManager.GetProduct(intID)


    ' 商品をショッピング・カートに追加する

    ShopManager.AddProductToCart(clsProduct)

    Response.Redirect("ShoppingCart.aspx")

  End If

End Sub
|
protected void btnAddToCart_Command(object sender, CommandEventArgs e) {


  if (e.CommandName.Equals("AddToCart")) {


    int intID = int.Parse( e.CommandArgument.ToString());


    // 選択した商品のProductクラスを生成する

    Product clsProduct = ProductManager.GetProduct(intID);


    // 商品をショッピング・カートに追加する

    ShopManager.AddProductToCart(clsProduct);

    Response.Redirect("ShoppingCart.aspx");

  }

}
|
|
| ProductDetail.aspxのOnCommandイベント・ハンドラ(上:VB、下:C#) |


