連載:改造WebアプリケーションUIビフォー/アフター
第1回 ASP.NETによる3階層Webアプリ「ITブック」構築
葛西秋雄
2010/02/05 |
 |
|
■ShoppingCart.aspxにショッピング・カートの中身を表示する
ShoppingCart.aspxには、GridViewコントロールを配置してObjectDataSourceをバインドします。GridViewのDataSourceIDプロパティには、ObjectDataSourceのIDを設定します。
<asp:GridView ID="gvCart" runat="server"

  AutoGenerateColumns="False" DataSourceID="odsCart"

  DataKeyNames="ID" ShowFooter="True" >

  <Columns>

    ……

  </Columns>

</asp:GridView>
|
|
| ShoppingCart.aspxのGridViewコントロールの定義 |
GridViewの<Columns>要素にはImageField、BoundField、TemplateField要素を追加して、商品のイメージ、タイトル、数量、価格などをバインドして表示します。GridViewには[編集]と[削除]ボタンを配置して、商品の数量を変更したり、商品を削除したりできるようにします。
<Columns>

  <asp:TemplateField ShowHeader="False">

    <ItemTemplate>

      <asp:Button ID="btnDelete" runat="server"

        CausesValidation="False"

        CommandName="Delete" Text="削除"

        OnClientClick="return confirm('カートから商品を削除してよろしいですか?');" />

    </ItemTemplate>

  </asp:TemplateField>


  <asp:TemplateField ShowHeader="False" Visible="true">


    <ItemTemplate>

      <asp:Button ID="Button1" runat="server"

        CausesValidation="False"  CommandName="Edit" Text="編集" />

    </ItemTemplate>


    <EditItemTemplate>

      <asp:Button ID="Button2" runat="server"

        CausesValidation="False" CommandName="Update" Text="更新" />

      <asp:Button ID="Button3" runat="server"

        CausesValidation="False" CommandName="Cancel" Text="中止" />

    </EditItemTemplate>

  </asp:TemplateField>

</Columns>
|
|
| GridViewコントロールの<Columns>要素の定義 |
ObjectDataSourceのTypeNameプロパティには、ビジネスロジック層のShopManagerクラスを設定します。SelectMethod、UpdateMethod、DeleteMethodプロパティには、ShopManagerクラスのGetShoppingCartItems、UpdateProductInCart、RemoveProductFromCartメソッドを設定します。
<asp:ObjectDataSource ID="odsCart" runat="server"

  TypeName="ShopManager"

  SelectMethod="GetShoppingCartItems"

  UpdateMethod="UpdateProductInCart"

  DeleteMethod="RemoveProductFromCart">

</asp:ObjectDataSource>
|
|
| ShoppingCart.aspxのObjectDataSourceの定義 |
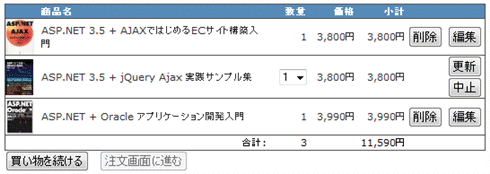
ブラウザを起動してProductList.aspx、ProductDetail.aspx、ShoppingCart.aspxの順に移動すると、GridViewにショッピング・カートの中身が表示されます。
ショッピング・カートから商品を削除するには[削除]ボタンをクリックします。数量を変更するには[編集]ボタンクリックしてドロップダウンリストから個数を選択します。買い物を続けるときは[買い物を続ける]ボタンをクリックしてProductList.aspxに移動します。[注文画面に進む]ボタンは、今回はサポートしていませんので無効にしています。

|
| 図7GridViewにショッピング・カートが表示された |
|
GridViewのフッターに数量と金額の合計を表示するには、GridViewのRowDataBoundイベント・ハンドラに次のようなコードを追加します。このイベント・ハンドラでは、カレント行がデータ行のとき小計(金額)と数量を取得して累計します。そして、カレント行がフッターのとき、対応するセルに値を埋め込んで表示します。
Protected Sub gvCart_RowDataBound(ByVal sender As Object, ByVal e As System.Web.UI.WebControls.GridViewRowEventArgs) Handles gvCart.RowDataBound

  Select Case e.Row.RowType


    ' カレント行がデータ行?

    Case DataControlRowType.DataRow

    priceTotal += Convert.ToDecimal(DataBinder.Eval(e.Row.DataItem, "SubTotal"))

    quantityTotal += Convert.ToInt32(DataBinder.Eval(e.Row.DataItem, "Quantity"))


    ' カレント行がフッター?

    Case DataControlRowType.Footer

    e.Row.Cells(1).Text = "合計:"

    e.Row.Cells(2).Text = quantityTotal.ToString()

    e.Row.Cells(4).Text = String.Format("{0:n0}円", priceTotal)

    e.Row.Cells(2).HorizontalAlign = HorizontalAlign.Right

    e.Row.Cells(4).HorizontalAlign = HorizontalAlign.Right

  End Select

End Sub
|
protected void gvCart_RowDataBound(object sender, GridViewRowEventArgs e) {

  switch (e.Row.RowType) {


    // カレント行がデータ行?

    case DataControlRowType.DataRow:

    priceTotal += Convert.ToDecimal(DataBinder.Eval(e.Row.DataItem, "SubTotal"));

    quantityTotal += Convert.ToInt32(DataBinder.Eval(e.Row.DataItem, "Quantity"));

    break;


    // カレント行がフッター?

    case DataControlRowType.Footer:

    e.Row.Cells[1].Text = "合計:";

    e.Row.Cells[2].Text = quantityTotal.ToString();

    e.Row.Cells[4].Text = string.Format("{0:n0}円", priceTotal);

    e.Row.Cells[2].HorizontalAlign = HorizontalAlign.Right;

    e.Row.Cells[4].HorizontalAlign = HorizontalAlign.Right;

    break;

  }

}
|
|
| GridViewコントロールのRowDataBoundイベント・ハンドラ(上:VB、下:C#) |
GridViewから[編集]ボタンをクリックして数量を変更したときは、ShopManagerクラスのUpdateProductInCartメソッドが実行されます。
Public Shared Sub UpdateProductInCart(ByVal newQuantity As Integer, ByVal ID As Guid)
|
public static void UpdateProductInCart(int newQuantity, Guid ID)
|
|
| GridViewコントロールのRowDataBoundイベント・ハンドラ(上:VB、下:C#) |
このメソッドには、引数として商品の数量とIDを渡す必要がありますので、ObjectDataSourceのUpdatingイベント・ハンドラに、次のようなコードを追加して引数の値を設定します。
Protected Sub odsCart_Updating(ByVal sender As Object, ByVal e As System.Web.UI.WebControls.ObjectDataSourceMethodEventArgs) Handles odsCart.Updating


  e.InputParameters("newQuantity") = Convert.ToInt32(CType( _

    gvCart.Rows(gvCart.EditIndex).FindControl("dropQuantity"), _

    DropDownList).SelectedValue)


  e.InputParameters("ID") = New Guid( _

    gvCart.DataKeys(gvCart.EditIndex).Value.ToString())


End Sub
|
protected void odsCart_Updating(object sender, ObjectDataSourceMethodEventArgs e) {


  e.InputParameters["newQuantity"] = Convert.ToInt32(

    ((DropDownList)gvCart.Rows[gvCart.EditIndex].SelectedValue);


  e.InputParameters["ID"] = new Guid(gvCart.DataKeys[

    gvCart.EditIndex].Value.ToString());


}
|
|
| ObjectDataSourceのUpdatingイベント・ハンドラ(上:VB、下:C#) |
おわりに
今回では、ASP.NETのデータ・コントロールを使用して、3階層の「ITブック」を構築する方法を解説しました。本稿では、SQL Serverなどの本格的なデータベースを利用する代わりにXMLファイルを使用しています(SQL Serverなどのデータベースを利用した3階層のECサイトを検討されている方は、ラトルズから出版されている拙著「ASP.NET 3.5 AJAXではじめるECサイト構築入門」を参照してください)。
次回では、今回解説した「ITショップ」のUIを改善するための予備知識としてjQueryとjQuery UIの基本を説明します。
業務アプリInsider 記事ランキング
本日
月間


