[検証実験]Webシステム開発の効率化を検証する
第1回 検証の趣旨と準備作業
 |
Linuxでの開発環境の構築 |
初めに次の環境をご用意ください。
| CPU |
Pentium III 450MHz以上 |
| メモリ |
512Mbytes以上 |
| ハードディスクの空き容量 |
300Mbytes以上 |
| OS |
RedHat 6.2 (kernel 2.2.14、glibc 2.1.2) |
| JDK |
1.3.1 (http://java.sun.com/j2se/1.3/からダウンロードできます) |
| ブラウザ |
NC 4.72以上 |
今回開発に使用するiWSとForteは次のものです(iWSは英語版を使用します)。
- iPlanet Web Server Enterprise Edition 6.0 SP2
- Forte for Java 3.0 Community Edition
対応OSなどの詳しい情報については、各リリースノートを、次のURLからご参照ください。
なお、iWSとForteは同じマシンにセットアップすることになります(今回使用するCommunity Editionは、リモートのiWSとの連携機能を持ちません)。
■iWS、Forteの入手
それぞれ、次のURLからダウンロードしてください。ライセンスに関する同意や、各種情報の入力が必要となります。
■iWSのインストール
作業はrootで行います。なお、JDKは事前にインストールしておいてください。
1 Web Server実行用のユーザーを決め、rootグループに追加します。この例では、iwsというユーザーを新たに作りましたが、nobodyを使っても結構です
2 ダウンロードしたファイルiws60sp2-linux.tarを展開し、その中のsetupを実行します
3 説明を読み、次へ進みます
Sun Netscape Alliance

                                  iPlanet Web Server Installation/Uninstallation

                  -------------------------------------------------------------------------------


                  Welcome to the iPlanet Web Server installation program

                  This program will install iPlanet Server Products and the

                  iPlanet Console on your computer.


                  It is recommended that you have "root" privilege to install the

                  software.


                  Tips for using the installation program:

                    - Press "Enter" to choose the default and go to the next screen

                    - Type "Control-B" to go back to the previous screen

                    - Type "Control-C" to cancel the installation program

                    - You can enter multiple items using commas to separate them.

                      For example: 1, 2, 3


                  Would you like to continue with installation? [Yes]:
|
4 ライセンス契約を読み、同意します
Sun Netscape Alliance

                                  iPlanet Web Server Installation/Uninstallation

                  -------------------------------------------------------------------------------


                  BY INSTALLING THIS SOFTWARE YOU ARE CONSENTING TO BE BOUND BY

                  AND ARE BECOMING A PARTY TO THE AGREEMENT FOUND IN THE

                  LICENSE.TXT FILE. IF YOU DO NOT AGREE TO ALL OF THE TERMS

                  OF THIS AGREEMENT, PLEASE DO NOT INSTALL OR USE THIS SOFTWARE.


                  Do you agree to the license terms? [No]: yes
|
5 [Typical installation]を選びます
                                               Sun Netscape Alliance

                                  iPlanet Web Server Installation/Uninstallation

                  -------------------------------------------------------------------------------


                  Choose an installation type:


                     1. Express installation

                         Allows you to quickly install the servers using the most

                         common options and pre-defined defaults. Useful for quick

                         evaluation of the products.


                     2. Typical installation

                         Allows you to specify common defaults and options.


                     3. Custom installation

                         Allows you to specify more advanced options. This is

                         recommended for experienced server administrators only.


                  To accept the default shown in brackets, press the Enter key.


                  Choose an installation type [2]:
|
6 インストールディレクトリを設定します
Sun Netscape Alliance

                                  iPlanet Web Server Installation/Uninstallation

                  -------------------------------------------------------------------------------


                  This program will extract the server files and install them

                  into a directory you specify. That directory is called the

                  server root in the product documentation and will contain

                  the server programs, the Administration Server, and the server

                  configuration files.


                  To accept the default shown in brackets, press the Enter key.


                  Install location [/usr/iplanet/servers]:
|
7 インストールするコンポーネントを[All]にしたまま、次へ進みます
Sun Netscape Alliance

                                  iPlanet Web Server Installation/Uninstallation

                  -------------------------------------------------------------------------------


                  iPlanet Web Server components:


                  Components with a number in () contain additional subcomponents

                  which you can select using subsequent screens.


                      1. iPlanet Web Server, Enterprise Edition (4)


                  Specify the components you wish to install [All]:
|
8 インストールするサブコンポーネントを[1,2,3,4]にしたまま、次へ進みます
|
                                                 Sun Netscape Alliance

                                    iPlanet Web Server Installation/Uninstallation

                    -------------------------------------------------------------------------------


                    iPlanet Web Server, Enterprise Edition components:


                    Components with a number in () contain additional subcomponents

                    which you can select using subsequent screens.
                        1. Server Core

                        2. Java Runtime Environment

                        3. Java Support

                        4. SNMP Support


                    Specify the components you wish to install [1, 2, 3, 4]:
|
9 ホスト名を設定します
p;  Sun Netscape Alliance

                                  iPlanet Web Server Installation/Uninstallation

                  --------------------------------------------------


                  iPlanet Web Server, Enterprise Edition components:


                  Components with a number in () contain additional subcomponents
|
10 Web Server実行用のユーザーとグループを設定します
                                               Sun Netscape Alliance

                                  iPlanet Web Server Installation/Uninstallation

                  ---------------------------------------------------


                  Choose a Unix user and group to represent the iPlanet server

                  in the user directory.  The iPlanet server will run as this user.

                  It is recommended that this user should have no privileges

                  in the computer network system.  The Administration Server

                  will give this group some permissions in the server root

                  to perform server-specific operations.


                  If you have not yet created a user and group for the iPlanet

                  server,create this user and group using your native UNIX

                  system utilities.


                  To accept the default shown in brackets, press the Return key.


                  System User [nobody]: iws


                  System Group [nobody]: iws
|
11 iWS Administration Server実行用のユーザーとしてrootを設定します
                                               Sun-Netscape Alliance

                                  iPlanet Web Server Installation/Uninstallation

                  -----------------------------------------------------------


                  The iWS Administration Server is separate from the other web servers

                  on the system and should not be confused with the Mission Control Admin

                  Server.  It is recommended that the iWS Administration Server run with

                  a different user id than those used by the other web servers on the machine.

                  The Administration Server user is the only user able to write web server

                  configuration files.  If the iWS Administration Server is run as "root",

                  the administration GUI can be used to start and stop web servers.


                  Run iWS Administration Server as [root]:
|
12 iWS Administration ServerにアクセスするためのユーザーID、パスワードを設定します
                                               Sun-Netscape Alliance

                                  iPlanet Web Server Installation/Uninstallation

                  ---------------------------------------------------


                  The iWS Administration Server requires its own administrative user name

                  and password for GUI access.  When you access the iWS Administration Server

                  GUI, it will prompt you for the administrative user name and password.

                  Please select a user name and password now.


                  iWS Admin Server User Name [admin]:


                  iWS Admin Server Password:

                  iWS Admin Server Password (again):
|
13 iWS Administration Serverが使うポートを設定します
Sun-Netscape Alliance

                                  iPlanet Web Server Installation/Uninstallation

                  ---------------------------------------------------


                  The iWS Administration Server also listens to a different port (with

                  restricted access).  Pick a port number between 1024 and 65535 on which

                  to run your iWS Administration Server.  It must be different than the

                  Mission Control Admin Port and your web server port.


                  iWS Admin Server Port [8888]:
|
14 Web Serverのポートを設定します
                                               Sun-Netscape Alliance

                                  iPlanet Web Server Installation/Uninstallation

                  ---------------------------------------------------


                  Pick a port number between 1024 and 65535 on which to run your Web Server.

                  You should NOT use a port number on which you plan to run other servers.


                  Web Server Port [80]:
|
15 Web Serverのコンテントルートを設定します
                                               Sun-Netscape Alliance

                                  iPlanet Web Server Installation/Uninstallation

                  ---------------------------------------------------


                  Enter content root for the Web Server.


                  Web Server Content Root [/usr/iplanet/servers/docs]:
|
16 事前にインストールしたJDKを使うようにします
Sun-Netscape Alliance

                                  iPlanet Web Server Installation/Uninstallation

                  ---------------------------------------------------


                  Java support in the Web Server requires either a Java Runtime

                  Environment (JRE) or a Java Development Kit (JDK) of version 1.2 or

                  greater.


                  While a default JRE is provided, you may use any JDK with the Web Server.


                  Do you want to use your own JDK [No]: yes
|
17 JDKのディレクトリを設定します
Sun-Netscape Alliance

                                  iPlanet Web Server Installation/Uninstallation

                  ---------------------------------------------------


                  Java support in the Web Server requires either a Java Runtime

                  Environment (JRE) or a Java Development Kit (JDK) of version 1.2 or

                  greater.


                  You have either opted to use your own JDK or decided not to install

                  the default JRE, in which case you must provide your own JDK.  Please

                  enter the absolute path to your JDK directory.


                  JDK Directory: /usr/java/jdk1.3.1_02
|
18 JDKのライブラリパスを設定します。JDKのディレクトリ構成を特殊なものにしていなければ、ブランクのままで結構です
                                               Sun-Netscape Alliance

                                  iPlanet Web Server Installation/Uninstallation

                  ---------------------------------------------------


                  On most systems, the JDK libraries can be found in the /jre/lib

                  subdirectory of the JDK directory.  Unless your system has special

                  requirments, hit enter and leave this entry blank.


                  JDK LIBPATH:
|
19 JDKのクラスパスを設定します。JDKのディレクトリ構成を特殊なものにしていなければ、ブランクのままで結構です
                                               Sun-Netscape Alliance

                                  iPlanet Web Server Installation/Uninstallation

                  ---------------------------------------------------


                  On most systems, the classes for the JDK libraries can be found in the

                  /lib subdirectory of the JDK directory.  Unless your system has special

                  requirments, hit enter and leave this entry blank.


                  JDK CLASSPATH:
|
20 [Enter]を押し、インストールを終了します
Extracting Java Runtime Environment...

                  Extracting Java Support...

                  Extracting SNMP Support...

                  Extracting Upgrade Files...


                  Server Core installed successfully.

                  Java Runtime Environment installed successfully.

                  Java Support installed successfully.

                  SNMP Support installed successfully.


                  Press Return to continue...


                  Go to /usr/iplanet/servers and type startconsole to begin

                  managing your servers.
[root@testsrv iwsinstall]#
|
21 iWS Administration Serverのディレクトリ(この例では /usr/iplanet/servers/https-admserv)に移り、startを実行して、iWS
Administration Serverを起動します
[root@testsrv
                  https-admserv]# ./start

                  iPlanet-WebServer-Enterprise/6.0SP2 B11/13/2001 03:46

                  warning: daemon is running as super-user

                  [LS ls1] http://testsrv, port 8888 ready to accept requests

                  startup: server started successfully

                  [root@testsrv https-admserv]#
|
22 Web Serverのディレクトリ(この例では/usr/iplanet/servers/https-testsrv)に移り、startを実行して、Web
Serverを起動します
 [root@testsrv
                  https-testsrv]# ./start

                  iPlanet-WebServer-Enterprise/6.0SP2 B11/13/2001 03:46

                  [LS ls1] http://testsrv, port 80 ready to accept requests

                  startup: server started successfully

[root@testsrv https-testsrv]# |
23 ブラウザからポート8888とポート80でアクセスします。画面がそれぞれ以下の画面のように表示されたら、OKです(Administration
Serverへのアクセス時には、12.で設定したユーザーID、パスワードを入力します)
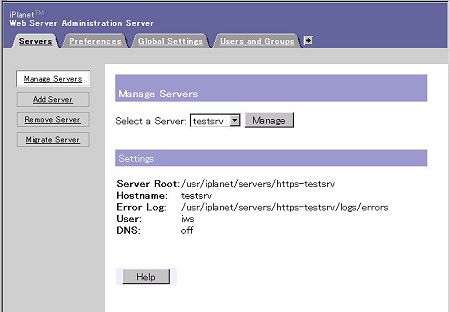 |
| Administratorの画面 |
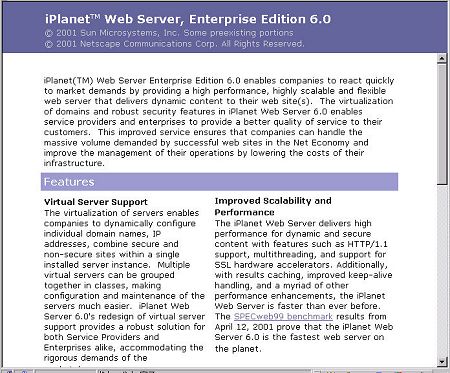 |
| Web Serverの画面 |
|
■Forteのインストールとセットアップ
作業はrootで行います。PDF形式のインストールガイドが http://www.sun.co.jp/software/tools/ffj/documentation/index.htmlから入手できます。な
お、iWSのインストールは事前に済ませておいてください。
1 環境変数JAVA_PATHにJDKのディレクトリを設定します(今回の例では、/usr/java/jdk1.3.1_02
)
2 ダウンロードしたファイルffj-ce-30_ml.noarch.rpmをインストールします。/usr/local/Forte4jディレクトリにインストールされます
3 インストールされたForteを実行します(/usr/local/Forte4j/bin/runide.sh)
4 Forteの以前のバージョンがインストールされていなければ、「いいえ」で「完了」をクリックします
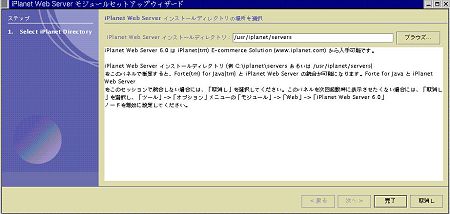
5 iWSがインストールされているディレクトリを指定します
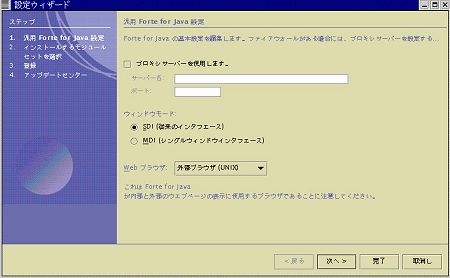
6 外部のInternetアクセスにプロキシを使っているか選択します
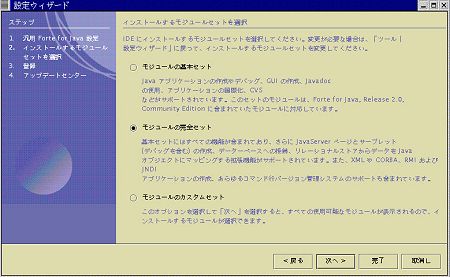
7 インストールするモジュールとして、完全セットを選び、次に進みます
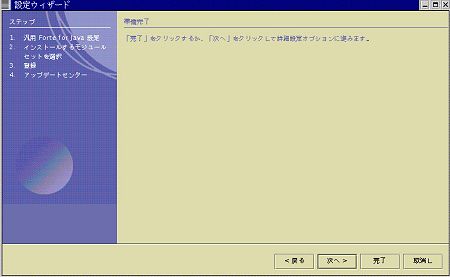
8 次の詳細設定に進みます
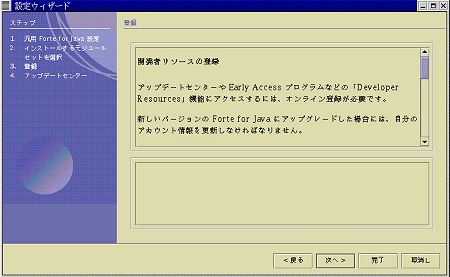
9 登録に関する説明を読み、次へ進みます
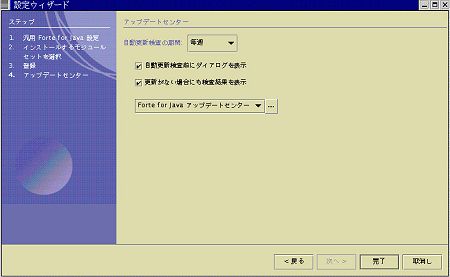
10 Forteの更新に関して設定します
|
これでForteが起動しますので、「開発環境の動作確認」に移ってください。
|
|
3/4 |
 |
|
INDEX
|
|
[検証実験]Webシステム開発の効率化を検証 第1回
|
| |
Page1
Webアプリケーション開発を立ち上げるのは簡単ですか?
困難を乗り越えるには…… |
| |
Page2
Windowsにおける環境構築
iWSのインストール
Forteのインストール |
 |
Page3
Linuxにおける環境構築
iWSのインストール
Forteのインストール |
| |
Page4
開発環境の動作確認 |
| |


