携帯の醍醐味! 位置情報とGoogleマップを使うには:クラウドとフレームワークで超簡単ケータイ開発(3)(3/3 ページ)
Google Static Maps APIで地図画像を表示
それでは、「Google Static Maps API version2」を使用して、Googleマップを表示してみましょう。
まず「com.hayato.gpstweet.service.TwitterService」を以下のように編集します。
TwitterService クラスに地図のデフォルトズームレベルを表す定数「DEFAULT_MAPZOOM」を作成します。次に、GoogleマップのURIを作成するgetMapURI()を作成します。引数に緯度、経度、ツイートの位置情報(markers形式)、ズームレベルを指定します。
次に「com.hayato.gpstweet.controller.twitter.ShowController」を以下のように編集します。GoogleマップのURIを作成するcreateMap()メソッドを追加します。
……【略】……
    // GoogleMapsの画像URI作成
    private void createMap(Double latitude, Double longitude)
    throws TwitterException {

        // ツイートの位置情報をmarkers形式で取得する
        String tweetLocation = getTweetLocation();
        // ズームレベルをリクエストから取得する
        Integer mapzoom = asInteger("mapzoom");
        // GoogleMapの画像URI作成
        String mapURI =
            service.getMapURI(latitude, longitude, tweetLocation, mapzoom);
        requestScope("mapURI", mapURI);
    }
……【略】……検索結果のツイートから位置情報を取得して、markers形式に変換するためにgetTweetLocation()メソッドを追加します。ズームレベルは、リクエストに持たせ、そこから取得します。
……【略】……
    // ツイートの位置情報をmarkers形式で取得する
    private String getTweetLocation() {
        List tweetList = requestScope("tweets");
        // ツイートの位置情報をmarkers形式にする
        String tweetLocation = "";
        for (int i = 0; i < tweetList.size(); i++) {
            Tweet tweet = tweetList.get(i);
            if (tweet.getGeoLocation() != null) {
                tweetLocation +=
                    "&markers=label:" + i + "|size:mid|color:red|"
                        + tweet.getGeoLocation().getLatitude() + ","
                        + tweet.getGeoLocation().getLongitude() + "&";
            }
        }
        return tweetLocation;
    }
……【略】…… tweet.getGeoLocation()メソッドでツイートの位置情報が取得できます。labelに数字を指定したmarkers形式に変換します。
run()にズームレベルをリクエストに保存するロジックを追加し、処理の最後に、createMap()を呼び出し、Googleマップを作成するようにします。
……【略】……
    // 位置情報による検索
    @Override
    public Navigation run() throws Exception {
        Double latitude, longitude;
        // ズームレベル(デフォルト値を設定)
        Integer mapzoom = TwitterService.DEFAULT_MAPZOOM;

        // 位置情報を取得していない場合
        if (requestScope("latitude") == null) {
            Gps gps = getGps();
            latitude = gps.getLat();
            longitude = gps.getLon();
            // 位置情報をリクエストに保存する
            requestScope("latitude", latitude);
            requestScope("longitude", longitude);
            // ズームレベルをリクエストに保存する
            requestScope("mapzoom", mapzoom);
        } else {
            // リクエストから位置情報を取得する
            latitude = asDouble("latitude");
            longitude = asDouble("longitude");
        }

        // 位置情報を指定して、TwitterServiceを呼び出す
        List<Tweet> tweetList =
            service.search(latitude, longitude).getTweets();
        requestScope("tweets", tweetList);

        // GoogleMapsの画像URI作成
        createMap(latitude, longitude);

        return forward("show.jsp");
}……【略】……JSPファイル「war/twitter/show.jsp」を以下のように編集します。
……【略】……
<body style="border: 2px solid black;">
<div style="background: none repeat scroll 0% 0% #87CEFA;">
  <br>
  <table border="0" cellpadding="0" cellspacing="0">
  <tbody>
  <tr>
    <td valign="top">
      <img src="${mapURI}">
    </td>
  </tr>
  </tbody>
  </table>
  <br>
  <form method="post" action="tweet" style="margin: 0pt; padding: 0pt;">
……【略】……<form>タグの前にGoogleマップを表示するために<img>タグを配置します。srcに先ほどの「${mapURI}」を指定します。
……【略】……
  <form method="post" action="tweet" style="margin: 0pt; padding: 0pt;">
    <input name="latitude" value="${latitude}" type="hidden">
    <input name="longitude" value="${longitude}" type="hidden">
    <input name="mapzoom" value="${mapzoom}" type="hidden">
……【略】……<form>タグのhidden項目に「${mapzoom}」を保持します。
……【略】……
    <td style="padding: 5px;">
      <c:url value="/twitter/show" var="url" >
        <c:param name="latitude" value="${latitude}"/>
        <c:param name="longitude" value="${longitude}"/>
        <c:param name="mapzoom" value="${mapzoom}"/>
      </c:url>
      0.<a href="${url}" accesskey="0">更新</a>
    </td>
……【略】……更新やタイムラインのリンクにも、URLパラメータとして、「${mapzoom}」を設定します。
……【略】……
      1.<a href="${url}" accesskey="1">タイムライン</a>
    </td>
  </tr>
  <tr>
    <td style="padding: 5px;">
      <c:url value="/twitter/show" var="url" >
        <c:param name="latitude" value="${latitude}"/>
        <c:param name="longitude" value="${longitude}"/>
        <c:param name="mapzoom" value="${mapzoom+1}"/>
      </c:url>
      *.<a href="${url}" accesskey="*">拡大</a>
    </td>
    <td style="padding: 5px;">
      <c:url value="/twitter/show" var="url" >
        <c:param name="latitude" value="${latitude}"/>
        <c:param name="longitude" value="${longitude}"/>
        <c:param name="mapzoom" value="${mapzoom-1}"/>
      </c:url>
      #.<a href="${url}" accesskey="#">縮小</a>
    </td>
  </tr>
……【略】……タイムラインのリンクの後に、地図の拡大、縮小のリンクを作成します。「com.hayato.gpstweet.controller.twitter.TimelineController」を以下のように編集します。
……【略】……
    @Override
    public Navigation run() throws Exception {
        // タイムラインの取得
        List<Status> statusList = service.getTimeline();
        requestScope("tweets", statusList);
        // リクエストから位置情報を取得する
        Double latitude = asDouble("latitude");
        Double longitude = asDouble("longitude");
        // GoogleMapsの画像URI作成
        createMap(latitude, longitude);
        return forward("show.jsp");
    }
……【略】……}TimelineControllerクラスでも同様にGoogleマップを作成します。
……【略】……
    // ツイートの位置情報をmarkers形式で取得する
    private String getTweetLocation() {
        List<Status> statusList = requestScope("tweets");
        // ツイートの位置情報をmarkers形式にする
        String tweetLocation = "";
        for (int i = 0; i < statusList.size(); i++) {
            Status status = statusList.get(i);
            if (status.getGeoLocation() != null) {
                tweetLocation +=
                    "&markers=label:" + i + "|size:mid|color:red|"
                        + status.getGeoLocation().getLatitude() + ","
                        + status.getGeoLocation().getLongitude() + "&";
            }
        }
        return tweetLocation;
    }
……【略】……}タイムラインは、Statusクラスから位置情報を取得します。
……【略】……
    @Override
    public Navigation run() throws Exception {

……【略】……

        // 位置情報をURLパラメータに設定して、ShowControllerにリダイレクトさせる
        Object[] data = new String[]{
            requestScope("latitude"),
            requestScope("longitude"),
            requestScope("mapzoom"),
            };
        String url = MessageFormat.format(
            "show?latitude={0}&longitude={1}&mapzoom={2}", data);
        return redirect(url);
……【略】……ShowControllerにリダイレクトさせる際に、mapzoomも設定するよう修正します。
モバイルの新時代を創りあげよう!
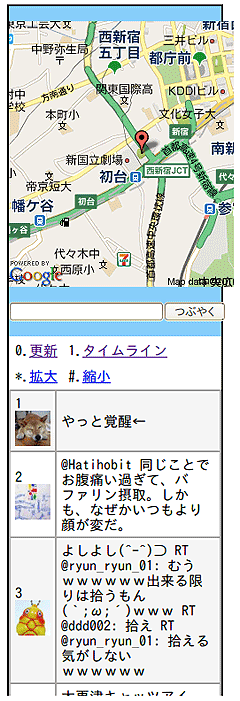
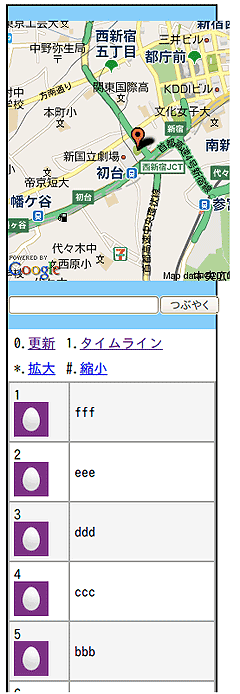
以上で完成です。以下、完成時の画面イメージです。
今回作成したサンプルのソースコードを「gpstweet - Project Hosting on Google Code」で公開しています。またアプリ自体は、Google App Engine上にデプロイしてあるので、触ってみてください。このアプリからつぶやいたツイートは、@gpstweetに反映されます。
本連載では3回にわたり、ケータイでTwitterの位置情報と地図を使ったサービスを一通り作ってみましたが、いかがでしたでしょうか。
Mobyletにより、簡単にケータイサイトが作れ、Twitter4jで簡単にTwitterと連携でき、Slim3を使用して、簡単にGoogle App Engineのクラウド上でアプリケーションが構築できることが実感していただければ幸いです。
ぜひ、皆さんもケータイサイトの構築にチャレンジしてみてください。これからは、ケータイやスマートフォンの時代です。皆さんで新しい時代を創りあげましょう!
関連記事
- クラウドで動くGPS連動スマホ用Webアプリを作る
たぶん1時間でできるマッシュアップ講座 - 位置情報を取得する仕組み
連載:位置情報を使ってみよう(1) - iPhoneで動かす業務用Webアプリ開発入門
- 携帯アプリを作って学ぶJava文法の基礎
Copyright © ITmedia, Inc. All Rights Reserved.

 図5 地図表示
 図6 タイムライン表示


