選択した画像をトリミングして保存・削除・一括削除するには:2カ月で160本作った還暦開発者が送る10のアプリ開発ノウハウ(3)(2/4 ページ)
コントロールのレイアウト(MainPage.xaml)
ここでは、メイン画面でツールボックスからデザイン画面上に、ツールボックスから各コントロールを配置する。
今回、広告を表示させるために使用している「AdControl」についての解説は割愛する。また別な機会に詳細を解説したいと思う。よって今回は広告に関しては無視してほしい。
書き出されるXAMLコードは下記のようになる。
<Page
    xmlns="http://schemas.microsoft.com/winfx/2006/xaml/presentation"
    xmlns:x="http://schemas.microsoft.com/winfx/2006/xaml"
    xmlns:local="using:ImageTriming"
    xmlns:d="http://schemas.microsoft.com/expression/blend/2008"
    xmlns:mc="http://schemas.openxmlformats.org/markup-compatibility/2006"
    xmlns:UI="using:Microsoft.Advertising.WinRT.UI"
    x:Class="ImageTriming.MainPage"
    mc:Ignorable="d">
    <Viewbox>■(1)
       <Grid>
            <Grid  Background="Transparent" VerticalAlignment="Top" HorizontalAlignment="Left" ManipulationStarted="ContentPanel_ManipulationStarted" ManipulationDelta="ContentPanel_ManipulationDelta" ManipulationMode="All" Margin="0,60,0,0">■(2)
                <Border Width="640" Height="480" BorderThickness="1" BorderBrush="White">■(3)
                    <Image  x:Name="Image1"  Width="640" Height="480" Stretch="None"  Margin="0,2,0,-2"/>■(3)
                </Border>■(3)
                <Rectangle x:Name="Rectangle1" Visibility="Collapsed" HorizontalAlignment="Left" VerticalAlignment="Top"  StrokeDashArray="2,2" Stroke="Yellow" StrokeThickness="3"  Fill="#20000000"  ManipulationDelta="Rectangle1_ManipulationDelta"  ManipulationStarted="Rectangle1_ManipulationStarted" ManipulationMode="All"/>■(3)
            </Grid>■(2)
            <Button x:Name="Button1" Content="切り出す" HorizontalAlignment="Left" Height="63" Margin="23,549,0,0" VerticalAlignment="Top" Width="198" FontFamily="Meiryo UI" FontSize="36"/>■(4)
            <Button x:Name="imageSelectButton" Content="画像選択" HorizontalAlignment="Left" Height="63" Margin="226,549,0,0" VerticalAlignment="Top" Width="198" FontFamily="Meiryo UI" FontSize="36"/>■(4)
            <StackPanel Margin="666,107,10,167" Orientation="Horizontal">
                <Image x:Name="resultImage" HorizontalAlignment="Left"   VerticalAlignment="Top"  Stretch="None"/>■(5)
                <AppBarButton x:Name="saveButton" Icon="Save" Label="保存" HorizontalAlignment="Left" Height="90"  VerticalAlignment="Top" Width="84"   IsEnabled="False" />■(6)
            </StackPanel>
            <ScrollViewer HorizontalAlignment="Left" Height="141" Margin="10,617,0,0" VerticalAlignment="Top" Width="1346" HorizontalScrollBarVisibility="Visible">■(7)
                <GridView Height="120" Width="1336" FlowDirection="LeftToRight" x:Name="GridView1"/>■(7)
            </ScrollViewer>■(7)
            <AppBarButton x:Name="deleteButton" Icon="Delete" Label="削除" Margin="433,549,0,0"/>■(8)
            <AppBarButton x:Name="allDeleteButton" Icon="Delete" Label="一括削除" Margin="509,549,0,138"  Width="80"/>■(8)
            <TextBlock HorizontalAlignment="Left" Height="45" Margin="23,10,0,0" TextWrapping="Wrap" Text="画像のトリミング" VerticalAlignment="Top" Width="368" FontFamily="Meiryo UI" FontSize="36" FontWeight="Bold" Foreground="Crimson"/>■(9)
            <UI:AdControl ApplicationId="8377ae29-8082-4035-be1e-7e5737cbe26d" AdUnitId="10056643" HorizontalAlignment="Left" Height="90" Margin="640,2,-11,0" VerticalAlignment="Top" Width="728"/>
        </Grid>
    </Viewbox>■(1)
</Page>
以上、全てをレイアウトしたのが図6になる。
以降は、ソースコードに割り振った番号ごとに詳細に見ていこう。
(1)
Grid要素全体をViewBox要素で囲む。ViewBox要素は、伸縮およびスケーリングを実行して単一の子を使用可能な領域全体に引き伸ばせるコンテンツ・デコレータを定義する。
(2)
Grid要素を配置し、GridコントロールのBackgroundには「Transparent」を指定する。Backgroundに何も指定していないと、タッチのイベントが拾えないので、注意してほしい。
また、ユーザーがタッチ操作を開始した時に発生する、ManipulationStartedに「ContentPanel_ManipulationStarted」イベントハンドラを関連付け、ユーザーが指を動かしてタッチ操作に変化が生じたときに発生するManipulationDeltaに「ContentPanel_ManipulationDelta」イベントハンドラを関連付ける。
UIElementのBehaviorとジェスチャーの相互作用を使用するための値を設定する、ManipulationModeプロパティには「All(すべての相互作用のモードを有効にする)」を指定。ManipulationModeプロパティの値については下記のURLを参照してほしい。
(3)
Grid要素の子要素としてImageとRectangle要素を配置する。名前が「Image1」というImage要素をBorder要素でくくり、周囲に白い枠線を描く。
名前が「Rectangle1」というRectangle要素にも、ユーザーが指を動かしてタッチ操作に変化が生じたときに発生するManipulationDeltaに「Rectangle1_ManipulationDelta」イベントハンドラを関連付ける。
ユーザーがタッチ操作を開始した時に発生するManipulationStartedに「Rectangle1_ManipulationStarted」イベントハンドラを関連付ける。
ManipulationModeプロパティにも「All」を指定。StrokeDashArrayプロパティには"2,2"と指定して描かれる矩形を破線で表示する。Visibilityに「Collaspsed」を指定して、最初は非表示としている。
(4)
名前が「Button1」という「切り出す」用のButton要素を配置し、名前が「ImageSelectButton」という、「画像選択」ボタンを配置する
(5)
矩形で選択された範囲を切り出して表示する、名前が「resultImage」というImage要素を配置する。
(6)
名前が「saveButton」というAppBarButton要素を配置する。この「保存」アイコンは最初の状態では使用不可としている。
VS 2012では、Styleプロパティで、StaticResourceを使ってソリューション・エクスプローラー内のCommonフォルダー内にあるStandardStyles.xamlの中のスタイルを参照していた。しかしVS 2013では、このStandardStyles.xamlはなくなり、ツールボックスにあるAppBarButtonを使うようになる(図7)。
デザイン画面上に、ツールボックスからAppBarButtonをドラッグ&ドロップし、プロパティで、[名前]に「saveButton」と指定し、[アイコン]パネルを展開し、[Symbol]の一覧から「Save」を選択する。[共通]パネル内の[Label]に「保存」と指定する(図8)。
これ以降のアイコンの指定についても、この作業と同じことを行う。[Symbol]に各種アイコンが登録されているので、その中から必要なアイコンを選択する。
(7)
ScrollViewer要素を配置し、その子要素として名前が「GridView1」というGridView要素を配置する。
(8)
AppbarButton要素を2つ配置し、名前に「deleteButton」「allDeleteButton」と指定し、プロパティのSymbolに「Delete」を指定し、Labelに「削除」と「一括削除」と指定する。
(9)
タイトルとなるTextBlock要素を配置する。
Copyright © ITmedia, Inc. All Rights Reserved.

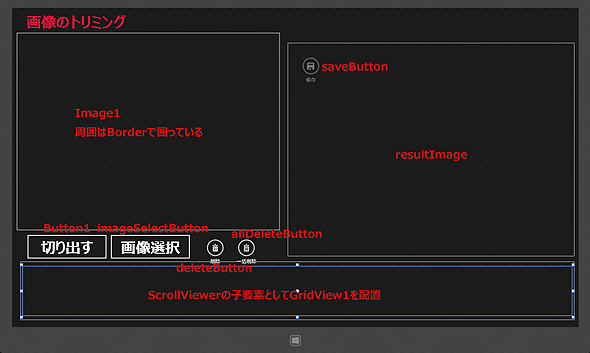
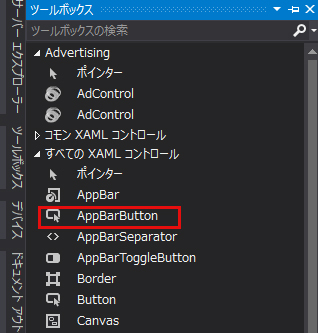 図7 「ツールボックス」内のAppBarButtonコントロール
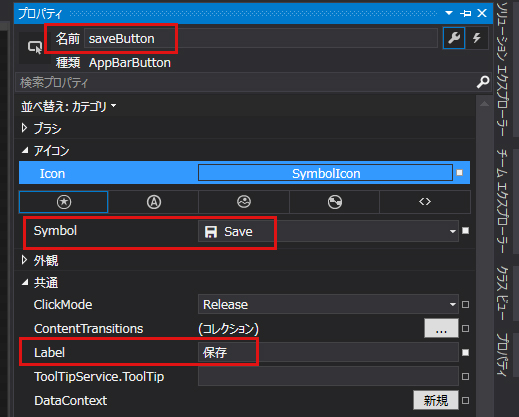 図8 「AppBarButton」のプロパティを設定する

