iOS 4のSDKで、Twitterを使ったiPhoneアプリを作る:SDKで始めるiPad/iPhoneアプリ開発の勘所(4)(2/4 ページ)
非同期通信を行う「NSURLConnection」クラス
まずは、Twitterにアクセスしてデータ取得を行います。Cocoa Touchフレームワークには、「NSURLConnection」という通信用のクラスが用意されており、このクラスは「同期通信」「非同期通信」という2種類の通信が可能です。
同期通信では、NSURLConnectionを呼び出した側が通信完了まで次の処理に遷移できません。この間は、ユーザーの画面操作にも反応できないため、画面が固まってしまいます。
一方、非同期通信ではNSURLConnectionを呼び出した側は通信完了を待たずに、次の処理に移ります。タイミングをずらして後から返ってくる通信結果を受け取る仕組みを作る必要があるため、同期通信に比べ実装量は増えてしまいますが、ユーザーは通信中に画面のスクロールやキャンセルが行えるようになります。そのため、ユーザーにとっては非同期通信の方が使いやすいアプリといえるでしょう。
今回のTwitterViewerでは非同期通信でTwitterから指定ユーザーのつぶやきを取得するようにします。
新規クラスを作成
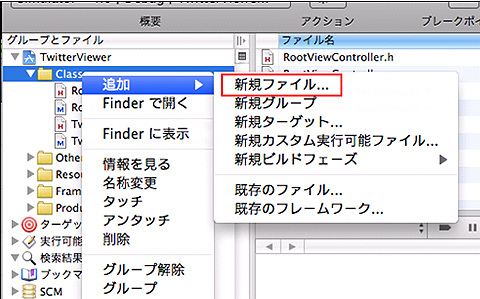
それでは、NSURLConnectionを利用して非同期通信を行う新規クラスを作成しましょう。[Classes]を右クリック→[追加]→[新規ファイル]をクリックします。
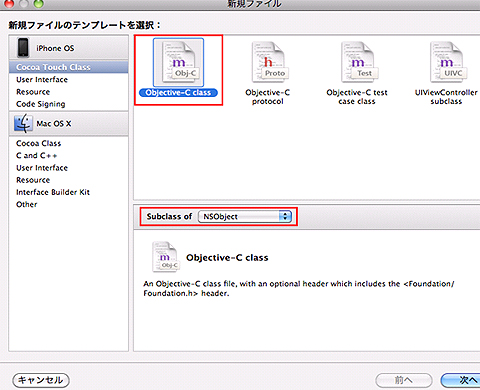
[新規ファイル]ウィンドウで[Objective-C class]、[Subclass of]には[NSObject]を選択して、[次へ]をクリックします。
[ファイル名]を「URLLoader.m」として、[完了]をクリックします。

インターフェイスファイル
プロジェクトに追加されたインターフェイスファイル「URLLoader.h」を以下のように編集します。
#import <Foundation/Foundation.h>

@interface URLLoader : NSObject {
    NSURLConnection *connection;
    NSMutableData   *data;
}

@property(retain, nonatomic) NSURLConnection *connection;
@property(retain ,nonatomic) NSMutableData *data;

- (void) loadFromUrl: (NSString *)url method:(NSString *) method;

@end
URLLoder.hは、NSURLConnectionのインスタンスであるconnectionプロパティと、受信したデータを格納するためのdataプロパティを持っています。
実装ファイル
次に、実装ファイル「URLLoder.m」を以下のように編集します。
#import "URLLoader.h"

@implementation URLLoader

@synthesize connection;
@synthesize data;

// (1)
- (void) connection:(NSURLConnection *)connection
             didReceiveResponse:(NSURLResponse *)response {
    self.data = [NSMutableData data];
}

// (2)
-(void) connection:(NSURLConnection *)connection
            didReceiveData:(NSData *)receiveData {
    [self.data appendData:receiveData];
}

// (3)
- (void) connectionDidFinishLoading:(NSURLConnection *)connection {
    [[NSNotificationCenter defaultCenter]
              postNotificationName: @"connectionDidFinishNotification"
                            object: self];
}

// (4)
- (void) connection:(NSURLConnection *)connection
             didFailWithError:(NSError *)error {
    [[NSNotificationCenter defaultCenter]
              postNotificationName: @"connectionDidFailWithError"
                            object: self];
}

// (5)
- (void) loadFromUrl: (NSString *)url method: (NSString *) method {
    NSMutableURLRequest *req =
                  [NSMutableURLRequest requestWithURL:[NSURL URLWithString:url]];
    [req setHTTPMethod:method];
    self.connection = [NSURLConnection connectionWithRequest:req delegate:self];
}

- (void)dealloc {
    [connection release];
    [data release];
    [super dealloc];
}

@end
(1)〜(4)はNSURLConnectionのデリゲート(委譲)処理です。NSURLConnectionのデリゲートプロトコルであるNSURLConnectionDelegateは、NSObjectの非形式プロトコルとして宣言されています。このため、NSObjectのサブクラスであるURLLoaderにデリゲートメソッドを実装するだけでNSURLConnectionのデリゲートとして機能します。
- (1)connection: didReceiveResponse
最初のレスポンス受信時に1回だけ呼ばれ、受信処理の初期化などを行います。サンプルでは受信データの格納先であるNSMutableDataインスタンスを初期化しています。
- (2)connection: didReceiveData
データ受信時に呼ばれます。ここで受け取るデータは受信途中の断片的なデータです。通信が終わるまでに何度も呼ばれます。そのため、サンプルでは通信が終わるまで フィールドのNSMutableDataに受信データを累積させています。
- (3)connectionDidFinishLoading
通信完了時に1回だけ呼ばれます。サンプルで行っている処理については後述します。
- (4)connection: didFailWithError
通信エラー発生時に呼ばれます。サンプルで行っている処理については後述します。
- (5)loadFromUrl
URLLoaderクラスが、ほかのクラスから利用される際に呼ばれるメソッドです。NSURLConnectionインスタンスのデリゲートとしてURLLoaderのインスタンス自身を設定し、初期化しています。NSURLConnectionでは、connectionWithRequest:delegateメソッドで初期化を行った場合、特に開始メソッドなどを呼ばなくても、非同期通信が開始します。
呼び出し
URLLoaderクラスの実装が完了したら、次はRootViewControllerから呼び出してみましょう。まず、RootViewController.mにURLLoader.hをインポートします。
#import "URLLoader.h"
さらに以下の3つのメソッドを追加します。
// (6)
- (void) loadTimeLineByUserName: (NSString *) userName {
    static NSString *urlFormat = @"http://twitter.com/status/user_timeline/%@.xml";

    NSString *url = [NSString stringWithFormat:urlFormat, userName];

    URLLoader *loder = [[[URLLoader alloc] init] autorelease];

    [[NSNotificationCenter defaultCenter] addObserver: self
                                             selector: @selector(loadTimeLineDidEnd:)
                                                 name: @"connectionDidFinishNotification"
                                               object: loder];

    [[NSNotificationCenter defaultCenter] addObserver: self
                                             selector: @selector(loadTimeLineFailed:)
                                                 name: @"connectionDidFailWithError"
                                               object: loder];

    [UIApplication sharedApplication].networkActivityIndicatorVisible = YES;

    [loder loadFromUrl:url method: @"GET"];
}

// (7)
- (void) loadTimeLineDidEnd: (NSNotification *)notification {
    URLLoader *loder = (URLLoader *)[notification object];
    NSData *xmlData = loder.data;

    NSLog(@"%@", [[NSString alloc] initWithData:xmlData encoding:NSUTF8StringEncoding]);
}

// (8)
- (void) loadTimeLineFailed: (NSNotification *)notification {

    UIAlertView *alert = [[UIAlertView alloc]
                          initWithTitle:@"エラー"
                                message:@"タイムラインの取得に失敗しました。"
                               delegate:self
                      cancelButtonTitle:@"閉じる"
                      otherButtonTitles:nil];
    [alert show];
    [alert release];
}
(6)loadTimeLineByUserNameメソッドでは、タイムライン取得開始処理を行っています。
static NSString *urlFormat = @"http://twitter.com/status/user_timeline/%@.xml";
ここで宣言した文字列は、指定したユーザーのタイムラインをXMLで取得するためのTwitterが提供しているURLフォーマットです。「%@」部分を取得したいユーザーのユーザー名に変えてリクエストを送ると、そのユーザーのタイムラインがXMLで取得できます。
Copyright © ITmedia, Inc. All Rights Reserved.
アイティメディアからのお知らせ


注目のテーマ

編集部からのお知らせ
![]() ITmediaはアイティメディア株式会社の登録商標です。
ITmediaはアイティメディア株式会社の登録商標です。