Visual Studio 2010でデータベース開発:特集:Visual Studio 2010で社内C/Sシステム開発(後編)(3/4 ページ)
●「詳細」における既存データの移動
以上で、ユーザーの新規登録は行えるようになったが、既存のユーザーを修正することはできない。そこでそれに対応するために、リボン・インターフェイスに[先頭][前へ][次へ][末尾][削除]などのボタンを追加し、既存のデータを前後に移動できるようにしよう。また、既存データを修正/削除できる状態(以降、編集モード)から、新規登録が行える状態(以降、新規登録モード)に戻れるように、[新規登録]ボタンも同様に追加する。
○リボン・タブとリボン・ボタンの実装
リボン・インターフェイスを実装するために、MainWindow.xamlファイルを開き、名前が「TabUserEntry」のリボン・タブ(=<r:RibbonTab x:Name="TabUserEntry">要素)を、下記のコードに書き直す。
……省略……
<r:RibbonTab x:Name="TabUserEntry"
Header="基本操作" Visibility="Hidden">
<r:RibbonGroup x:Name="GroupAddUserEntry"
Header="登録作業">
<r:RibbonButton x:Name="ButtonAddUserEntry"
Label="新規登録"
LargeImageSource="Images\Add.png" />
</r:RibbonGroup>
<r:RibbonGroup x:Name="GroupEditUserEntry"
Header="編集作業">
<r:RibbonButton x:Name="ButtonFirstUserEntry"
Label="先頭"
LargeImageSource="Images\First.png" />
<r:RibbonButton x:Name="ButtonPrevUserEntry"
Label="前へ"
LargeImageSource="Images\Prev.png" />
<r:RibbonButton x:Name="ButtonNextUserEntry"
Label="次へ"
LargeImageSource="Images\Next.png" />
<r:RibbonButton x:Name="ButtonLastUserEntry"
Label="末尾"
LargeImageSource="Images\Last.png" />
</r:RibbonGroup>
<r:RibbonGroup x:Name="GroupDelUserEntry"
Header="削除作業">
<r:RibbonButton x:Name="ButtonDelUserEntry"
Label="削除"
LargeImageSource="Images\Del.png" />
</r:RibbonGroup>
</r:RibbonTab>
……省略……
各ボタンに使用している.png画像(32×32ピクセル)は、PowerPointを使って自作して、[ソリューション エクスプローラー]内の「Images」フォルダに入れた。下記のリンクからダウンロードできる。
○リボン・ボタンのClickイベント・ハンドラ
作成した各ボタンのClickイベント・ハンドラを[ユーザー登録]コンテンツ(=ContetUserEntry.xaml.cs/.vbファイル)に追加し、それぞれのメソッド内に適切な処理を実装する。今回の例では、下記のようなコードになる。
using System;
using System.ComponentModel;
using System.Data;
using System.Windows;
using System.Windows.Controls;
using System.Windows.Data;
using ObentoApp.ObentoDataSetTableAdapters;
……省略……
private MainWindow main; // メイン・ウィンドウ
public ContetUserEntry()
{
InitializeComponent();
// MainWindowを取得
main = (MainWindow)Application.Current.MainWindow;
// 各リボン・ボタンのイベント・ハンドラを追加
main.ButtonAddUserEntry.Click +=
new RoutedEventHandler(ButtonAddUserEntry_Click);
main.ButtonFirstUserEntry.Click +=
new RoutedEventHandler(ButtonFirstUserEntry_Click);
main.ButtonPrevUserEntry.Click +=
new RoutedEventHandler(ButtonPrevUserEntry_Click);
main.ButtonNextUserEntry.Click +=
new RoutedEventHandler(ButtonNextUserEntry_Click);
main.ButtonLastUserEntry.Click +=
new RoutedEventHandler(ButtonLastUserEntry_Click);
main.ButtonDelUserEntry.Click +=
new RoutedEventHandler(ButtonDelUserEntry_Click);
}
private void ButtonAddUserEntry_Click(object sender, RoutedEventArgs e)
{
myCVS.View.MoveCurrentTo(null);
ChangeButtonState();
}
private
void ButtonFirstUserEntry_Click(object sender, RoutedEventArgs e)
{
myCVS.View.MoveCurrentToFirst();
ChangeButtonState();
}
private void ButtonPrevUserEntry_Click(object sender, RoutedEventArgs e)
{
if (myCVS.View.CurrentPosition == -1)
{
// 新規登録モードから編集モードへ変更された場合
myCVS.View.MoveCurrentToLast();
}
else if (myCVS.View.CurrentPosition > 0)
{
myCVS.View.MoveCurrentToPrevious();
}
ChangeButtonState();
}
private void ButtonNextUserEntry_Click(object sender, RoutedEventArgs e)
{
if (myCVS.View.CurrentPosition == -1)
{
// 新規登録モードから編集モードへ変更された場合
myCVS.View.MoveCurrentToLast();
}
else if (myCVS.View.CurrentPosition < ((CollectionView)myCVS.View).Count - 1)
{
myCVS.View.MoveCurrentToNext();
}
ChangeButtonState();
}
private void ButtonLastUserEntry_Click(object sender, RoutedEventArgs e)
{
myCVS.View.MoveCurrentToLast();
ChangeButtonState();
}
private void ButtonDelUserEntry_Click(object sender, RoutedEventArgs e)
{
e.Handled = true;
if (MessageBox.Show("現在のデータを1件、削除します。OKでしょうか?",
"確認", MessageBoxButton.OKCancel, MessageBoxImage.Question,
MessageBoxResult.Cancel) == MessageBoxResult.Cancel)
return;
if (myCVS.View.CurrentPosition == -1)
{
return;
}
// 現在のUserデータ行を削除
((DataRowView)myCVS.View.CurrentItem).Row.Delete();
// Userテーブルアダプタで、削除データをデータベースに反映
try
{
myTA.Update(myDS.User);
}
catch (DBConcurrencyException de)
{
MessageBox.Show("削除に失敗しました。すでに誰かによって削除されたようです。\n" + de.Message);
return;
}
catch (Exception ex)
{
MessageBox.Show("エラーが発生しました。\n" + ex.Message);
return;
}
// コレクションビューを更新
myCVS.View.Refresh();
ChangeButtonState();
}
private void ChangeButtonState()
{
// 新規登録モードの場合
ButtonAdd.Content = "登録";
if (myCVS.View.CurrentPosition == -1)
{
bool existUser = (((CollectionView)myCVS.View).Count > 0);
main.ButtonFirstUserEntry.IsEnabled = existUser;
main.ButtonPrevUserEntry.IsEnabled = existUser;
main.ButtonNextUserEntry.IsEnabled = existUser;
main.ButtonLastUserEntry.IsEnabled = existUser;
main.ButtonAddUserEntry.IsEnabled = false;
main.ButtonDelUserEntry.IsEnabled = false;
return;
}
// 編集モードの場合
ButtonAdd.Content = "更新";
main.ButtonAddUserEntry.IsEnabled = true;
main.ButtonDelUserEntry.IsEnabled = true;
bool existPrev = (myCVS.View.CurrentPosition > 0);
main.ButtonFirstUserEntry.IsEnabled = existPrev;
main.ButtonPrevUserEntry.IsEnabled = existPrev;
int count = ((CollectionView)myCVS.View).Count;
bool existNext = (myCVS.View.CurrentPosition < count - 1);
main.ButtonNextUserEntry.IsEnabled = existNext;
main.ButtonLastUserEntry.IsEnabled = existNext;
}
……省略……
Imports System.ComponentModel
Imports System.Data
Imports ObentoApp.ObentoDataSetTableAdapters
……省略……
Private main As MainWindow // メイン・ウィンドウ
Public Sub New()
InitializeComponent()
// MainWindowを取得
main = CType(Application.Current.MainWindow, MainWindow)
// 各リボン・ボタンのイベント・ハンドラを追加
AddHandler main.ButtonAddUserEntry.Click,
AddressOf ButtonAddUserEntry_Click
AddHandler main.ButtonFirstUserEntry.Click,
AddressOf ButtonFirstUserEntry_Click
AddHandler main.ButtonPrevUserEntry.Click,
AddressOf ButtonPrevUserEntry_Click
AddHandler main.ButtonNextUserEntry.Click,
AddressOf ButtonNextUserEntry_Click
AddHandler main.ButtonLastUserEntry.Click,
AddressOf ButtonLastUserEntry_Click
AddHandler main.ButtonDelUserEntry.Click,
AddressOf ButtonDelUserEntry_Click
End Sub
Private Sub ButtonAddUserEntry_Click(ByVal sender As Object, ByVal e As RoutedEventArgs)
myCVS.View.MoveCurrentTo(Nothing)
ChangeButtonState()
End Sub
Private Sub ButtonFirstUserEntry_Click(ByVal sender As Object, ByVal e As RoutedEventArgs)
myCVS.View.MoveCurrentToFirst()
ChangeButtonState()
End Sub
Private Sub ButtonPrevUserEntry_Click(ByVal sender As Object, ByVal e As RoutedEventArgs)
If myCVS.View.CurrentPosition = -1 Then
// 新規登録モードから編集モードへ変更された場合
myCVS.View.MoveCurrentToLast()
ElseIf myCVS.View.CurrentPosition > 0 Then
myCVS.View.MoveCurrentToPrevious()
End If
ChangeButtonState()
End Sub
Private Sub ButtonNextUserEntry_Click(ByVal sender As Object, ByVal e As RoutedEventArgs)
If myCVS.View.CurrentPosition = -1 Then
// 新規登録モードから編集モードへ変更された場合
myCVS.View.MoveCurrentToLast()
ElseIf myCVS.View.CurrentPosition < (CType(myCVS.View, CollectionView).Count - 1) Then
myCVS.View.MoveCurrentToNext()
End If
ChangeButtonState()
End Sub
Private Sub ButtonLastUserEntry_Click(ByVal sender As Object, ByVal e As RoutedEventArgs)
myCVS.View.MoveCurrentToLast()
ChangeButtonState()
End Sub
Private Sub ButtonDelUserEntry_Click(ByVal sender As Object, ByVal e As RoutedEventArgs)
e.Handled = True
If MessageBox.Show("現在のデータを1件、削除します。OKでしょうか?",
"確認", MessageBoxButton.OKCancel, MessageBoxImage.Question,
MessageBoxResult.Cancel) = MessageBoxResult.Cancel Then
Return
End If
If (myCVS.View.CurrentPosition = -1) Then
Return
End If
// 現在のUserデータ行を削除
CType(myCVS.View.CurrentItem, DataRowView).Row.Delete()
// Userテーブルアダプタで、削除データをデータベースに反映
Try
myTA.Update(myDS.User)
Catch de As DBConcurrencyException
MessageBox.Show("削除に失敗しました。すでに誰かによって削除されたようです。" & vbLf & de.Message)
Return
Catch ex As Exception
MessageBox.Show("エラーが発生しました。" & vbLf & ex.Message)
Return
End Try
// コレクションビューを更新
myCVS.View.Refresh()
ChangeButtonState()
End Sub
Private Sub ChangeButtonState()
// 新規登録モードの場合
ButtonAdd.Content = "登録"
If myCVS.View.CurrentPosition = -1 Then
Dim existUser As Boolean =
(CType(myCVS.View, CollectionView).Count > 0)
main.ButtonFirstUserEntry.IsEnabled = existUser
main.ButtonPrevUserEntry.IsEnabled = existUser
main.ButtonNextUserEntry.IsEnabled = existUser
main.ButtonLastUserEntry.IsEnabled = existUser
main.ButtonAddUserEntry.IsEnabled = False
main.ButtonDelUserEntry.IsEnabled = False
Return
End If
// 編集モードの場合
ButtonAdd.Content = "更新"
main.ButtonAddUserEntry.IsEnabled = True
main.ButtonDelUserEntry.IsEnabled = True
Dim existPrev As Boolean = (myCVS.View.CurrentPosition > 0)
main.ButtonFirstUserEntry.IsEnabled = existPrev
main.ButtonPrevUserEntry.IsEnabled = existPrev
Dim count As Integer = CType(myCVS.View, CollectionView).Count
Dim existNext As Boolean =
(myCVS.View.CurrentPosition < count - 1)
main.ButtonNextUserEntry.IsEnabled = existNext
main.ButtonLastUserEntry.IsEnabled = existNext
End Sub
……省略……
○リボン・ボタンのClickイベント・ハンドラ
また、新規登録だけでなく、既存のデータを編集できるようになったので、ButtonAdd_Clickメソッド内の「myDS.User.AddUserRow(name, dutyPerson)」部分のコードを下記のように書き換える。
……省略……
bool addMode = (myCVS.View.CurrentPosition == -1);
if (addMode)
{ // 新規登録モード
myDS.User.AddUserRow(name, dutyPerson);
}
else
{ // 編集モード
ObentoDataSet.UserRow row =
((DataRowView)myCVS.View.CurrentItem).Row
as ObentoDataSet.UserRow;
row.Name = name;
row.DutyPerson = dutyPerson;
}
……省略……
……省略……
Dim addMode As Boolean = (myCVS.View.CurrentPosition = -1)
If addMode Then // 新規登録モード
myDS.User.AddUserRow(name, dutyPerson)
Else // 編集モード
Dim row As ObentoDataSet.UserRow =
CType(CType(myCVS.View.CurrentItem, DataRowView).Row, ObentoDataSet.UserRow)
row.Name = name
row.DutyPerson = dutyPerson
End If
……省略……
●リソースをアプリケーション全体で共有
最後に、グラデーション・ブラシなどのリソースをアプリケーション全体で共有するようにしよう。
○外部リソース・ディクショナリ・ファイルの作成
共有するリソースは、外部ファイルのリソース・ディクショナリに移す。
外部リソース・ディクショナリ・ファイルを作成するには、[ソリューション エクスプローラー]のプロジェクト項目の右クリック・メニューから[追加]−[リソース ディクショナリ]を実行する。これにより[新しい項目の追加]ダイアログが表示されるので、「AppDictionary.xaml」という[名前]でファイルを作成する。
リソース・ディクショナリの拡張子は「.xaml」だが、UI(=ユーザー・インターフェイス)を構築する、通常の.xamlファイルとは異なる。そこで、[ソリューション エクスプローラー]のプロジェクト項目の下に「Assets」(=資産)という名前のフォルダを作成して、そこにAppDictionary.xamlファイルを移動させよう。
○アプリケーション全体での外部リソース・ディクショナリ・ファイルの共有
この外部リソース・ディクショナリ・ファイルがアプリケーション全体で利用できるように、アプリケーション全体用のXAMLコードである「App.xaml」(C#の場合。VBでは「Application.xaml」)ファイルをコード・エディタで開き、そこにAppDictionary.xamlファイルをリソースとして指定する記述を追加する。具体的には、下記のようなコードを記述する。
<Application x:Class="ObentoApp.App"
xmlns="http://schemas.microsoft.com/winfx/2006/xaml/presentation"
xmlns:x="http://schemas.microsoft.com/winfx/2006/xaml"
StartupUri="MainWindow.xaml">
<Application.Resources>
<ResourceDictionary>
<ResourceDictionary.MergedDictionaries>
<ResourceDictionary Source="Assets/AppDictionary.xaml" />
<!-- アプリケーション レベルのリソースをここに書く -->
</ResourceDictionary.MergedDictionaries>
</ResourceDictionary>
</Application.Resources>
</Application>
○データセットをアプリケーション全体で共有
それでは、まずデータセット(=リソース)を[お弁当登録]/[お弁当一覧]/[ユーザー登録]/[ユーザー一覧]コンテンツ間で共有しよう(これ以外の[お弁当発注]/[注文一覧]コンテンツはそれぞれ独自のデータセットを持たせる)。AppDictionary.xamlファイルを開き、下記の太字部分を記述する。
<ResourceDictionary
xmlns="http://schemas.microsoft.com/winfx/2006/xaml/presentation"
xmlns:x="http://schemas.microsoft.com/winfx/2006/xaml"
xmlns:my="clr-namespace:ObentoApp">
<my:ObentoDataSet x:Key="CommonDataSet" />
</ResourceDictionary>
ここでAppDictionary.xamlファイルの内容を保存しておこう。
さらに(このデータセットを使っている)メイン・ウィンドウや各ユーザー・コントロールのC#/VBコードも修正する。
先ほど示した「新規行を追加するコード例」では、ユーザー・コントロール(=[ユーザー登録]コンテンツ)のLoadedイベント・ハンドラ内で、データセットや各種テーブルアダプタの取得処理を実装していた。これと同様の処理を、メイン・ウィンドウ(=<RibbonWindow>要素)のLoadedイベント・ハンドラ(MainWindow.xaml.cs/.vbファイル)に実装する。次のコードはその例。
public ObentoDataSet ObentoDS; // データセット
public UserTableAdapter UserTA; // Userテーブルアダプタ
public ObentoTableAdapter ObentoTA; // Obentoテーブルアダプタ
public OrderTableAdapter OrderTA; // Orderテーブルアダプタ
……省略……
private void RibbonWindow_Loaded(object sender, RoutedEventArgs e)
{
ObentoDS = ((ObentoDataSet)(this.FindResource("CommonDataSet")));
OrderTA = new OrderTableAdapter();
UserTA = new UserTableAdapter();
ObentoTA = new ObentoTableAdapter();
OrderTA.Fill(ObentoDS.Order);
UserTA.Fill(ObentoDS.User);
ObentoTA.Fill(ObentoDS.Obento);
}
……省略……
Public ObentoDS As ObentoDataSet // データセット
Public UserTA As UserTableAdapter // Userテーブルアダプタ
Public ObentoTA As ObentoTableAdapter // Obentoテーブルアダプタ
Public OrderTA As OrderTableAdapter // Orderテーブルアダプタ
……省略……
Private Sub RibbonWindow_Loaded(ByVal sender As Object, ByVal e As RoutedEventArgs) Handles MyBase.Loaded
ObentoDS = CType(Me.FindResource("CommonDataSet"), ObentoDataSet)
OrderTA = New OrderTableAdapter()
UserTA = New UserTableAdapter()
ObentoTA = New ObentoTableAdapter()
OrderTA.Fill(ObentoDS.Order)
UserTA.Fill(ObentoDS.User)
ObentoTA.Fill(ObentoDS.Obento)
End Sub
……省略……
また、各ユーザー・コントロールのXAMLコードで、<CollectionViewSource>要素のSource属性に指定されるデータセットを「CommonDataSet」(=キー名)に変更する。下記の太字部分は、独自のデータセットを生成しているコードなので、削除してよい(独自のデータセットではなく、共有のデータセットを使うため、不要)。この作業は、[ユーザー登録]コンテンツだけでなく、(後述する)[お弁当登録]/[お弁当一覧]/[ユーザー一覧]コンテンツすべてで行う必要がある。
<UserControl x:Class="ContetUserEntry"
……省略……
xmlns:my="clr-namespace:ObentoApp" >
<UserControl.Resources>
<my:ObentoDataSet x:Key="ObentoDataSet" />
<CollectionViewSource x:Key="UserViewSource"
Source="{Binding Path=User, Source={StaticResource CommonDataSet}}" />
</UserControl.Resources>
……省略……
C#/VBコード内でデータセットやテーブルアダプタにアクセスするには、前述の「リボン・ボタンのClickイベント・ハンドラのコード例」で示したように、MainWindowオブジェクトを取得して(例えば「main」というフィールド変数に格納した場合は)、
main.ObentoDS
main.UserTA
のようなコードを記述すればよい(先ほど実装した[ユーザー登録]コンテンツ内のコードは、この記述に修正する必要がある)。
以上で、データセットの共有は完了だ。
○グラデーション・ブラシをアプリケーション全体で共有
[ユーザー登録]コンテンツでは、新規登録モードと編集モードがあるわけだが、「現在はどちらのモードなのか?」がユーザーから見て分かりにくい。そこで、それぞれのモードの違いを、ユーザー・コントロールの背景色で示すことにしよう。新規登録モードでは白〜緑色のグラデーションにし、編集モードでは白〜青色のグラデーションにする。
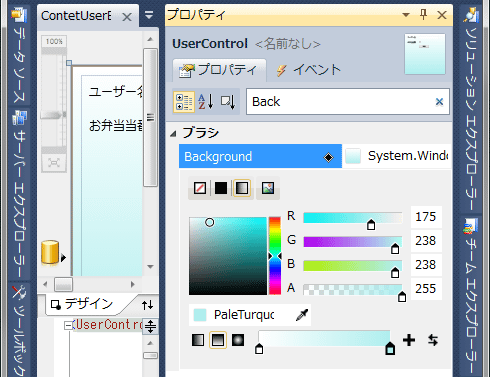
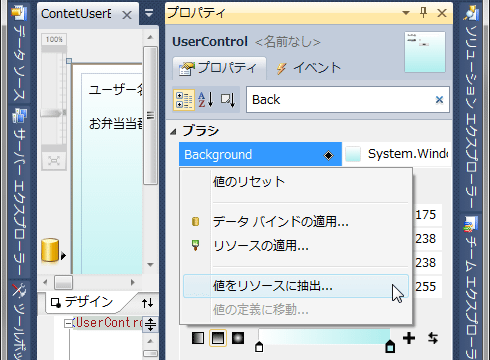
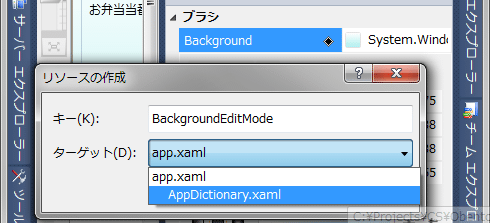
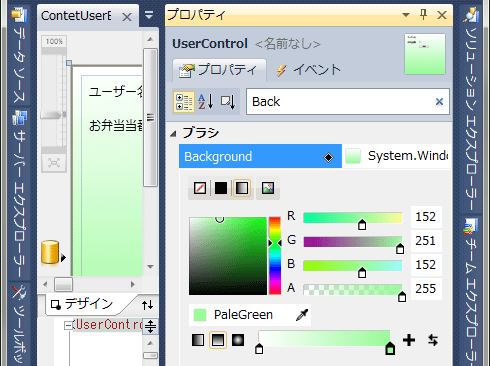
同様のモードの違いは、[お弁当登録]/[ユーザー一覧]/[お弁当一覧]コンテンツでも存在するので、この2つのグラデーション・ブラシ(=リソース)を、外部リソース・ディクショナリ・ファイル(App.xaml/Application.xaml)に格納することにしよう。この手順を、以下に一連のスクリーン・キャプチャ画像で示す(グラデーション・ブラシの作成方法については、前回説明したので割愛)。
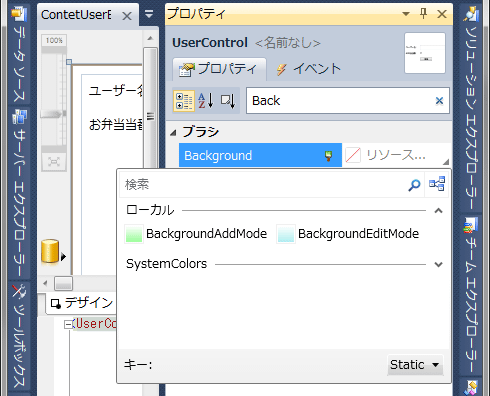
後は同様に、[リソースの作成]ダイアログで「BackgroundAddMode」という[キー名]を設定して、「AppDictionary.xaml」ファイルにグラデーション・ブラシをリソースとして出力すればよい
[プロパティ]ウィンドウを活用して、各コンテンツ間で共有するリソースを定義する手順
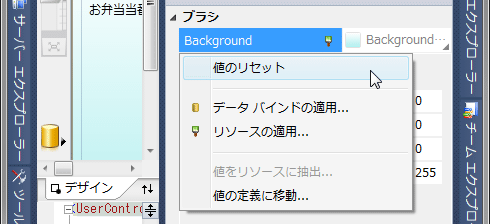
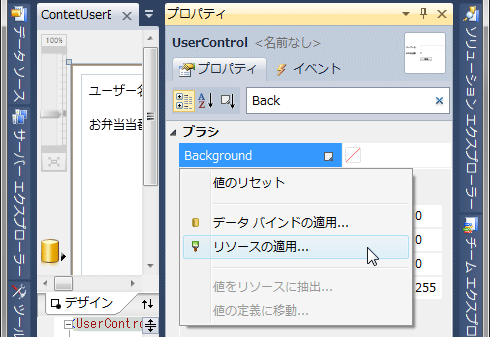
外部リソース・ディクショナリ・ファイルにリソースとして出力したグラデーション・ブラシを利用する手順を以下に示す。
[プロパティ]ウィンドウを活用して、リソースとして出力したグラデーション・ブラシを利用する手順
さらに、新規登録モードと編集モードを判別して背景色を切り替える処理が必要だ。ここでは、ChangeButtonStateメソッド内で、どちらのモードかを判定したうえで、下記のいずれかのコードによりユーザー・コントロールの背景色を設定すればよい。
// 新規登録モード
this.Background = this.FindResource("BackgroundAddMode")
as System.Windows.Media.Brush;
// 編集モード
this.Background = this.FindResource("BackgroundEditMode")
as System.Windows.Media.Brush;
// 新規登録モード
Me.Background = CType(Me.FindResource("BackgroundAddMode"),
System.Windows.Media.Brush)
// 編集モード
Me.Background = CType(Me.FindResource("BackgroundEditMode"),
System.Windows.Media.Brush)
以上で[ユーザー登録]コンテンツの開発は完了だ。次の画面は、その実行例。
次のページでは、コンボボックスへのデータ・バインディングや、データグリッドの利用、簡易な印刷処理を説明する。
Copyright© Digital Advantage Corp. All Rights Reserved.


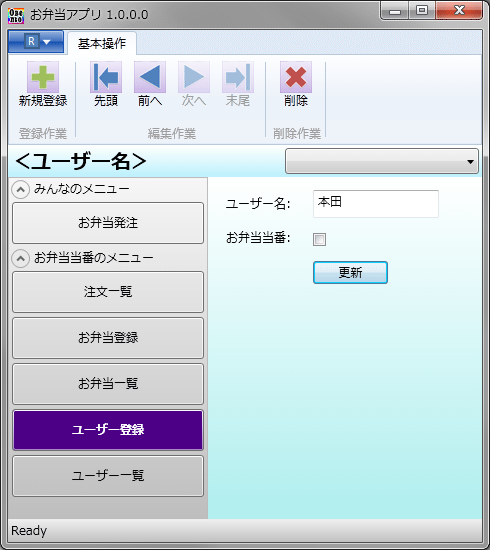 [ユーザー登録]コンテンツの実行例