CloudStackのインストールからサーバ起動まで:CloudStackによるプライベートクラウド構築術(3)(2/3 ページ)
Management Serverの設定
次に Management Serverに CloudStackバイナリのインストールを行います。
Management Server(192.168.1.2)にログインします。
SELinuxの設定をenforcingから permissiveに変更します。
# vi /etc/selinux/config
ファイル内でSELINUXが設定されている行を下記のように変更します。
SELINUX=permissive
上記設定はサーバ再起動後に有効になります。ですが、下記コマンドにより即時に変更することができます。
# setenforce permissive
次に CloudStackのバイナリファイルのダウンロードを行います。
ダウンロードはwgetコマンドで行います。
ここでは、RHEL5 / CentOS5 用の CloudStack 2.2.9のダウンロードを行っています。
# wget http://sourceforge.net/projects/cloudstack/files/Cloudstack%202.2/2.2.9/CloudStack-oss-2.2.9-1-rhel5.tar.gz/download
(最新版のバイナリは http://cloudstack.org/download.html で確認できます)
ダウンロードしたCloudStackバイナリファイルの解凍を行います。
# tar xzf CloudStack-oss-2.2.9-1-rhel5.tar.gz
解凍したディレクトリに移動します。
# cd CloudStack-oss-2.2.9-1-rhel5
Management Serverのインストールを行います。
# ./install.sh
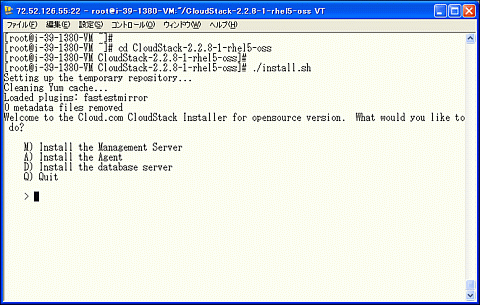
下記のように入力が必要になります。Management Serverのため【M】を入力します。
インストール途中で、Is this ok [y/N] と聞かれますので、【y】を入力し続行します。
Welcome to the Cloud.com CloudStack Installer for opensource version. What would you like to do?
M) Install the Management Server
A) Install the Agent
D) Install the database server
Q) Quit
> M
Total download size: 157 M
Is this ok [y/N]: y
(省略)
Complete!
Done
インストール中にエラーが出ていないことを確認してください。Doneと表示されたら Management Server のインストールは完了です。
続いて、Database Serverのインストールを行います。先ほどと同様に ./install.shを実行します。
# ./install.sh
今度は Database Serverのため【D】を入力します。同様に、Is this ok [y/N] と聞かれたら【y】を入力しインストールを続行します。
Welcome to the Cloud.com CloudStack Installer for opensource version. What would you like to do?
A) Install the Agent
D) Install the database server
U) Upgrade the CloudStack packages installed on this computer
R) Stop any running CloudStack services and remove the CloudStack packages from this computer
Q) Quit
> D
Doneと表示されたら Database Serverのインストールが完了となります。インストール中にエラーが出ていないこと、 MySQLサーバの起動で OK が表示されることを確認します。
MySQLサーバが起動したら、 次に設定ファイル /etc/my.cnfを編集します。
# vi /etc/my.cnf
[mysqld] セクション内に下記を追加します。
innodb_rollback_on_timeout=1
innodb_lock_wait_timeout=600
max_connections=350
編集が終わったら MySQLサーバを再起動し、起動オプションの設定を行います。
# service mysqld restart
# chkconfig mysqld on
MySQLデータベースのテーブルの初期設定を行います。
# cloud-setup-databases cloud:password@localhost --deploy-as=root
このコマンドにより、 MySQLデータベース内に CloudStackで使用するテーブルが作成されます。
次に、Management Server の初期設定と、Webインターフェイスの起動を行います。
# cloud-setup-management
エラーが表示されず、全てOKと表示されることを確認します。
続いて、システムVMのテンプレートをダウンロードし、Secondary Storage に展開します。Secondary Storage領域をマウントするためのディレクトリ /mnt/secondaryを作成します。
# mkdir /mnt/secondary
Storage Server領域をNFSマウントします。
# mount -t nfs 192.168.1.3:/export/secondary /mnt/secondary
下記コマンドでXenServer用のシステムVMテンプレートのダウンロードとインストールを行います。
# /usr/lib64/cloud/agent/scripts/storage/secondary/cloud-install-sys-tmplt -m /mnt/secondary -u http://download.cloud.com/releases/2.2.0/systemvm.vhd.bz2 -h xenserver -F
(取得するテンプレートのURLはハイパーバイザにより異なります)
最後に、マウントしたSecondary Storage領域のNFSをアンマウントします。
Copyright © ITmedia, Inc. All Rights Reserved.


