iOS 4のSDKで、Twitterを使ったiPhoneアプリを作る:SDKで始めるiPad/iPhoneアプリ開発の勘所(4)(3/4 ページ)
「Cocoa Notification」機能で通知を受け取る
その後、URLLoaderクラスを初期化していますが、特に重要なのが、その後の部分です。
[[NSNotificationCenter defaultCenter] addObserver: self
                                         selector: @selector(loadTimeLineDidEnd:)
                                             name: @"connectionDidFinishNotification"
                                           object: loder];
Cocoaフレームワークの「Cocoa Notification」という仕組みを使ってURLLoaderの通信完了通知を受け取るよう指定しています。引数objectに指定されたURLLoaderのインスタンスloaderから「connectionDidFinishNotification」という名前の通知があった場合に、「loadTimeLineDidEnd」というメソッドが実行されるようにNotificationCenterに登録しています。
ここで先ほどURLLoaderに実装したconnectionDidFinishLoadingメソッドの中身を思い出してみてください。
[[NSNotificationCenter defaultCenter]
          postNotificationName: @"connectionDidFinishNotification"
                        object: self];
NSNotificationCenterの「postNotificationName :object」メソッドを呼んで、「connectionDidFinishNotification」という名前の通知を発行しています。
つまり、通信が完了するとRootViewControllerのloadTimeLineDidEndが呼ばれる仕組みです。loadTimeLineDidEndメソッドでは引数にNSNotificaionを取り、[notification object]で通知元のURLLoaderインスタンスを取り出し、受信データをログ出力しています。
Cocoa Notificationを用いると、このように異なるクラス間で通知を送りあったり、データのやりとりができます。サンプルでは、同様にCocoa Notificationを用いて、通信エラー発生時に「loadTimeLineFailed」が呼ばれるように設定しています。
iOS SDK 4のシミュレータを使う
次に、RootViewController.mのviewDidLoadメソッドのコメントアウトを外し、viewDidLoadメソッド内でloadTimeLineByUserNameメソッドを呼び出すように編集します。
 - (void)viewDidLoad {
     [super viewDidLoad];
     [self loadTimeLineByUserName:@"itmedia"];
 }
今回はITmediaのTwitterユーザー名である「itmedia」を引数に渡してloadTimeLineByUserNameメソッドを呼び出しました。
以上でURLからデータを取得する部分が出来上がりましたので、実行結果を確認してみましょう。
今回はシミュレータの画面ではなくログを確認するため、Xcodeの[実行]→[コンソール]をクリックしてコンソールを表示しておきます。
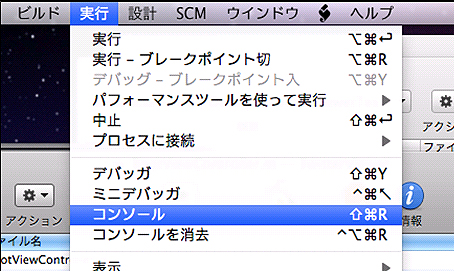
シミュレータを起動して実行し、以下のようにコンソールにXMLが表示されればデータの取得は成功です(使用しているMac端末がインターネットに接続している必要があります)。

XMLを解析する「NSXMLParser」クラス
NSURLConnectionクラス使って取得したXMLには、多くの情報が含まれています。今回はその中から、「ユーザー名」と「つぶやき」を取得します。このようなXMLの解析とデータ変換のためにCocoa Touch フレームワークにはNSXMLParserクラスが用意されています。
一般に、XML解析にはDOM(Document Object Model)とSAX(Simple API for XML)という2種類の方式があります。NSXMLParserはSAX型のXML解析クラスです。SAXでは、XMLを上から順に読んでいき、「開始タグが見つかった」「終了タグに到達した」などのイベントごとに処理します。
クラスを作成
それでは、実際にNSXMLParserを使ってXMLから「ユーザー名」と「つぶやき」を取得するクラスを作成しましょう。
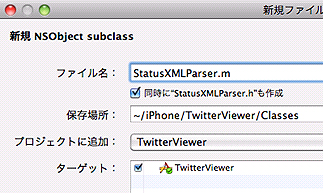
[Classes]を右クリック→[追加]→[新規ファイル]で、[新規ファイル]ウィンドウを開いたら、[Objective-C class]、[Subclass of]に[NSObject]を選択して[次へ]をクリックします。
[ファイル名]を「StatusXMLParser.m」として[完了]をクリックします。
インターフェイスファイル
「StatusXMLParser.h」を以下のように編集します。
#import <Foundation/Foundation.h>
@interface StatusXMLParser : NSObject <NSXMLParserDelegate> {
    NSMutableString *currentXpath;
    NSMutableArray *statuses;
    NSMutableDictionary *currentStatus;
    NSMutableString *textNodeCharacters;
}

@property (retain , nonatomic) NSMutableString *currentXpath;
@property (retain , nonatomic) NSMutableArray *statuses;
@property (retain , nonatomic) NSMutableDictionary *currentStatus;
@property (retain , nonatomic) NSMutableString *textNodeCharacters;

- (NSArray *) parseStatuses: (NSData *) xmlData;

@end
NSXMLParserは「開始タグが見つかった」などのイベントごとにデリゲートに処理を委譲します。このためStatusXMLParser.hでは、NSXMLParserのデリゲートになれるよう<NSXMLParserDelegate>プロトコルを採用しています。
後は、実装クラスにデリゲートメソッドを実装することで好きな解析処理ができます。
実装ファイル
続けて、「StatusXMLParser.m」を以下のように編集します。
#import "StatusXMLParser.h"

@implementation StatusXMLParser

@synthesize currentXpath;
@synthesize statuses;
@synthesize currentStatus;
@synthesize textNodeCharacters;

// (9)
- (void) parserDidStartDocument:(NSXMLParser *)parser {
    self.currentXpath = [[[NSMutableString alloc]init] autorelease];
    self.statuses = [[[NSMutableArray alloc] init] autorelease];
}

// (10)
- (void) parser:(NSXMLParser *)parser didStartElement:(NSString *)elementName namespaceURI:(NSString *)namespaceURI qualifiedName:(NSString *)qName attributes:(NSDictionary *)attributeDict {
    [self.currentXpath appendString: elementName];
    [self.currentXpath appendString: @"/"];

    self.textNodeCharacters = [[[NSMutableString alloc] init] autorelease];

    if ([self.currentXpath isEqualToString: @"statuses/status/"]) {
        self.currentStatus = [[[NSMutableDictionary alloc] init] autorelease];
    }
}

// (11)
- (void) parser:(NSXMLParser *)parser didEndElement:(NSString *)elementName namespaceURI:(NSString *)namespaceURI qualifiedName:(NSString *)qName {

    NSString *textData = [self.textNodeCharacters stringByTrimmingCharactersInSet:[NSCharacterSet whitespaceAndNewlineCharacterSet]];

    if ([self.currentXpath isEqualToString: @"statuses/status/"]) {
        [self.statuses addObject:self.currentStatus];
        self.currentStatus = nil;

    } else if ([self.currentXpath isEqualToString: @"statuses/status/text/"]) {
        [self.currentStatus setValue:textData forKey:@"text"];

    } else if ([self.currentXpath isEqualToString: @"statuses/status/user/name/"]) {
        [self.currentStatus setValue:textData forKey:@"name"];
    }

    int delLength = [elementName length] + 1;
    int delIndex = [self.currentXpath length] - delLength;

    [self.currentXpath deleteCharactersInRange:NSMakeRange(delIndex,delLength)];
}

// (12)
- (void) parser:(NSXMLParser *)parser foundCharacters:(NSString *)string {
    [self.textNodeCharacters appendString:string];
}

// (13)
- (NSArray *) parseStatuses:(NSData *)xmlData {
    NSXMLParser *parser = [[[NSXMLParser alloc] initWithData:xmlData] autorelease];
    [parser setDelegate:self];
    [parser parse];

    return self.statuses;
}

- (void) dealloc {
    [currentXpath release];
    [statuses release];
    [currentStatus release];
    [textNodeCharacters release];
    [super dealloc];
}

@end
(9)〜(12)がXMLParserDelegateプロトコルに準拠したデリゲートメソッドです。それぞれXML解析時に以下のタイミングで呼び出されます。
- (9) parserDidStartDocument
ドキュメントが開始したとき - (10) parser:didStartElement
要素が開始した(開始タグが見つかった)とき - (11) parser: didEndElement
要素が終了した(終了タグが見つかった)とき - (12) parser:foundCharacters
要素の中で文字列が見つかったとき
(13)のparseStatusesメソッドはStatusXMLParserを利用するクラスから呼ばれるメソッドです。NSXMLParserインスタンスのデリゲートにStatusXMLParserインスタンス自身をに設定して初期化し、解析処理をスタートします。
StatusXMLParserでは現在解析中のXML要素をパス形式の文字列としてcurrentXpathプロパティで管理しています。
要素が終了した(終了タグが見つかった)ときに、currentXpathプロパティが、「statuses/status/text/」だった場合は「つぶやき」として、「statuses/status/user/name/」だった場合は「ユーザー名」として、一時データ格納先のcurrentStatusプロパティにテキスト値であるtextNodeCharactersプロパティの値を設定しています。そして、1つの<status>要素が終了したらcurrentStatusプロパティの中身をstatusesプロパティに追加します。
これを繰り返して「ユーザー名」と「つぶやき」から成るデータの一覧を作成しています。
Copyright © ITmedia, Inc. All Rights Reserved.
アイティメディアからのお知らせ


注目のテーマ

編集部からのお知らせ
![]() ITmediaはアイティメディア株式会社の登録商標です。
ITmediaはアイティメディア株式会社の登録商標です。