いまさら聞けないKVSの常識をHbaseで身につける:ビッグデータ処理の常識をJavaで身につける(3)(3/3 ページ)
JavaからHbaseを操作する
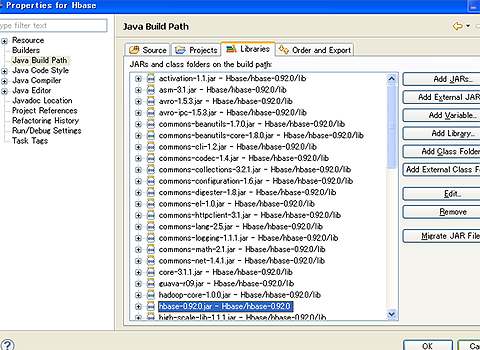
次に、シェルでやったのと同じ処理をJavaでも記述してみます。準備に必要なのは、Eclipseのプロジェクトに「hbase-0.92.0.jar」「lib/*.jar」をクラスパスを設定するだけです。
後は、mainメソッドを持ったクラスを作れば、JavaのコードでHbaseを操作できます。mainメソッドの中では、まずはHbaseに接続します。
Configuration config = HBaseConfiguration.create();
HBaseAdmin admin = new HBaseAdmin(config);
特に設定を変更しない場合は、ローカルホストで動作しているHbaseに接続にいきます。別のマシン上のHbaseに接続するのであれば、「hbase-site.xml」で指定するか、プログラムで「config」に設定します。
config.set("hbase.zookeeper.quorum", "ホスト名");
IPアドレスを直接指定した場合には、ホスト名とIPアドレスの正引きと逆引きが何度も行われるため、うまく接続できません。クライアントのhostsファイルにHbaseが動作しているサーバのIPアドレスとホスト名を設定しておくと確実です。
次に、テーブルを作成します。
HTableDescriptor htd = new HTableDescriptor("t1");
htd.addFamily(new HColumnDescriptor("csv"));
admin.createTable(htd);
テーブルを削除するには、シェルと同様にdisableにしてからdeleteします。
admin.disableTable(Bytes.toBytes("t1"));
admin.deleteTable(Bytes.toBytes("t1"));
テーブルができたら、CSVファイルを読み込んで、Hbaseに登録してみます。今回は、タイトル行を修飾子に使用してテーブル上に、このように格納します。
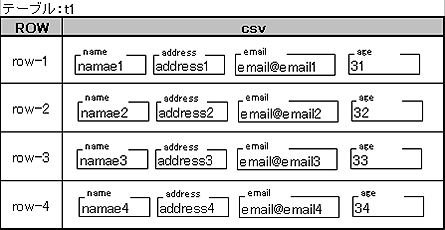
Key値は、「row」+行番号という文字列をbyte[]にしたものです。データもbyte[]にしたものを登録します。つまり、どんな型のものでもbyte[]にしてしまえば、Keyにもデータにもなれるのです。byte[]との変換にはユーティリティクラス(org.apache.hadoop.hbase.util.Bytes)を使用します。
HTable table = new HTable(config, Bytes.toBytes("t1"));    // テーブルを指定

// ファイルを読み込んで、登録
InputStream is = Test.class.getResourceAsStream("data.csv");
InputStreamReader in = new InputStreamReader(is, "SJIS");
BufferedReader br = new BufferedReader(in);
String line = br.readLine();    // 1行目はタイトル
String[] titles = line.split(",", -1);
int count = 0;
while ((line = br.readLine()) != null) {
    count++;
    Put p1 = new Put(Bytes.toBytes("row-" + count));    // Keyを指定
    String[] csvs = line.split(",", -1);
    for (int i = 0; i < csvs.length; i++) {
        p1.add(Bytes.toBytes("csv"), Bytes.toBytes(titles[i]), Bytes.toBytes(csvs[i]));
    }
    table.put(p1);  // 登録
}
br.close();
in.close();
is.close();
登録したデータを取得してみます。KVSでは、基本的にはKeyを指定してアクセスしなければなりません。
HTable table = new HTable(config, Bytes.toBytes("t1"));    // テーブルを指定
Result result = table.get(new Get(Bytes.toBytes("row-1"))); // Keyを指定

if (result == null || result.getRow() == null){
    System.out.println("ROW not found");
}
NavigableMap<byte[], byte[]> map = result.getFamilyMap(Bytes.toBytes("csv"));
if (map == null){
    System.out.println("ColumnFamily not found");
} else {
    for (Entry<byte[], byte[]> entry : map.entrySet()) {
        String key = Bytes.toString(entry.getKey());
        String val = Bytes.toString(entry.getValue());
        System.out.println (key + ":" + val);   // デバッグ出力
    }
}
しかし、いくら「Keyを指定しなければならない」といわれても、ときには全件を取得したり、「csvの特定の要素が○○だったら」という条件で取得したりしたい場合もあります。
そのような場合には、「フィルタ」という機能を使用すれば条件にあったデータだけを取得できます。この処理はRDBでのテーブルスキャンに相当するため、非常に時間がかかります。大量データを処理するためには、Hadoopの完全分散モードを利用して、処理を分散しなければなりません。
Scan scan = new Scan();
Filter filter = new DependentColumnFilter(
        Bytes.toBytes("csv"), 		// カラムファミリを指定
        Bytes.toBytes("name"), 		// 修飾子を指定
        false,
        CompareOp.EQUAL,
        new BinaryPrefixComparator(Bytes.toBytes("namae1"))
);
scan.setFilter(filter);
ResultScanner scanner = table.getScanner(scan);
for (Result rr = scanner.next(); rr != null; rr = scanner.next()) {
:
完全一致だけではなく、前方一致などもできます。Filterの代わりにFilterListを使えば、条件に複数要素も指定できます。
Scan scan = new Scan();
Filter filter1 = new DependentColumnFilter(
        Bytes.toBytes("csv"),
        Bytes.toBytes("name"),
        false,
        CompareOp.EQUAL,
        new BinaryComparator(Bytes.toBytes("namae1"))
);
Filter filter2 = new DependentColumnFilter(
        Bytes.toBytes("csv"),
        Bytes.toBytes("email"),
        false,
        CompareOp.EQUAL,
        new BinaryComparator(Bytes.toBytes("email@email1"))
);
FilterList filter = new FilterList(FilterList.Operator.MUST_PASS_ALL);
filter.addFilter(filter1);
filter.addFilter(filter2);
scan.setFilter(filter);
ResultScanner scanner = table.getScanner(scan);
コラム「Webブラウザ/HTTPでも操作できる」
今回はJavaのAPIを使ってHbaseにアクセスしましたが、「hbase rest start -p 8080」として、HTTPを使ってアクセスする方法もあります。データ形式には、XMLやJSONが指定できます。
http://ホスト名:8080/t1/row-1/csv
「t1」がテーブル名、「row-1」がKey値、「csv」がカラムファミリ、とWebブラウザから指定すれば、中身がXMLで返ってきます。
HadoopとHbaseで行列計算をしてみよう
KVSの最大のメリットは「分散」です。そこで、HadoopとHbaseを使って処理量が非常に多くなるアプリを作成し、分散処理を実装してみます。
Hbase 0.92.0には「hadoop-core-1.0.0.jar」が含まれているので、Hadoopはバージョン1.0.0を使用します。
HadoopからHbaseを使ったアプリを実行する簡単な方法は、「hadoop-1.0.0/lib」の下に「hbase-0.92.0.jar」「hbase-0.92.0/lib/*.jar」をすべてコピーし、hadoopコマンドを使って実行します。また、HadoopとHbaseは分散モードで起動します。
以下のようなアプリを作成します。
- 元データはHbase上のテーブル「t2」に入っているものとする
- 1点に対して複数の値(double:0〜1.0)を持っている
- Hadoopで、それぞれの点間の距離(double:0〜1.0)を算出する
- 距離の近い順に別テーブル「t3」に格納
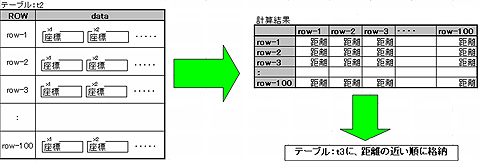
このような大量の距離計算は、地図などのGISだけではなく、テキストマイニングなどでも頻繁に行われています。Hadoopの各ノードでは、各点のデータを何度も読み込み、大量の結果データを書き込むため、Hadoop+Hbaseによる分散処理が有効です。
まず、事前にテーブル「t2」「t3」を作り、t2には「Math.random()」で100点分のデータを入れておきます。
Configuration config = HBaseConfiguration.create();
HBaseAdmin admin = new HBaseAdmin(config);

// テーブルt2を作成
HTableDescriptor htd = new HTableDescriptor("t2");
htd.addFamily(new HColumnDescriptor("data"));
admin.createTable(htd);

// テーブルt3を作成
htd = new HTableDescriptor("t3");
htd.addFamily(new HColumnDescriptor("data"));
admin.createTable(htd);

// ランダムデータを格納する
HTable table2 = new HTable(config, Bytes.toBytes("t2"));
for (int i = 1 ; i <= 100 ; i++){
    Put p1 = new Put(Bytes.toBytes("row-" + i));    // Key値を指定
    for (int j = 1; j <= 2; j++) {                    // 次元数を指定
        double d = Math.random();
        p1.add(Bytes.toBytes("data"), Bytes.toBytes("x"+j), Bytes.toBytes(d));
    }
    table2.put(p1); // 登録
}
次に、HadoopのMap処理で、テーブルの中身を1行ずつ取り出してReduceに渡します。
@Override
protected void map(ImmutableBytesWritable row, Result result, Context context) throws IOException, InterruptedException {
    String rowid = Bytes.toString(row.get());
    StringBuffer buf = new StringBuffer();
    // 1行全部を1つの文字列に変換
    for (KeyValue keyvalue : result.raw()) {
        String qualifier = Bytes.toString(keyvalue.getBuffer(),
keyvalue.getQualifierOffset(), keyvalue.getQualifierLength());
        double value = Bytes.toDouble(keyvalue.getBuffer(),
keyvalue.getValueOffset());
        buf.append(qualifier + "=" + value + " ");
    }
    // 1行単位で、Reduceに渡す
    context.write(new Text(rowid), new Text(buf.toString()));
}
Reduceでは、1行ずつに対して全データを総当たりで読み込みます。
@Override
protected void reduce(Text key, Iterable<Text> values, Context context) throws IOException, InterruptedException {
    for (Text value : values) {
        // Mapで文字列化したデータをdoubleに戻す
        String[] strs = value.toString().split(" ");
        String[] qualifiers = new String[strs.length];
        double[] p1 = new double[strs.length];
        for (int i = 0 ; i < strs.length ; i++){
            qualifiers[i] = strs[i].split("=")[0];
            p1[i] = Double.parseDouble(strs[i].split("=")[1]);
        }

        // 1行に対して、全レコードをぶつける
        Configuration config = context.getConfiguration();
        HTable table2 = new HTable(config, Bytes.toBytes("t2"));
        Scan scan = new Scan();
        ResultScanner scanner = table2.getScanner(scan);
        for (Result rr = scanner.next(); rr != null; rr = scanner.next()) {
            NavigableMap<byte[], byte[]> map = rr.getFamilyMap(Bytes.toBytes("data"));
            if (map != null){
                double[] p2 = new double[qualifiers.length];
                for (int i = 0 ; i < qualifiers.length ; i++){
                    p2[i] = Bytes.toDouble(map.get(Bytes.toBytes(qualifiers[i])));
                }
                // 2点間の距離を算出
                double d = distance(p1, p2);

            // ここで結果を’t3’に格納する
            }
        }
        scanner.close();
    }
}
最後に、計算結果を「t3」に格納します。
// 結果を整形
String key2 = Bytes.toString(rr.getRow());
DecimalFormat df = new DecimalFormat("0.0000000000");
String newKey = df.format(d) + "/" + key.toString() + ":" + key2;

// HDFSに出力
  StringBuffer str = new StringBuffer();
  for (int i = 0 ; i < qualifiers.length ; i++){
      str.append("x" + (i+1) + "=" + p1[i] + " ");
      str.append("x" + (i+1) + "=" + p2[i] + "/");
  }
context.write(key, new Text(newKey + " " + str.toString()));

//テーブルに出力
HTable table3 = new HTable(config, Bytes.toBytes("t3"));
Put put = new Put(Bytes.toBytes(newKey));   // Keyを指定
put.add(Bytes.toBytes("data"), Bytes.toBytes("key1"), Bytes.toBytes(key.toString()));
put.add(Bytes.toBytes("data"), Bytes.toBytes("key2"), Bytes.toBytes(key2));
table3.put(put);    // 登録
HbaseはKey値でソートして格納するので、算出した距離をKey値にすれば、単純に取り出しただけで「近い順」になってくれます。逆に「Double.MAX_VALUE-距離」をKey値にすれば「遠い順」に取り出せます。
それでは、「hbase shell」で結果を見てみましょう。
hbase(main):002:0> count 't3'
Current count: 1000, row: 0.1131250133/row-91:row-14
Current count: 2000, row: 0.1434975286/row-72:row-11
Current count: 3000, row: 0.1691559387/row-48:row-41
Current count: 4000, row: 0.1933620176/row-60:row-26
Current count: 5000, row: 0.2184668296/row-62:row-44
Current count: 6000, row: 0.2445907168/row-7:row-5
Current count: 7000, row: 0.2733257841/row-52:row-15
Current count: 8000, row: 0.3113542664/row-8:row-59
Current count: 9000, row: 0.3675337066/row-52:row-18
Current count: 10000, row: 0.7355109677/row-83:row-63
10000 row(s) in 1.0410 seconds
元データ「t2」が100件だったので、2乗の1万件が「t3」に登録されています。
距離が近い順に格納できたのでしょうか。先頭から5件を取り出してみます。
hbase(main):003:0> scan 't3', {LIMIT => 5}
ROW                     COLUMN+CELL
 0.0000000000/row-100:r column=data:key1, timestamp=1329350527267, value=row-100
 0.0000000000/row-100:r column=data:key2, timestamp=1329350527267, value=row-100
 0.0000000000/row-10:ro column=data:key1, timestamp=1329350529985, value=row-10
 0.0000000000/row-10:ro column=data:key2, timestamp=1329350529985, value=row-10
 0.0000000000/row-11:ro column=data:key1, timestamp=1329350526165, value=row-11
 0.0000000000/row-11:ro column=data:key2, timestamp=1329350526165, value=row-11
 0.0000000000/row-12:ro column=data:key1, timestamp=1329350527514, value=row-12
 0.0000000000/row-12:ro column=data:key2, timestamp=1329350527514, value=row-12
 0.0000000000/row-13:ro column=data:key1, timestamp=1329350530359, value=row-13
 0.0000000000/row-13:ro column=data:key2, timestamp=1329350530359, value=row-13
5 row(s) in 0.0890 seconds
同じ点同士の距離も計算してしまっているため、「row-100とrow-100の距離は0」が一番上に来ていますが、確かに近い順に取得できました。
今回のように数値の小さい順に結果が欲しい場合には、その数値をKey値にしつつ、Key値がユニークであることも保証する必要があります。
今回は、計算結果が0.0〜1.0だったので、単に文字化すると「0.00001→1.0E-5」となってしまって大小関係が入れ替わってしまうため、DecimalFormat("0.0000000000")で「0.00001→0.0000100000」となるようにしました。もし1以上であれば、文字列でソートしても期待している順番になるように、「DecimalFormat("0000000000")」とします。
また、今回は最終的にKey値を「数値+比較した2点のKey値」とすることで、ユニークであることも確保しました。
Key値を何にするかが非常に重要
KVSでは、Key値を何にするかが非常に重要です。RDBのプライマリキーには機械的に通し番号を振ることが多いですが、KVSのKey値はユニークであることに加え、データを使うときの取り出し方も考えておく必要があります。
そこが、RDBとKVSの大きな違いかもしれません。
著者紹介
荒本 道隆(あらもと みちたか)
2011年度より、TIS−Hadoopersにて、TISとともに検証活動実施。社内では新しい技術を実験的に実システムへ導入し、評価と検証に取り組んでいる。また社外でも、主に先端IT活用推進コンソーシアムで活動中。
関連記事
- テキストマイニングで始める実践Hadoop活用
- 次世代Hadoopの特徴は、MapReduce 2とGiraph
Hadoopの父に聞く、HadoopとClouderaの現在・未来 - MapReduceのJava実装Apache Hadoopを使ってみた
いま再注目の分散処理技術(後編) - 分散Key-Valueストアの本命「Bigtable」
- Javaで覚えるIT技術者の40の常識
新人プログラマ/SEは覚えておきたい“まとめ”
Copyright © ITmedia, Inc. All Rights Reserved.
アイティメディアからのお知らせ


注目のテーマ

編集部からのお知らせ
![]() ITmediaはアイティメディア株式会社の登録商標です。
ITmediaはアイティメディア株式会社の登録商標です。