FactoryMethodパターンでリファクタリングすると、ゲーム開発がどう便利になるのかをSwiftコードで学ぶ:iOS SDKとSwiftで始めるゲーム作成入門(6)(2/4 ページ)
» 2016年05月17日 05時00分 公開
[杉本裕樹,マネーフォワード]
自機を好きな位置に配置する
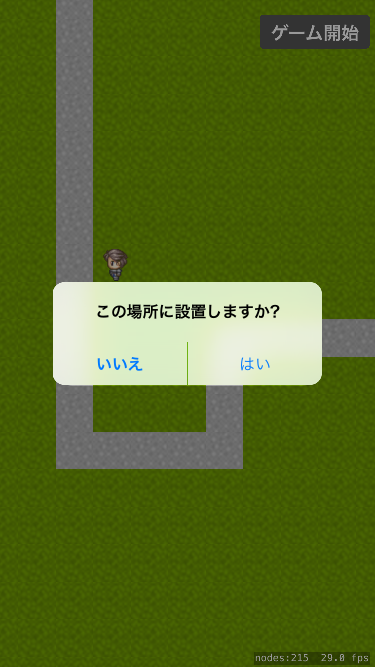
前項で自機を設置用のSceneを作りました。次は、そのSceneに実際の設置処理を追加していきます。追加する箇所の仕様は「画面をタップ」→「設置確認のアラートを出す」→「OKを押したら配置」とします。
先ほど作成したSetCharScene.swiftにtouchesEndedメソッドを追加してください。
class SetCharScene: SKScene {
    var chars = [Char]()
    var coin = 100

    // 省略

    override func touchesEnded(touches: Set<UITouch>, withEvent event: UIEvent?) {
        if touches.count == 1, let point = touches.first?.locationInNode(self) {
            if coin < 10 {
                return
            }

            let alert = UIAlertController(title: nil, message: "この場所に設置しますか?",
                                          preferredStyle: .Alert)
            let rootViewController = UIApplication.sharedApplication().delegate?.window??.rootViewController
            alert.addAction(UIAlertAction(title: "はい", style: .Default, handler: { _ in
                let char = Char(imageNamed: "Char")
                char.position = point
                self.coin -= 10
                self.addChild(char)
                self.chars.append(char)
            }))
            alert.addAction(UIAlertAction(title: "いいえ", style: .Cancel, handler: nil))
            rootViewController?.presentViewController(alert, animated: true, completion: nil)
        }
    }
}
これで画面タップで確認ポップアップが表示されて、「はい」を押すとキャラクターが配置されるようになりました。
配置した自機を実際のゲーム画面にも反映する
自機の設置はできたので、それを実際のゲーム画面にも反映します。GameScene.swiftを以下のように修正してください。
class GameScene: SKScene, SKPhysicsContactDelegate {
    // 省略
    // let char = Char(imageNamed: "Char")
    var chars = [Char]()

    // 省略
    func createChars(points: [CGPoint]) {
        points.forEach {
            let char = Char(imageNamed: "Char")
            char.position = $0
            char.physicsBody = SKPhysicsBody(rectangleOfSize: char.size)
            char.physicsBody?.contactTestBitMask = 0x1
            addChild(char)
            chars.append(char)
        }
    }

    override func update(currentTime: NSTimeInterval) {
        // chars.forEachを使ってそれぞれのcharに対して処理をするよう修正
        chars.forEach { char in
            char.stateMachine.updateWithDeltaTime(currentTime)
            if let charState = char.stateMachine.currentState as? Char.CharState where charState.enableToAttack() {
                enemyList.enemiesCloseToPoint(char.frame.origin, distance: 50).forEach {
                    $0.life -= charState.power
                    char.stateMachine.enterState(Char.StayState.self)
                    if $0.life <= 0 {
                        $0.physicsBody?.node?.removeFromParent()
                        $0.physicsBody?.node?.removeAllActions()

                        if enemyList.isAllEnemyRemoved() {
                            state = .GameClear

                            let myLabel = SKLabelNode(fontNamed: "HiraginoSans-W6")
                            myLabel.text = "ゲームクリア"
                            myLabel.fontSize = 45
                            myLabel.position = CGPoint(x:CGRectGetMidX(self.frame), y:CGRectGetMidY(self.frame) - 20)
                            addChild(myLabel)
                        }
                    }
                }
            }
        }
//        char.stateMachine.updateWithDeltaTime(currentTime)
//        if let charState = char.stateMachine.currentState as? Char.CharState where charState.enableToAttack() {
//            enemyList.enemiesCloseToPoint(char.frame.origin, distance: 50).forEach {
//                $0.life -= charState.power
//                char.stateMachine.enterState(Char.StayState.self)
//                if $0.life <= 0 {
//                    $0.physicsBody?.node?.removeFromParent()
//                    $0.physicsBody?.node?.removeAllActions()
//
//                    if enemyList.isAllEnemyRemoved() {
//                        state = .GameClear
//
//                        let myLabel = SKLabelNode(fontNamed: "HiraginoSans-W6")
//                        myLabel.text = "ゲームクリア"
//                        myLabel.fontSize = 45
//                        myLabel.position = CGPoint(x:CGRectGetMidX(self.frame), y:CGRectGetMidY(self.frame) - 20)
//                        addChild(myLabel)
//                    }
//                }
//            }
//        }
    }
}
GameSceneに「createChars」という自機を作るメソッドを作りました。
次は、SetCharSceneからそのメソッドを呼び出すようにします。SetCharScene.swiftのdidMoveToViewを以下のように修正してください。
class SetCharScene: SKScene {
    // 省略
    override func didMoveToView(view: SKView) {
        // 省略
        let button = Button(text: "ゲーム開始", rect: buttonRect, afterTap: {
            let scene = GameScene(fileNamed: "GameScene")
            scene?.scaleMode = .ResizeFill
            view.presentScene(scene)
            scene?.createChars(self.chars.map { $0.position }) // この1行を追加
        })
        addChild(button)
    }
    // 省略
}
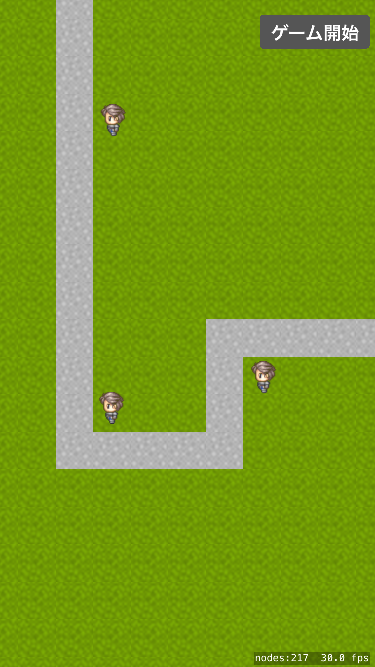
これで自由に自機をセットできるようになりました。
関連記事
 開発者向けiOS 9、WatchOS 2、Swift 2、Xcode 7の新機能と新しいApple Developer Programの参考情報まとめ
iOS 9、WatchOS 2、Swift 2、Xcode 7の新機能や、Apple Developer Programについて、その概要とアップルが公開している参考情報をまとめて紹介します。 Apple WatchやiPhoneのアプリを作ろう! Playgroundで学ぶSwiftの基礎―変数、定数、型、演算
本連載では、これからプログラミングやiPhoneアプリ開発を始めてみたい方を対象に、開発に必要な知識を基礎から解説していきます。今回は、Swiftの変数、定数、型、演算などについてサンプルプログラムを交えて解説します。 iOSアプリ開発でObjective-CからSwiftに移行するための手順、注意点まとめ〜言語仕様の違いは? 連携時の呼び出し方は?
開発生産性や品質を向上させたいiOSアプリ開発者のためにObjective-CからSwiftへ移行するメリットや手順、注意点など勘所をまとめて紹介します。
Copyright © ITmedia, Inc. All Rights Reserved.
SpecialPR
アイティメディアからのお知らせ
スポンサーからのお知らせPR
SpecialPR


注目のテーマ

システム開発ノウハウ 【発注ナビ】PR
編集部からのお知らせ
あなたにおすすめの記事PR
![]() ITmediaはアイティメディア株式会社の登録商標です。
ITmediaはアイティメディア株式会社の登録商標です。