「パスワードのない世界」を実現する「Windows Hello for Business」のオンプレ展開をリアルレポート(その5):vNextに備えよ! 次期Windows Serverのココに注目(64:特別編)(1/2 ページ)
Windows Server 2016による「Windows Hello for Business」のオンプレミス展開を検証し、実装のポイントやユーザーエクスペリエンスをレポート。今回は、「デバイス登録サービス」の有効化とWindows 10デバイスのディレクトリ同期、自動デバイス登録の準備を解説します。
Windows Hello for Businessのオンプレミス展開を実践・検証
本稿では、最新版のWindows Server 2016とWindows 10を使用して「Windows Hello for Business」(旧称、Microsoft Passport for Work)のオンプレミス展開を実装し、その機能を検証していきます。
前回は、「Azure Active Directory(Azure AD)」のディレクトリとオンプレミスのActive Directoryドメインのディレクトリ統合を解説しました。「デバイス登録サービス(Device Registration Service)」の有効化と、Windows 10デバイスのディレクトリ同期、自動デバイス登録の準備を解説します。
- Windows Helloとは(マイクロソフト)
- Windows Hello生体認証の企業利用(Windows IT Center)
AD FSの「デバイス登録サービス」をドメイン参加済みWindows 10用に準備する
「Active Directoryフェデレーションサービス(AD FS)」の「デバイス登録サービス(Device Registration Service)」を有効化し、ドメイン参加済みWindows 10の自動デバイス登録用に構成します。
●デバイス登録サービスとデバイス認証の有効化
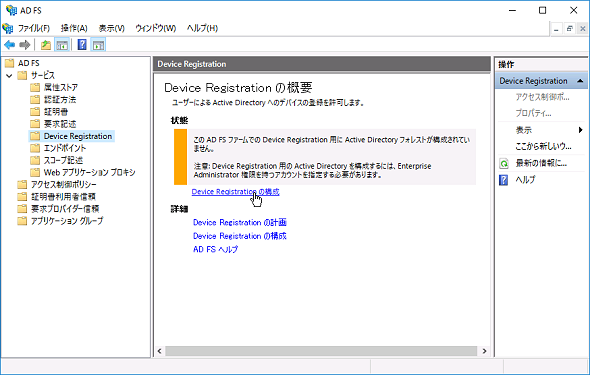
AD FSを実行するサーバでWindows PowerShellを開き、次のコマンドラインを実行します。これで、「デバイス登録サービス」と「デバイス認証」の有効化が完了します。この作業は、「AD FSの管理」スナップインのGUIで実行することも可能です(画面1)。
PS C:\> Initialize-ADDeviceRegistration -ServiceAccountName <Active Directoryフェデレーションサービスのサービスアカウントの資格情報(ドメイン名\ユーザー名)>
PS C:\> Enable-AdfsDeviceRegistration
PS C:\> Set-AdfsGlobalAuthenticationPolicy -DeviceAuthenticationEnabled $true
●Windows 10デバイスのディレクトリ同期の準備
Azure AD ConnectをAD FSと別のサーバにインストールした場合は、Azure AD Connectの「C:\Program Files\Microsoft Azure Active Directory Connect\AdPrep\AdSyncPrep.psm1」をAD FSのサーバにコピーします。また、次の作業に進む前に、AD FSのサーバに以下の前提コンポーネントをインストールします。
- リモートサーバ管理ツールの「AD DSスナップインおよびコマンドラインツール」(RSAT-ADDS-Tools)
- リモートサーバ管理ツールの「Windows PowerShellのActive Directoryモジュール」(RSAT-AD-PowerShell)
- Windows PowerShell用Windows Azure Active Directoryモジュール
- ITプロフェッショナル用Microsoft Online ServicesサインインアシスタントRTW
上記の前提コンポーネントをインストールしたら、AD FSのサーバで次の操作を行います。
(1)Windows PowerShellを開き、以下のコマンドラインを実行します。Azure AD Connectorのサービスアカウントが不明の場合は、「Azure AD Connectorウィザード」を実行して「追加のタスク」ページで「現在の構成を表示する」を選択して「ACCOUNT」を確認してください。
PS C:\> Import-Module -Name "C:\Program Files\Microsoft Azure Active Directory Connect\AdPrep\AdSyncPrep.psm1(またはAdSyncPrep.psm1をコピーしたパス)"
PS C:\> $aadAdminCred = Get-Credential (Azure ADのテナント管理者の資格情報を入力)
PS C:\> Initialize-ADSyncDomainJoinedComputerSync -AdConnectorAccount <Azure AD Connectorのサービスアカウントの資格情報(ドメイン名\ユーザー名)> -AzureADCredentials $aadAdminCred
PS C:\> Initialize-ADSyncDeviceWriteBack -DomainName <オンプレミスのActive DirectoryドメインのDNS名> -AdConnectorAccount <Azure AD Connectorのサービスアカウントの資格情報(ドメイン名\ユーザー名)>
PS C:\> Initialize-ADSyncNGCKeysWriteBack -AdConnectorAccount <Azure AD Connectorのサービスアカウントの資格情報(ドメイン名\ユーザー名)>
(2)さらに、次のコマンドラインを実行します。このコマンドラインは、「Azure AD Connectウィザード」によりAD FSに追加された証明書利用者信頼「Microsoft Office 365 Identity Platform」に要求発行規則を追加します。
PS C:\> $existingRules = (Get-ADFSRelyingPartyTrust -Identifier urn:federation:MicrosoftOnline).IssuanceTransformRules
PS C:\> $rule1 = '@RuleName = "Issue object GUID"
      c1:[Type == "http://schemas.microsoft.com/ws/2008/06/identity/claims/groupsid", Value =~ "515$", Issuer =~ "^(AD AUTHORITY|SELF AUTHORITY|LOCAL AUTHORITY)$"] &&
      c2:[Type == "http://schemas.microsoft.com/ws/2008/06/identity/claims/windowsaccountname", Issuer =~ "^(AD AUTHORITY|SELF AUTHORITY|LOCAL AUTHORITY)$"]
      => issue(store = "Active Directory", types = ("http://schemas.microsoft.com/identity/claims/onpremobjectguid"), query = ";objectguid;{0}", param = c2.Value);'
PS C:\> $rule2 = '@RuleName = "Issue account type for domain joined computers"
      c:[Type == "http://schemas.microsoft.com/ws/2008/06/identity/claims/groupsid", Value =~ "515$", Issuer =~ "^(AD AUTHORITY|SELF AUTHORITY|LOCAL AUTHORITY)$"]
      => issue(Type = "http://schemas.microsoft.com/ws/2012/01/accounttype", Value = "DJ");'
PS C:\> $rule3 = '@RuleName = "Pass through primary SID"
      c1:[Type == "http://schemas.microsoft.com/ws/2008/06/identity/claims/groupsid", Value =~ "515$", Issuer =~ "^(AD AUTHORITY|SELF AUTHORITY|LOCAL AUTHORITY)$"] &&
      c2:[Type == "http://schemas.microsoft.com/ws/2008/06/identity/claims/primarysid", Issuer =~ "^(AD AUTHORITY|SELF AUTHORITY|LOCAL AUTHORITY)$"]
      => issue(claim = c2);'
PS C:\> $updatedRules = $existingRules + $rule1 + $rule2 + $rule3
PS C:\> $crSet = New-ADFSClaimRuleSet -ClaimRule $updatedRules
PS C:\> Set-AdfsRelyingPartyTrust -TargetIdentifier urn:federation:MicrosoftOnline -IssuanceTransformRules $crSet.ClaimRulesString
なお、この操作を行うためのスクリプトは、以下のドキュメントからコピーできます。
- Connect domain-joined devices to Azure AD for Windows 10 experiences[英語](Microsoft Azure)
(3)最後に、次のコマンドラインを実行して、AD FSの2つのエンドポイントを有効化し、サービスを再起動します。
PS C:\>	Enable-AdfsEndpoint -TargetAddressPath "/adfs/services/trust/13/windowstransport"
PS C:\>	Enable-AdfsEndpoint -TargetAddressPath "/adfs/services/trust/2005/windowstransport"
PS C:\>	Restart-Service -Name adfssrv
Copyright © ITmedia, Inc. All Rights Reserved.


