MicrosoftのAIをカスタマイズしてハンバーガーとチーズバーガーを区別させよう:特集:AIをアプリに組み込もう(2/3 ページ)
カスタマイズしたモデルをAPIから利用する
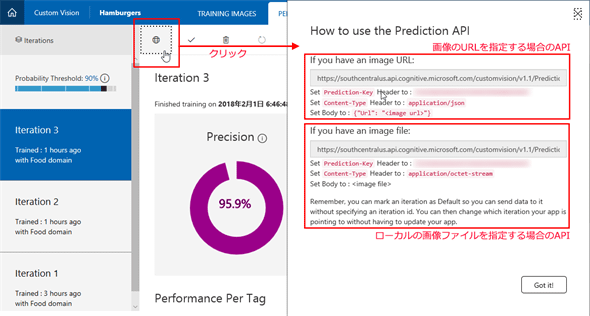
公開されるAPIは、Custom Vision Serviceの[PERFORMANCE]タブにある地球の絵のボタン([Prediction URL]ボタン)をクリックすると表示される。
上の画像を見ると分かる通り、画像の判定に使用するAPIには大きく分けて2種類がある。1つはローカルマシンにある画像ファイルを利用するもので、もう1つは画像のURLを指定するものだ。それぞれにエンドポイントが違っていて、おおよその形式はエンドポイントの「customvision」以下を抜粋すると次のようになっている。なお、APIの詳細については「Custom Vision Prediction 1.1」ページを参照のこと。
- ローカルファイル版:customvision/v1.1/Prediction/{プロジェクトID}/image?……
- 画像のURL版:customvision/v1.1/Prediction/{プロジェクトID}/url?……
「プロジェクトID」および「?」以降に指定するパラメーターは、上に示したエンドポイントのURLに含まれているので、基本的にはエンドポイントとPrediction Key、それからContent-Typeの3つの値をコピーして、コードに含めるようにすればよい。
また、上では省略したがパラメーターには「iterationId」がある。つまり、カスタマイズしたモデルを利用するAPIは学習のイテレーションごとに生成されるので、任意のイテレーションの結果を利用して、画像の判定を行える。特定のイテレーションをデフォルトのエンドポイントとする場合には上の画像のチェックマークボタン([Make default]ボタン)をクリックする。実際にどう使えばよいかというと、イテレーションを進めるごとに、最新のデータを用いたAPIをデフォルトのエンドポイントとして、アプリからはiterationIdパラメーターを省略して呼び出しを行うようにすることで、常に最新の学習結果を利用できるようになる。
ローカルマシンにある画像ファイルを利用する場合には、それをバイト配列の形に変換してリクエストボディーに含める(Content-Typeヘッダには「application/octet-stream」を指定)。
一方、画像のURLを指定するのであれば、リクエストボディーにJSON形式のデータ「{ "Url": 画像のURL }」を含める(Content-Typeヘッダには「application/json」を指定)。
この他にPrediction-Keyヘッダに上で見た「Prediction-Key」の値を指定する。
.NET Standardベースのクラスライブラリにコードをまとめる
以上の処理を.NET Standard 2.0ベースのクラスライブラリにまとめたのが以下のコードだ(「Use the Prediction Endpoint to Test Images Programmatically」ページにあるコードを基に、ローカルの画像ファイルのパスからバイト配列を指定してリクエストを送信するメソッド、バイト配列を受け取りリクエストを送信するメソッド、画像のURLを受け取りリクエストを送信するメソッドなどを作成したものだ)。
public class MyCustomVision
{
// ファイルパスからバイト配列を作成するヘルパー
static byte[] GetImageAsByteArray(string imageFilePath)
{
FileStream fileStream =
new FileStream(imageFilePath, FileMode.Open, FileAccess.Read);
BinaryReader binaryReader = new BinaryReader(fileStream);
return binaryReader.ReadBytes((int)fileStream.Length);
}
// ローカルの画像ファイルのパスを受け取ってリクエストを送信するメソッド
public static async Task<CustomVisionResponse> DetectHamburger(
string imageFilePath)
{
byte[] byteData = GetImageAsByteArray(imageFilePath);
var result = await MakeRequest(byteData);
return result;
}
// バイト配列を受け取ってリクエストを送信するメソッド
public static async Task<CustomVisionResponse> DetectHamburger(
byte[] byteData)
{
var result = await MakeRequest(byteData);
return result;
}
// 画像ファイル(バイト配列)の判定を行うバージョン
static async Task<CustomVisionResponse> MakeRequest(byte[] byteData)
{
HttpClient client = new HttpClient();
client.DefaultRequestHeaders.Add("Prediction-Key", "{Prediction-Keyの値}");
string url = "ローカルの画像ファイルを利用する場合のエンドポイントURL";
HttpResponseMessage response;
CustomVisionResponse result = null;
using (var content = new ByteArrayContent(byteData))
{
content.Headers.ContentType =
new MediaTypeHeaderValue("application/octet-stream");
response = await client.PostAsync(url, content);
string tmp = await response.Content.ReadAsStringAsync();
result = JsonConvert.DeserializeObject<CustomVisionResponse>(tmp);
}
return result;
}
// URLで指定された画像の判定を行うバージョン
public static async Task<CustomVisionResponse> DetectHamburgerUrl(
string imgUrl)
{
HttpClient client = new HttpClient();
client.DefaultRequestHeaders.Add("Prediction-Key", "{Prediction-Keyの値}");
string url = "画像URLを指定する場合のエンドポイントURL";
HttpResponseMessage response;
CustomVisionResponse result = null;
var body = new { Url = imgUrl };
using (var content = new StringContent(JsonConvert.SerializeObject(body)))
{
content.Headers.ContentType =
new MediaTypeHeaderValue("application/json");
response = await client.PostAsync(url, content);
string tmp = await response.Content.ReadAsStringAsync();
result = JsonConvert.DeserializeObject<CustomVisionResponse>(tmp);
}
return result;
}
}
また、APIの呼び出しが成功した場合、その戻り値は次のような形式のJSONデータとなる。重要なのはこのうちのPredictations配列だ。ここに各タグに合致する確率が格納される。
{
"Id": 文字列,
"Project": 文字列,
"Iteration": 文字列,
"Created": 文字列,
"Predictions": [
{
"TagId": 文字列,
"Tag": 文字列,
"Probability": 小数点値
}
]
}
そこでこれを模したクラスとして以下を定義して、上のコードではパースに使用している。
public class CustomVisionResponse
{
public string Id { get; set; }
public string Project { get; set; }
public string Iteration { get; set; }
public string Created { get; set; }
public List<Prediction> Predictions { get; set; }
}
public class Prediction
{
public string TagId { get; set; }
public string Tag { get; set; }
public double Probability { get; set; }
}
後は、このクラスライブラリを呼び出すアプリを作成するだけだ。
Copyright© Digital Advantage Corp. All Rights Reserved.


