画像をタッチ編集! アートなiPhoneカメラアプリを作る:Retinaに映える! iOS美麗アプリ制作入門(3)(1/2 ページ)
デザイン/アート用のC++フレームワーク「openFrameworks」でパーティクルやプリミティブを使ったRetinaに映える美麗なiPhone/iPadアプリの制作方法を紹介します
openFrameworksからカメラ画像を取得・編集しよう
前回の「PerfumeのモーションデータをiPhoneアプリにして動かしてみた」では、PerfumeのモーションデータをiPhoneで表示しました。今回は、iPhoneのカメラで撮影した画像を取得してみましょう。
残念ながらiOSのPhoto Libraryやカメラ画像の利用は、シミュレータではサポートされておらず、実機のみでしか動作しません。アプリを実機実行するためには、開発者登録が必要です。少し古いですが、詳しくは以下の記事などを参照しておいてください。
openFrameworksのサンプルカメラアプリを動かしてみる
実はopenFrameworksには、すでにカメラ画像を扱うサンプルアプリが用意されています。まずは、そのプロジェクトファイルをのぞいてみましょう。ダウンロードしたopenFrameworksのファイル内にある「of_preRelease_v007_iphone」→「apps」→「PhoneSpecificExamples」→「ImagePickerExample」→「ImagePickerExample.xcodeproj」を開きます。
コードを読む前に、まずはアプリを実行して、どういったタッチジェスチャが使われているか確認しましょう。
起動すると、簡単な説明が書かれた画像が表示されます。画面をドラッグして画像を動かすことができるようです。
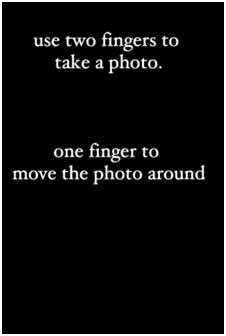 ImagePickerExample起動直後
次に、2本指でタップすると、iOSの機能が呼び出されてカメラが起動します。
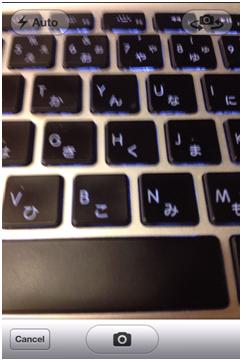 写真撮影画面
写真が撮影できたら「Use」をタップします。
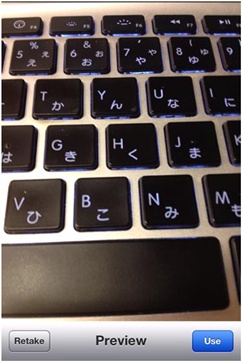 利用する写真を確定
起動直後の画像が撮影した画像に変更されています。画像を2本指でタップすると再度カメラが起動します。
 撮影した写真をアプリから利用
ポイントは3つあります。1本指で画像の位置を変更していること、2本指でイベントを実行していること、カメラを利用していることです。
サンプルカメラアプリの中身
具体的にコードを読んでみましょう。
#pragma once

#include "ofMain.h"
#include "ofxiPhone.h"
#include "ofxiPhoneExtras.h"

class testApp : public ofxiPhoneApp {

public:
    void setup();
    void update();
    void draw();
    void exit();

    void touchDown(ofTouchEventArgs &touch);
    void touchMoved(ofTouchEventArgs &touch);
    void touchUp(ofTouchEventArgs &touch);
    void touchDoubleTap(ofTouchEventArgs &touch);
    void touchCancelled(ofTouchEventArgs &touch);

    void lostFocus();
    void gotFocus();
    void gotMemoryWarning();
    void deviceOrientationChanged(int newOrientation);

    // the camera image needs to be flipped, so we'll use this memory for that.
    unsigned char * cameraPixels;
    ofxiPhoneImagePicker * camera;
    ofImage    photo;
    ofPoint imgPos;
};
「testApp.h」では、連載第1回の「Retinaに映えるiOSアプリが作れるopenFrameworks」で紹介した、基本的なイベントが定義されています。
    void setup();
    void update();
    void draw();
    void exit();

    void touchDown(ofTouchEventArgs &touch);
    void touchMoved(ofTouchEventArgs &touch);
    void touchUp(ofTouchEventArgs &touch);
    void touchDoubleTap(ofTouchEventArgs &touch);
    void touchCancelled(ofTouchEventArgs &touch);

    void lostFocus();
    void gotFocus();
    void gotMemoryWarning();
    void deviceOrientationChanged(int newOrientation);
「testApp.h」の最後に、画像をpixelで保存する配列(cameraPixels)とカメラを使うためのオブジェクト(camera)、さらに画像(photo)と座標を保存する変数(imgPos)が定義されています。
    // the camera image needs to be flipped, so we'll use this memory for that.
    unsigned char * cameraPixels;
    ofxiPhoneImagePicker * camera;
    ofImage    photo;
    ofPoint imgPos;
次に「testApp.mm」です。メソッドごとに確認していきましょう。
初期化処理でカメラを初期化
setup()では、iPhoneの設定を初期化した後、ofxiPhoneImagePickerであるcameraを初期化しています。
#include "testApp.h"
//--------------------------------------------------------------
void testApp::setup(){
    // register touch events
    ofRegisterTouchEvents(this);

    // initialize the accelerometer
    ofxAccelerometer.setup();

    //iPhoneAlerts will be sent to this.
    ofxiPhoneAlerts.addListener(this);

    cameraPixels = NULL;
    camera = new ofxiPhoneImagePicker();
    camera->setMaxDimension(480); //otherwise we will have enormous images
    imgPos.x=ofGetWidth()/2;
    imgPos.y=ofGetHeight()/2;

    photo.loadImage("images/instructions.png");
}
画像が変わったときの処理
今回のupdate()は、ロードした画像が変わったときに処理が行われるようになっています。
まずは、画像のPixelを格納するcameraPixelsの領域を確保します。
//--------------------------------------------------------------
void testApp::update()
{
    if(camera->imageUpdated){

        // the pixels seem to be flipped, so let's unflip them:
        if (cameraPixels == NULL){
            // first time, let's get memory based on how big the image is:
            cameraPixels = new unsigned char [camera->width * camera->height*4];
        }
撮影した画像は上下が反転している状態になるため、cameraPixelsに上下を反転させた状態で撮影した画像のピクセル情報を保存します。
        // now, lets flip the image vertically:
        for (int i = 0; i < camera->height; i++){
            memcpy(cameraPixels+(camera->height-i-1)*camera->width*4, camera->pixels+i*camera->width*4, camera->width*4);
        }
update()の最後にcameraPixelsに格納したピクセル情報をphotoにセットしています。
        // finally, set the image from pixels...
        photo.setFromPixels(cameraPixels,camera->width, camera->height, OF_IMAGE_COLOR_ALPHA);

        imgPos.x=ofGetWidth()/2;
        imgPos.y=ofGetHeight()/2;

        camera->imageUpdated=false;
画像の描画処理
draw()の中身は、photoを表示する1行だけです。
void testApp::draw()
{
    photo.draw(imgPos.x-photo.width/2,imgPos.y-photo.height/2);
}
大きな流れは以上です。
タップしたときはカメラを起動
残りのタッチイベントも確認しましょう。touch.idはタッチしているポイントの数になり、0から始まります。よって、「touch.id == 0」は1本指タップとなり、1であれば2本指タップになります。
今回は2本指でタップしたときはカメラを起動し、1本指でドラッグしたときは画像が移動するように記述されています。
//--------------------------------------------------------------
void testApp::touchDown(ofTouchEventArgs &touch){
    if(touch.id == 1){
        camera->openCamera();
        imgPos.x=ofGetWidth()/2;
        imgPos.y=ofGetHeight()/2;
    }
}

//--------------------------------------------------------------
void testApp::touchMoved(ofTouchEventArgs &touch){
    if(touch.id == 0){
        imgPos.x=touch.x;
        imgPos.y=touch.y;
    }
}
画面ドラッグで画像が移動しても、そんなに楽しくないですね! openFrameworksだと、簡単にピクセル情報が扱えます。せっかくなので、次ページでは先ほどのサンプル少し書き換えて、ドラッグで画像の色味を変えるようにしてみましょう。
Copyright © ITmedia, Inc. All Rights Reserved.
アイティメディアからのお知らせ


注目のテーマ

編集部からのお知らせ
![]() ITmediaはアイティメディア株式会社の登録商標です。
ITmediaはアイティメディア株式会社の登録商標です。