ブラウザで位置情報を取得してみよう:位置情報を使ってみよう(2)(3/4 ページ)
» 2009年06月19日 00時00分 公開
[笹尾和宏,新日鉄ソリューションズ]
Google Mapsとの連携
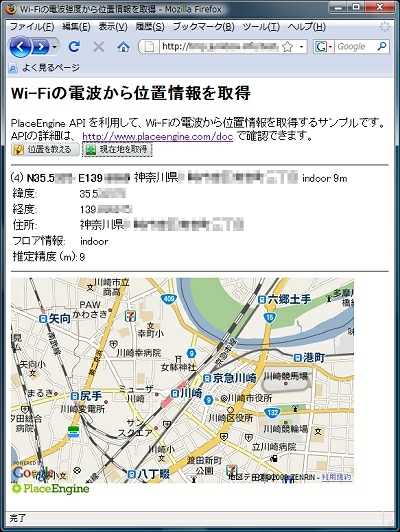
取得した緯度・経度に対応した地図が表示されるように変更してみましょう。今回は地図の表示にGoogle Maps APIを利用しました。ソースコードの追加部分を赤字で示します。
[サンプルの実行]
<!DOCTYPE HTML PUBLIC "-//W3C//DTD HTML 4.01 Transitional//EN">
<html lang="ja">
<head>
<meta http-equiv="Content-Type" content="text/html; charset=utf-8">
<meta http-equiv="Content-Script-Type" content="text/javascript">
<meta http-equiv="Content-Style-Type" content="text/css">
<title>Wi-Fiの電波強度から位置情報を取得</title>
<script src="http://www.placeengine.com/javascripts/pengine.js" type="text/javascript"></script>
<script type="text/javascript" src="http://maps.google.com/maps?file=api&v=2&key=GoogleAPIKey"></script>
<script type="text/javascript">
<!--
// PlaceEngine 用
// キーは http://www.placeengine.com/appk から入手
var pe = {};
var peKey = "PlaceEngineAPIKey";
// Google Maps 用
// キーは http://code.google.com/intl/ja/apis/ajaxsearch/signup.html から入手
var gmap = {};
function initPlaceEngine() {
    // PlaceEngine の利用準備
    // ( http://www.placeengine.com/doc/tut を参照 )
    pe = new PEngine({
        // pe.getLocation() が呼び出されたときの処理
        onGetLocation: function(longitude, latitude, r, info) {
            // HTML表示の更新
            document.getElementById("latitude").innerHTML = latitude;
            document.getElementById("longitude").innerHTML = longitude;
            document.getElementById("address").innerHTML = info.addr;
            document.getElementById("floor").innerHTML = info.floor;
            document.getElementById("result").innerHTML = r;

            // Google Maps の地図を表示
            // ( http://code.google.com/intl/ja/apis/maps/documentation/reference.html を参照 )
            if (GBrowserIsCompatible()) {
                gmap = new GMap2(document.getElementById("map"));
                // 緯度、経度、拡大率(14)を指定
                gmap.setCenter(new GLatLng(latitude, longitude), 14);
            }
        },
        idstatus:"message",
        appkey:peKey
    });
}
//-->
</script>
</head>
<body onLoad="initPlaceEngine()" onunload="GUnload()">
<h2>Wi-Fiの電波強度から位置情報を取得</h2>

Wi-Fiの電波から位置情報を取得し、近くの駅を表示します<br>
Place Engine APIの詳細は、 <a href="http://www.placeengine.com/doc">http://www.placeengine.com/doc</a> で確認できます。<br>
<input alt="位置を教える" src="wide_bt2.png" type="image" onclick="pe.registerLocation()" onkeypress="pe.registerLocation()">
<input alt="現在地を取得" src="wide_bt1.png" type="image" onclick="pe.getLocation()" onkeypress="pe.getLocation()">
<hr>
<div id="message">ネットワークに接続されていないか JavaScript が有効ではありません</div>
<table summary="取得した位置情報">
<tr><td>緯度:</td><td id="latitude">--</td></tr>
<tr><td>経度:</td><td id="longitude">--</td></tr>
<tr><td>住所:</td><td id="address">--</td></tr>
<tr><td>フロア情報:</td><td id="floor">--</td></tr>
<tr><td>推定精度 (m):</td><td id="result">--</td></tr>
</table>
<hr>
<div id="map" style="width:500px;height:300px">地図が表示できません</div>
<a href="http://www.placeengine.com/"><img src="logo.png" border="0" alt="PlaceEngine"></a>
</body>
</html>
では、追加した部分を見ていきましょう。
9行目:Google MapsのAPIを読み込んでいます。GoogleAPIkeyには先ほどのGoogle APIキーが利用できますので同じ値を設定してください。
<script type="text/javascript" src="http://maps.google.com/maps?file=api&v=2&key=GoogleAPIKey"></script>
17〜19行目: Google Mapsのオブジェクトを保持する変数を用意しています。
// Google Maps 用
// キーは http://code.google.com/intl/ja/apis/ajaxsearch/signup.html から入手
var gmap = {};
34〜41行目:地図を表示するためのコードを記述します。Google Map APIで対応ブラウザをチェック(GBrowserIsCompatible())した後、gmapに地図のオブジェクトを割り当てます。また、取得した緯度(latitude)・経度(longitude)が画面の中央に来るようにするため、gmap.setCenter()を呼び出します(40行目)。
            // Google Maps の地図を表示
            // ( http://code.google.com/intl/ja/apis/maps/documentation/reference.html を参照 )
            if (GBrowserIsCompatible())
                gmap = new GMap2(document.getElementById("map"));
                // 緯度、経度、拡大率(14)を指定
                gmap.setCenter(new GLatLng(latitude, longitude), 14);
            }
51行目:Google Maps APIを利用した際に、一部のブラウザがメモリリークを起こすバグに対応するため、bodyタグのonLoadに、Google API の GUnload() ( ブラウザのメモリリークの削減)を追加しました。
<body onLoad="initPlaceEngine()" onunload="GUnload()">
68行目:地図の表示領域です。37行目のdocument.getElementById("map") でこの領域(id=”map”)に地図が表示されます。
<div id="map" style="width:500px;height:300px">地図が表示できません</div>○地図が表示できません
Google APIも使いやすくできているため、このように、簡単に連携できます。
Copyright © ITmedia, Inc. All Rights Reserved.
SpecialPR
アイティメディアからのお知らせ
スポンサーからのお知らせPR
SpecialPR
システム開発ノウハウ 【発注ナビ】PR
あなたにおすすめの記事PR


