Xamarin.Forms:RelativeLayoutでコントロールを相対的に配置するには?:.NET TIPS
Xamarin.Formsで、RelativeLayoutコントロールと各種のプロパティを使用して、画面のサイズなどに相対的にコントロールを配置する方法を解説する。
対象:Visual Studio 2015以降
Xamarin.FormsでUIコントロールを配置するとき、RelativeLayoutコントロール(Xamarin.Forms名前空間)を使えば位置やサイズを相対的に指定できる。
本稿では、RelativeLayoutコントロールを使う記述方法と、動的に位置やサイズを変更する方法を解説する*1。
*1 本稿で使用したXamarin.Formsのバージョン
Xamarin 4.2.1.60 (47830f6)/Xamarin.Forms 2.2.0.45
RelativeLayoutコントロールの使用例
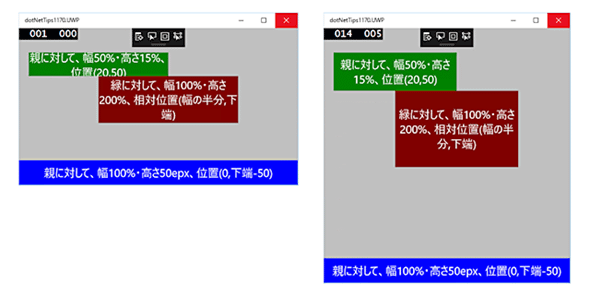
RelativeLayoutコントロールを使うと、異なる画面サイズに対して柔軟に変化するレイアウトを実現できる。次の画像は、同じ画面をサイズを変えて2つ並べたものだ。緑・赤・青色のコントロールの位置やサイズが、画面サイズに応じて変化しているのが分かるだろう。
 RelativeLayoutコントロールの使用例(Windows 10)
画面全体(灰色の部分)がRelativeLayoutコントロールだ。その中に3つのLabelコントロール(Xamarin.Forms名前空間)が配置してある。
緑色のLabelコントロールは、親コントロール(=RelativeLayoutコントロール)に対して、幅50%/高さ15%のサイズにしている。位置は固定で、左から20epx/上から50epxだ。
赤色のLabelコントロールは、緑色のLabelコントロールに対する相対指定になっている。幅は同じで高さは2倍だ。位置は、左端を緑色のLabelコントロールの左右中央に合わせ、上端は緑色のLabelコントロールの下端に合わせている。
青色のLabelコントロールは、再び親コントロールに対する相対指定だ。高さは50epxで固定だが、幅を親コントロールに合わせている。位置は、親コントロールの下端に合わせている。
RelativeLayoutコントロール内での位置/サイズの指定方法
配置したいUIコントロールに、位置/サイズのconstraint(制約)を指定する。constraintには、WidthConstraint添付プロパティ(幅)/HeightConstraint添付プロパティ(高さ)/XConstraint添付プロパティ(横位置)/YConstraint添付プロパティ(縦位置)の4つがある。
constraintには、次の表に示すパラメータを指定する。
| パラメータ名 | 意味 | 例 |
|---|---|---|
| Type | 相対指定の基準にするコントロールのタイプ。親コントロールか他のコントロールか | RelativeToParent(親コントロール) RelativeToView(他のコントロール) |
| ElementName | Type=RelativeToViewのとき、相対指定の基準にするコントロールを名前で指定する(Type=RelativeToParentのときは指定しない) | Label1 Button2 |
| Property | 相対指定の基準にするコントロールのプロパティ | Height X |
| Factor | Propertyパラメータで指定したプロパティの値に掛ける数値(省略時は1.0) | 1.0 0.15 |
| Constant | Factorパラメータを掛けた後に加算する数値(省略時は0.0) | 2.5 -50 |
実際の位置やサイズは、次式で計算した値になる。
{Propertyパラメータで指定したプロパティの値}×{Factorパラメータの値}+{Constantパラメータの値}
実際の例として、冒頭に掲げた画面のXAMLコードを示す(次のコード)。
<RelativeLayout x:Name="RelativeLayout1" BackgroundColor="Silver">
<!-- 親(RelativeLayoutコントロール)に対する相対指定 -->
<Label x:Name="Label1" BackgroundColor="Green" TextColor="White"
RelativeLayout.WidthConstraint="{ConstraintExpression
Type=RelativeToParent,
Property=Width, Factor=0.5}"
RelativeLayout.HeightConstraint="{ConstraintExpression
Type=RelativeToParent,
Property=Height, Factor=0.15}"
RelativeLayout.XConstraint="{ConstraintExpression
Type=RelativeToParent,
Property=X, Constant=20}"
RelativeLayout.YConstraint="{ConstraintExpression
Type=RelativeToParent,
Property=Y, Constant=50}"
Text="親に対して、幅50%・高さ15%、位置(20,50)" />
<!-- Label1(緑色)に対する相対指定 -->
<Label BackgroundColor="Maroon" TextColor="White"
RelativeLayout.WidthConstraint="{ConstraintExpression
Type=RelativeToView,
ElementName=Label1,
Property=Width, Factor=1}"
RelativeLayout.HeightConstraint="{ConstraintExpression
Type=RelativeToView,
ElementName=Label1,
Property=Height, Factor=2}"
RelativeLayout.XConstraint="{ConstraintExpression
Type=RelativeToView,
ElementName=Label1,
Property=Width, Factor=0.5, Constant=20}"
RelativeLayout.YConstraint="{ConstraintExpression
Type=RelativeToView,
ElementName=Label1,
Property=Height, Constant=50}"
Text="緑に対して、幅100%・高さ200%、相対位置(幅の半分,下端)" />
<!-- 親(RelativeLayoutコントロール)に対する相対指定 -->
<Label x:Name="Label3" BackgroundColor="Blue" TextColor="White"
RelativeLayout.WidthConstraint="{ConstraintExpression
Type=RelativeToParent,
Property=Width, Factor=1}"
HeightRequest="50"
RelativeLayout.XConstraint="{ConstraintExpression
Type=RelativeToParent,
Property=X}"
RelativeLayout.YConstraint="{ConstraintExpression
Type=RelativeToParent,
Property=Height, Constant=-50}"
Text="親に対して、幅100%・高さ50epx、位置(0,下端-50)" />
</RelativeLayout>
この他に、Labelコントロールに文字位置などを指定するスタイル定義が必要だが、ここでは省略させていただく。
なお、RelativeLayoutコントロールに「"RelativeLayout1"」、3つ目のLabelコントロールに「"Label3"」という名前を付けてある。ここまでの話だけなら、これらの名前は不要である。次に解説する動的変更のコードで使用する。
レイアウトを動的に変更する
RelativeLayoutコントロール内に配置したUIコントロールの位置やサイズは、後から動的に変更できる。それには、RelativeLayoutクラスのSetBoundsConstraintメソッドを使う。
例えば、上述の画面で下端にある青いラベル(=Label3)の位置を、画面が横長のときに右端へ移動させるには、コードビハインドのSizeChangedイベントハンドラーを次のコードのように記述する。
public partial class MainPage : ContentPage
{
public MainPage()
{
InitializeComponent();
this.SizeChanged += MainPage_SizeChanged; // イベントハンドラーを接続
}
// 追加したイベントハンドラー
private void MainPage_SizeChanged(object sender, EventArgs e)
{
if (Width > Height)
{
// 横長:Label3を右端に
RelativeLayout.SetBoundsConstraint(Label3,
BoundsConstraint.FromExpression(
() => new Rectangle(
RelativeLayout1.Width - 125.0,
RelativeLayout1.Y,
125.0,
RelativeLayout1.Height),
null));
Label3.Text = "親に対して、幅125epx・高さ100%、位置(右端-125,0)";
}
else
{
// 縦長:Label3を下端に(XAML記述の繰り返し)
RelativeLayout.SetBoundsConstraint(Label3,
BoundsConstraint.FromExpression(
() => new Rectangle(
RelativeLayout1.X,
RelativeLayout1.Height - 50.0,
RelativeLayout1.Width,
50.0),
null));
Label3.Text = "親に対して、幅100%・高さ50epx、位置(0,下端-50)";
}
}
}
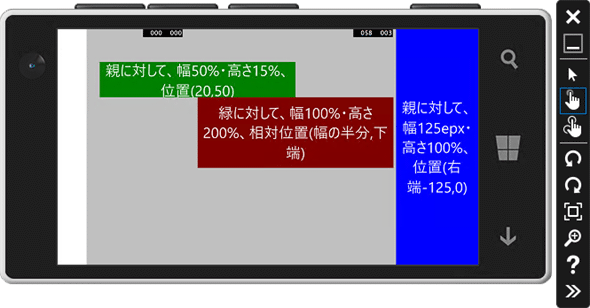
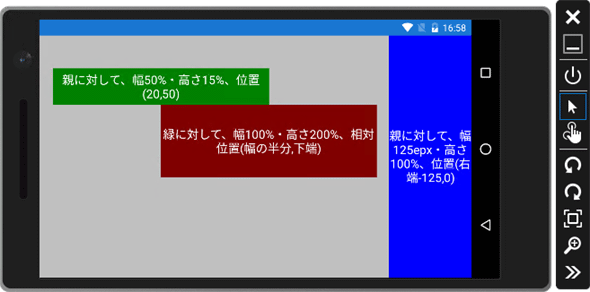
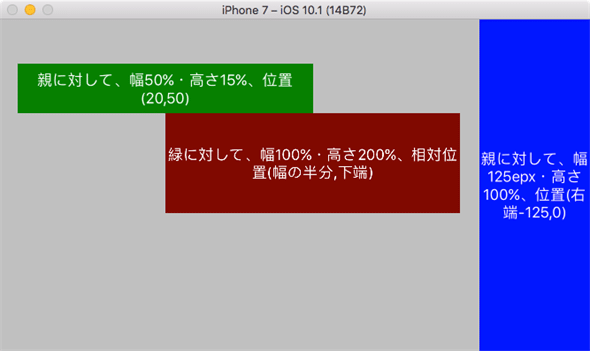
画面が横長のときは、Label3を右端に移動させている。
なお、Windows RuntimeのVisualStateManagerクラスとは異なり、初期状態へ戻すときもコードを書かねばならない(else句以降)。このような場合、XAMLコードの重複するconstraint記述は削除した方がよいだろう。
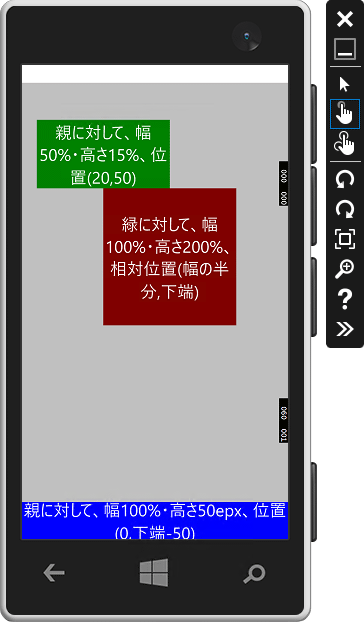
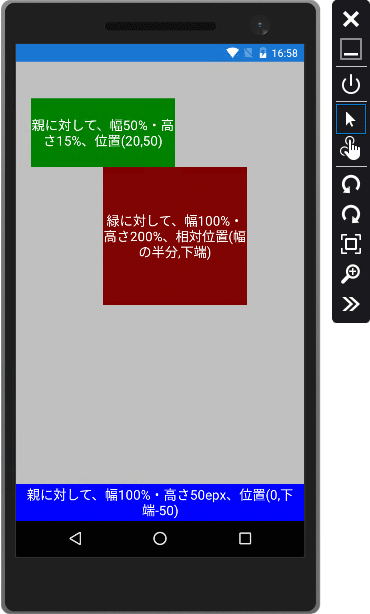
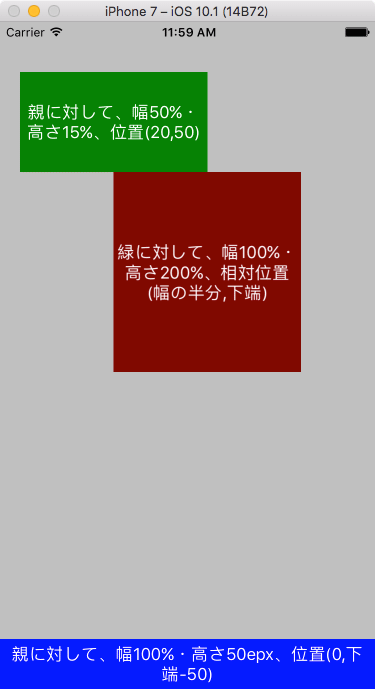
以上で完成だ。実行してみると次からの画像のようになる。まず、縦長の画面の場合。
 実行結果(縦置き画面)
上はVisual Studio Emulator for Androidでの実行結果。中はMac上のiOS Simulatorでの実行結果。下はMobile Emulator(Windows 10)での実行結果。なお、Remoted iOS Simulator for Windowsを使用するにはVisual Studio Enterprise Editionのライセンスが必要となった(編集者がCommunity Editionを使っているため、本稿ではMac上のSimulatorでの画面キャプチャーとなっている)。使用方法についてはプレビュー段階の記事だが「XamarinアプリのMacでのビルドとiOS Simulator for Windows」を参照されたい。
そして、次が画面を横長にした場合だ。
 実行結果(横置き画面)
上はVisual Studio Emulator for Androidでの実行結果。中はMac上のiOS Simulatorでの実行結果。下はMobile Emulator(Windows 10)での実行結果。なお、Remoted iOS Simulator for Windowsを使用するにはVisual Studio Enterprise Editionのライセンスが必要となった(編集者がCommunity Editionを使っているため、本稿ではMac上のSimulatorでの画面キャプチャーとなっている)。使用方法についてはプレビュー段階の記事だが「XamarinアプリのMacでのビルドとiOS Simulator for Windows」を参照されたい。
まとめ
RelativeLayoutコントロールは、その中に配置するUIコントロールの位置やサイズを相対的に指定する。また、コードビハインドで後から動的に位置やサイズを変更できる。
利用可能バージョン:Visual Studio 2015以降
カテゴリ:Xamarin 処理対象:Xamarin.Forms
関連TIPS:Xamarin.Forms:コントロールを等間隔に配置するには?
関連TIPS:Xamarin.Forms:Gridコントロールを分割するには?
関連記事
Copyright© Digital Advantage Corp. All Rights Reserved.

 Xamarin.Forms:コントロールを等間隔に配置するには?
 Xamarin.Forms:Gridコントロールを分割するには?


