携帯の醍醐味! 位置情報とGoogleマップを使うには:クラウドとフレームワークで超簡単ケータイ開発(3)(1/3 ページ)
数年前に比べケータイ向けサービス構築を支援するフレームワークやノウハウがたまってきて、そして無料または、格安でサービスを公開できる仕組み(クラウドやVPSなど)も普及している今こそ、ケータイ向けサービス開発を始めるチャンスではないでしょうか
前回の「JavaでTwitterをOAuth認証して使えるTwitter4jとは」では、「Twitter4j」を使って、JavaでTwitterからタイムラインを取得したり、つぶやいたりする機能を実装しました。
今回は最後に、携帯端末ならではの位置情報取得機能とGoogleマップ表示機能を実装して、サンプルアプリを仕上げます。
位置情報の取得はGPSと基地局測位の2つある!
ケータイでは、2つの方法を使って、位置情報を取得できます。
- GPS
GPS衛星を使い測位する。正確な位置が取得できるが、GPSを搭載していない機種では使えない。天候や場所によっては、測位できない場合もある - 基地局測位
GPSを搭載していない機種でも、基地局情報により、大体の位置が把握できる。携帯の基地局の位置と数に依存するので、場所によっては大きな誤差が出る場合がある
この2つの方法によって位置情報を取得するわけですが、実際にはキャリアごとに決められたフォーマットで、位置情報取得用のURIにGET/POSTアクセスを行う必要があります。
大手3キャリアを対象にするためには、それぞれにも上記2つの方法があるので、計6種類の位置情報取得方法をサポートする必要があります。しかし、連載第1回の「Google App EngineとSlim3とMobyletで始める携帯Web入門」で紹介した「Mobylet」を使用することにより、共通のタグを1つ置いておくだけで位置情報が取得できます。
前回から画面遷移を変更
1つ注意点があります。携帯で位置情報を取得するためには、ユーザーに位置情報を取得することを通知し、許可を得る必要があります。そのため、ワンアクション増えることになります。具体的には、以下のような画面遷移です。
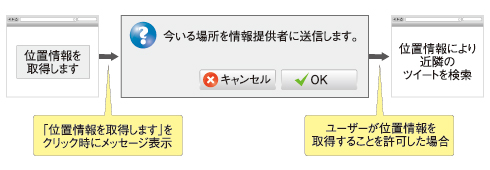 図1 位置情報を取得する際の画面遷移図
「位置情報を取得しますボタン」は、機種によって、リンクまたはボタンとなります。「位置情報を取得する確認画面」も機種により変わります。
画面遷移の変更に伴い、各ファイルの構成を以下のように変更します。
| URLパス | コントローラ | JSP | 処理内容 |
|---|---|---|---|
| /twitter/ | IndexController | index.jsp | 位置情報を取得するタグを配置 |
| /twitter/show | ShowController | show.jsp | 位置情報により、ツイートを検索し一覧表 |
| /twitter/timeline | TimelineController | show.jsp | タイムラインを取得し一覧表示 |
| /twitter/tweet | TweetController | show.jsp | Twitterにつぶやく |
| 表1 ファイル構成も変更 | |||
Mobyletタグで位置情報による検索を実装
まずは、位置情報を取得するためのMobyletのカスタムタグを「war/twitter/index.jsp」に作成します。
<%@page pageEncoding="UTF-8" isELIgnored="false" session="false"%>
<%@taglib prefix="c" uri="http://java.sun.com/jsp/jstl/core"%>
<%@taglib prefix="fn" uri="http://java.sun.com/jsp/jstl/functions"%>
<%@taglib prefix="f" uri="http://www.slim3.org/functions"%>
<%@taglib prefix="m" uri="http://taglibs.mobylet.org/" %>
<html>
<head>
<meta http-equiv="Content-Type" content="text/html; charset=UTF-8" />
<title>twitter Index</title>
</head>
<body>
<p>Hello twitter Index !!! </p>
<m:gps kickBackUrl="show">
位置情報を取得します
</m:gps>
</body>
</html>Mobyletのタグを使用するためには、「<%@taglib prefix="m"uri="http://taglibs.mobylet.org/" %>」を設定します。<m:gps>タグを使用して、位置情報を取得するURLを作成しますが、遷移先のURLをkickBackUrlに指定します。ここではshowを指定して、ShowControllerクラスが呼ばれるように設定します。
次に、「com.hayato.gpstweet.service.TwitterService」を以下のように編集します。
package com.hayato.gpstweet.service;

import java.util.List;

import twitter4j.Paging;
import twitter4j.Status;
import twitter4j.Twitter;
import twitter4j.TwitterException;
import twitter4j.TwitterFactory;
import twitter4j.http.AccessToken;

public class TwitterService {

……【略】……

    // 位置情報による検索
    public QueryResult search(double latitude, double longitude)
    throws TwitterException {
        Twitter twitter = getTwitter();
        Query query = new Query();
        // 緯度と経度から位置情報を作成
        GeoLocation location = new GeoLocation(latitude, longitude);
        // 指定位置から半径10kmを設定
        query.setGeoCode(location, 10, Query.KILOMETERS);
        // 位置情報を使用して検索
        QueryResult result = twitter.search(query);
        return result;
    }
}ツイートの検索には、twitter4j.Queryクラスを使用します。Queryに位置情報を設定することにより、指定位置のツイートやユーザープロファイルの場所が指定位置のユーザーのツイートを検索できます。
緯度と経度からtwitter4j.GeoLocationクラスを作成し、QueryのsetGeoCode()メソッドで指定します。その際に検索範囲を指定できますので、今回は半径10kmを指定しています。
位置情報を基に検索を行うコントローラクラスを作成します。build.xmlを実行し、「gen-controller」で、ダイアログに「/twitter/show」を指定します。
作成された「com.hayato.gpstweet.controller.twitter.ShowController」を以下のように編集します。
package com.hayato.gpstweet.controller.twitter;

import java.util.List;

import org.mobylet.core.Mobylet;
import org.mobylet.core.MobyletFactory;
import org.mobylet.core.gps.Gps;
import org.slim3.controller.Controller;
import org.slim3.controller.Navigation;

import twitter4j.Tweet;

import com.hayato.gpstweet.service.TwitterService;

public class ShowController extends Controller {
    private TwitterService service = new TwitterService();

    // 位置情報の取得
    protected Gps getGps() {
        // MobyletインスタンスからGPSを取得する。
        Mobylet mobylet = MobyletFactory.getInstance();
        Gps gps = mobylet.getGps();
        return gps;
    }

    // 位置情報による検索
    @Override
    public Navigation run() throws Exception {
        Double latitude, longitude;

        // 位置情報を取得していない場合
        if (requestScope("latitude") == null) {
            Gps gps = getGps();
            latitude = gps.getLat();
            longitude = gps.getLon();
            // 位置情報をリクエストに保存する
            requestScope("latitude", latitude);
            requestScope("longitude", longitude);
        } else {
            // リクエストから位置情報を取得する
            latitude = asDouble("latitude");
            longitude = asDouble("longitude");
        }

        // 位置情報を指定して、TwitterServiceを呼び出す
        List<Tweet> tweetList = service.search(latitude, longitude).getTweets();
        requestScope("tweets", tweetList);
        return forward("show.jsp");
    }
}位置情報は、Mobyletクラスから取得できます。MobyletFactoryクラスからgetInstance()でMobyletインスタンスを取得して、getGps()で、GPSクラスを取得します。GPSクラスから経度と緯度を取得します。一度取得した位置情報は、リクエストに保存し、使い回します。
JSPファイル「war/twitter/show.jsp」を以下のように編集します。
show.jspは、前回の「timeline.jsp」をベースにして作成します。位置情報を送信するために、hidden項目やURLパラメータに「${latitude}」「${longitude}」を設定します。検索されたツイートは、QueryResultとして返ってきます。
QueryResultクラスからツイートしたユーザーの画像のURLを取得するには、「${tweet.profileImageUrl}」を使用します。このshow.jspをTimelineControllerと共用するため、「${tweet}」のクラス名を確認して、ユーザー画像のURLの取得方法を変えています。
TimelineControllerから取得するクラスは、「twitter4j.StatusJSONImpl」です。このクラスの場合のみ、「${tweet.user.profileImageURL}」を使用します。
次ページでは、Googleマップから位置情報を取得して、この実装をFireMobileSimulatorで試してみます。
Copyright © ITmedia, Inc. All Rights Reserved.
アイティメディアからのお知らせ


注目のテーマ

編集部からのお知らせ
![]() ITmediaはアイティメディア株式会社の登録商標です。
ITmediaはアイティメディア株式会社の登録商標です。