サーブレットとEJBの連携:Java Servlet徹底解説(後編)(4/7 ページ)
» 2000年12月19日 00時00分 公開
[米持幸寿,日本アイ・ビー・エム]
表示系を実装する
表示系の実装(HTML、JSP、JavaScript、Bean)
まず、テスト用Beanの作成、およびHTML、JSP、JavaScriptの作成部分から見ていこう。
テスト用のBeanは、必要なメソッドを定義しただけの空のBeanを作成すればよい。Java ServletやJSPから呼び出したときにそれらしく動けばよいのである。すべての例外(xxxException)とメソッドが定義され、プロパティがアクセスできる程度になればよい。
この後、EJBの開発ではVisualAge for Java使うので、これらのソースもVisualAge for Javaの上で開発しておく方が後々面倒でない。
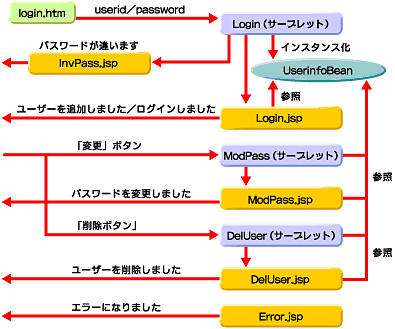
再度、下図を見てほしい。以下に図中に示された一連のソースコードを紹介する。ソースに対する説明は、前編「JSPとどう連携するか」ですでに解説した内容とだぶるので、ここでは説明を省く。まだ理解が不足していると感じる方は、是非前編を読み返していただきたい。
package atmarkit2;
public class UserinfoBean {
  private String userid = "";
  private String password = "";
  private String msg = "";
  public UserinfoBean(String userid, String password) {
    this.userid = userid;
    this.password = password;
  }
  public String getUserid() { return userid; }
  public String getPassword() { return password; }
  public String getMsg() { return msg; }
  public void setMsg(String msg) { this.msg = msg; }
  public void login(String userid, String password)
    throws InvPassException, UserAddedException {
    this.userid = userid;
    this.password = password;
    if(!userid.equals(password)){
      msg = "パスワードが違います";
      throw new InvPassException();
    }
    if(userid.equals("new")) throw new UserAddedException();
    msg = "ログインされました";
  }
  public void modPass(String password) {
    this.password = password;
    msg = "パスワードが変更されました";
  }
  public void delUser() {
    msg = "ユーザーが削除されました";
  }
}
リスト1 リソーステスト用のUserinfoBean.java
package atmarkit2;
public class InvPassException extends Exception {
}
リスト2 InvPassException.java
package atmarkit2;
public class UserAddedException extends Exception {
}
リスト3 UserAddedException.java
<html>
<head>
<jsp:useBean id="userinfo" class="atmarkit2.UserinfoBean" scope="session"/>
<script language="JavaScript" src="/atmarkit2/login.js"></script>
</head>
<body>
<H1><%=userinfo.getUserid() %>さん、ようこそ!</H1>
<%=userinfo.getMsg() %>
<FORM action='/servlet/atmarkit2.ModPass' method='POST'>
  新しいパスワード
  <INPUT type='password' name='password' /><BR />
  検査用パスワード
  <INPUT type='password' name='passcomp' /><BR />
  <INPUT type='submit' value='パスワード変更' onClick='return check()' />
  <INPUT type='button' value='ユーザーを削除' onclick='return delUser()' />
</FORM>
</body>
</html>
リスト4 Login.htm
function check() {
  if(document.forms[0].password.value=="" ||
    document.forms[0].passcomp.value=="" ) {
      alert("パスワードを指定してください");
      return false;
  }
  if(document.forms[0].password.value !=
      document.forms[0].passcomp.value) {
    alert("2つのパスワードが違っています");
    return false;
  }
  return confirm("パスワードを変更してもよろしいですか");
}
function delUser() {
  if(confirm("ユーザーを削除してもよろしいですか") == false) return;
  document.forms[0].action="/servlet/atmarkit2.DelUser";
  document.forms[0].submit();
}
リスト5 Login.js
<html>
<head>
<jsp:useBean id="userinfo" class="atmarkit2.UserinfoBean" scope="session"/>
<script language="JavaScript" src="/atmarkit2/login.js"></script>
</head>
<body>
<H1><%=userinfo.getUserid() %>さん、ようこそ!</H1>
<%=userinfo.getMsg() %>
<FORM action='/servlet/atmarkit2.ModPass' method='POST'>
  新しいパスワード
  <INPUT type='password' name='password' /><BR />
  検査用パスワード
  <INPUT type='password' name='passcomp' /><BR />
  <INPUT type='submit' value='パスワード変更' onClick='return check()' />
<INPUT type='button' value='ユーザーを削除' onclick='return delUser()' />
</FORM>
<A HREF="/atmarkit2/login.htm">戻る</A>
</body>
</html>
リスト6 Login.jsp
<html> <head> <meta http-equiv="refresh", content="5; URL=/atmarkit2/Login.htm" /> <title>アットマークアイティ−2000年12月</title> <jsp:useBean id="userinfo" class="atmarkit2.UserinfoBean" scope="session"/> <body> <H1><%=userinfo.getUserid() %>さん</H1> <%=userinfo.getMsg() %> </body> </html>
リスト7 ModUser.jsp
<html> <head> <meta http-equiv="refresh", content="5; URL=/atmarkit2/Login.htm" /> <title>アットマークアイティ−2000年12月</title> <jsp:useBean id="userinfo" class="atmarkit2.UserinfoBean" scope="session"/> <body> <H1><%=userinfo.getUserid() %>さん</H1> <%=userinfo.getMsg() %> </body> </html>
リスト8 DelUser.jsp
<html>
<head>
<meta http-equiv="refresh", content="5; URL=/atmarkit2/Login.htm" />
<jsp:useBean id="userinfo" class="atmarkit2.UserinfoBean" scope="session"/>
</head>
<body>
<H1>ログインエラー</H1>
<%=userinfo.getMsg() %>
</body>
</html>
リスト9 InvPass.jsp
<html>
<head>
<meta http-equiv="refresh", content="5; URL=/atmarkit2/Login.htm" />
<jsp:useBean id="userinfo" class="atmarkit2.UserinfoBean" scope="session"/>
</head>
<body>
<H1><%=userinfo.getUserid() %>さん</H1>
次のエラーになりました<BR />
<%=userinfo.getMsg() %>
</body>
</html>
リスト10 Error.jspp
サーブレットの実装
次に、サーブレットの説明をしよう。サーブレットもほとんど前回と同じであるが、画面ごとに該当するメソッドをUserinfoBean上で呼び出すように作られている。UserinfoBeanは、使われたユーザーIDとパスワードを見て、InvPassException、UserAddedExceptionなどを返して来るので、それに対応して表示するページを変更している。
package atmarkit2;
import javax.servlet.*;
import javax.servlet.http.*;
import java.io.*;
public class Login extends HttpServlet
{
  ServletContext ctx = null;
    public void init(ServletConfig config) {
        synchronized(this) {
          if(ctx == null) {
            ctx = config.getServletContext();
        }
      }
    }
  public void service(HttpServletRequest request,
       HttpServletResponse response)
  throws IOException, ServletException {
  // ブラウザからの情報の読み取り
  String userid = request.getParameter("userid");
  String password = request.getParameter("password");
  // セッションオブジェクトに保管
  HttpSession session = request.getSession(true);
  UserinfoBean bean = new UserinfoBean(userid, password);
  session.putValue("userinfo", bean);
  RequestDispatcher rd = null;
  try {
    bean.login(userid, password);
    rd = ctx.getRequestDispatcher("/atmarkit2/Login.jsp");
  } catch(UserAddedException e) {
    bean.setMsg("ユーザーが追加されました");
    rd = ctx.getRequestDispatcher("/atmarkit2/Login.jsp");
  } catch(InvPassException e) {
    rd = ctx.getRequestDispatcher("/atmarkit2/InvPass.jsp");
  } catch(Exception e) {
    bean.setMsg(e.getMessage());
    rd = ctx.getRequestDispatcher("/atmarkit2/Error.jsp");
  }
  // 画面を表示
  rd.forward(request, response);
  }
}
リスト11 Login.java
 package atmarkit2;
import javax.servlet.*;
import javax.servlet.http.*;
import java.io.*;
public class ModPass extends HttpServlet
{
  ServletContext ctx = null;
    public void init(ServletConfig config) {
      synchronized(this) {
        if(ctx == null) {
        ctx = config.getServletContext();
      }
    }
  }
  public void service(HttpServletRequest request, HttpServletResponse response)
    throws IOException, ServletException {
    // ブラウザからの情報の読み取り
    String password = request.getParameter("password");
    // セッションオブジェクトに保管
    HttpSession session = request.getSession(true);
    UserinfoBean bean = (UserinfoBean)session.getValue("userinfo");
    RequestDispatcher rd = null;
    try {
      bean.modPass(password);
      rd = ctx.getRequestDispatcher("/atmarkit2/ModPass.jsp");
    } catch(Exception e) {
      bean.setMsg(e.getMessage());
       rd = ctx.getRequestDispatcher("/atmarkit2/Error.jsp");
 }
  // 画面を表示
  rd.forward(request, response);
  }
}
リスト12 ModPass.java
package atmarkit2;
import javax.servlet.*;
import javax.servlet.http.*;
import java.io.*;
public class DelUser extends HttpServlet
  {
    ServletContext ctx = null;
    public void init(ServletConfig config) {
        synchronized(this) {
          if(ctx == null) {
          ctx = config.getServletContext();
        }
      }
  }
  public void service(HttpServletRequest request, HttpServletResponse response)
  throws IOException, ServletException {
    // ブラウザからの情報の読み取り
    String password = request.getParameter("password");
    // セッションオブジェクトに保管
     HttpSession session = request.getSession(true);
    UserinfoBean bean = (UserinfoBean)session.getValue("userinfo");
    RequestDispatcher rd = null;
    try {
      bean.delUser();
      rd = ctx.getRequestDispatcher("/atmarkit2/DelUser.jsp");
      } catch(Exception e) {
      bean.setMsg(e.getMessage());
      rd = ctx.getRequestDispatcher("/atmarkit2/Error.jsp");
      }
  // 画面を表示
  rd.forward(request, response);
}
リスト13 DelUser.java
ここまでのファイルがすべて出来上がると、EJBなしの状態でとりあえず画面が動くようになる。こうすることで、EJB側の開発とは別に画面デザイン、JavaScriptのテストなどを平行して進めることができる。画面は後で紹介するのでここでは省く。
Copyright © ITmedia, Inc. All Rights Reserved.
SpecialPR
アイティメディアからのお知らせ
スポンサーからのお知らせPR
SpecialPR
システム開発ノウハウ 【発注ナビ】PR
あなたにおすすめの記事PR

 画面構成と関連するサーブレットとJSP


