第7回 WPF UI要素の基礎とレイアウト用のパネルを学ぼう:連載:WPF入門(2/2 ページ)
■パネル(レイアウト用のUI要素)
WPFには柔軟なレイアウトを簡単に実現するための仕組みが備わっている。ここでは、レイアウトの背景、基礎的な概念、および、標準で提供されているレイアウト用のパネルについて説明していく。
●背景
かつて技術が未成熟だったころ、GUIアプリケーションは固定レイアウト(要素のサイズや配置をすべてハード・コーディング)になることが多かったが、技術の進歩とともに、柔軟なレイアウトが可能となった。レイアウトを柔軟にすることには以下のような利点がある。
○多様な表示方法への対応
以下に挙げるような理由から、GUIアプリケーションは環境ごとに表示方法が異なってくる。
- ハードウェア上の制約: PCの場合、ディスプレイのサイズは機器ごとにかなりの差がある。
- 利用者の嗜好: ある人は全画面表示を好み、ある人は小さくしたウィンドウを複数並べることを好むなど、利用者ごとに好むウィンドウ・サイズが異なる。
- アクセシビリティ: 弱視や老眼の人の利用が想定される場合、フォント・サイズは容易にカスタマイズ可能にする必要がある。
固定レイアウトでは、このような多様な表示方法への対応は難しい。
○多言語対応
文章の長さは使用言語ごとに異なり、特に例えば、漢字文化圏とアルファベット文化圏では長さが倍以上変わる場合もある。
多言語対応が必要な場合に固定レイアウトを行っていると、言語によって文字が途中で切れるか、逆に余白が残りすぎるなどといった問題が生じる。柔軟なレイアウト手法によってサイズや配置を自動調整できれば、他言語対応に伴うGUIの再調整作業は必要なくなり、他言語対応の手間をほぼ翻訳の手間だけにできる。
●WPFのレイアウトの基礎概念
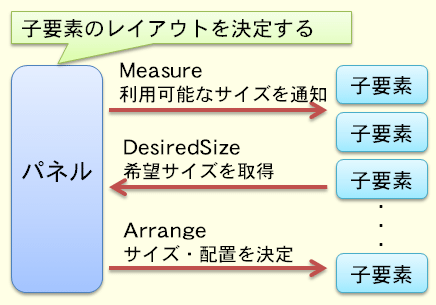
柔軟なレイアウトを実現するため、WPFのUI要素は自分自身だけでなく、レイアウト用のパネル(後述するCanvasやGridなど)などを親要素とし、Figure 2に示すように、親子間で協調しながらサイズや配置を決定していく。
親子間の協調のため、UIElementクラスには以下のようなメソッドが用意されている。
- DesiredSizeプロパティ: 要素が希望するサイズ。
- Measureメソッド: 親要素から利用可能な領域サイズを渡し、DesiredSizeプロパティの値を更新する。
- Arrangeメソッド: 実際に要素のサイズや配置を決定する。
希望サイズを測るだけのMeasureメソッドと実際にサイズや配置を決定するArrangeメソッドに分かれているのは、正式にレイアウトを決定するまでの間に、ほかの要素との兼ね合いで何度も測り直しが発生するためである。
○希望サイズの決定
Measureでの希望サイズや配置の決定に当たって、FrameworkElementクラスは以下のようなプロパティを持っている。
- Width, Height: 幅、高さを具体的に指定する。ただし、親要素によって希望サイズが拒否される可能性もあるため、必ずしもこの値が最終的なサイズにはならない。
- MinWidth, MaxWidth, MinHeight, MaxHeight: 幅、高さの最小値、最大値を指定する。
- Margin: 要素の外側の余白幅を指定する。
- HorizontalAlignment, VerticalAlignment: 配置される空間よりも要素のサイズの方が小さい場合に、要素を上下左右のどちらに寄せるかを指定する。
WidthプロパティとHeightプロパティを用いることで、具体的な幅、高さを直接指定することも可能ではあるが、思ったとおりの見た目を得やすい半面、前述のような多様な表示方法への適応力が弱まるという問題もある。具体的な値の指定は可能な限り避けた方がいいだろう。
また、このWidthプロパティやHeightプロパティはあくまで希望サイズを指定するためのものであって、レイアウト決定後の実際の値ではない。これらのプロパティを指定せず、親要素や子要素に応じてサイズを自動決定した場合、その値はデフォルト値(NaN: Not a Number、無効な数値)のままになっている。レイアウト決定後の値を取得したい場合には、ActualWidthプロパティとActualHeightプロパティを利用する。
●標準提供されるパネル
WPFで標準提供されているパネルを紹介していこう。ここで紹介するクラスはいずれもPanelクラス(System.Windows.Controls名前空間)の派生クラスとなっている。
○StackPanel
StackPanelクラス(System.Windows.Controls名前空間)では、子要素を縦または横一列に整列する。
List 5に示すように特に何も指定しなければ縦に、List 6に示すようにOrientation属性で「Horizontal」を指定すると横に整列する。List 5、List 6の実行結果をそれぞれMovie 1、Movie 2に示す。
<Window x:Class="atmarkit07.Panels.StackPanelSample"
xmlns="http://schemas.microsoft.com/winfx/2006/xaml/presentation"
xmlns:x="http://schemas.microsoft.com/winfx/2006/xaml"
Title="StackPanel(縦)" Height="300" Width="300">
<StackPanel>
<Button Content="幅指定なし" />
<Button Content="幅 100 右寄せ" HorizontalAlignment="Right" />
<Button Content="幅 100 中央" HorizontalAlignment="Center" />
<Button Content="幅 100 左寄せ" HorizontalAlignment="Left" />
<Button Content="幅 200〜250" MinWidth="200" MaxWidth="250" />
<Button Content="余白30" Margin="30" />
</StackPanel>
</Window>
<Window x:Class="atmarkit07.Panels.StackPanelHorizontalSample"
xmlns="http://schemas.microsoft.com/winfx/2006/xaml/presentation"
xmlns:x="http://schemas.microsoft.com/winfx/2006/xaml"
Title="StackPanel(横)" Height="300" Width="300">
<Window.Resources>
<Style TargetType="Button">
<Setter Property="LayoutTransform">
<Setter.Value>
<RotateTransform Angle="-90" />
</Setter.Value>
</Setter>
</Style>
</Window.Resources>
<StackPanel Orientation="Horizontal">
<Button Content="高さ指定なし"/>
<Button Content="高さ 100 上寄せ" VerticalAlignment="Top" />
<Button Content="高さ 100 中央" VerticalAlignment="Center" />
<Button Content="高さ 100 下寄せ" VerticalAlignment="Bottom" />
<Button Content="高さ 200〜250" MinWidth="200" MaxWidth="250"/>
<Button Content="余白30" Margin="30" />
</StackPanel>
</Window>
○WrapPanel
WrapPanelクラス(System.Windows.Controls名前空間)では、子要素を左から右に順番に並べ、幅を超えた分は右端で折り返すようにレイアウトする。HTMLでのインライン要素のレイアウトを想像するといいだろう。
List 8にWrapPanelの利用例となるXAMLコードを、Movie 3にその実行結果を示す。
<Window x:Class="atmarkit07.Panels.WrapPanelSample"
xmlns="http://schemas.microsoft.com/winfx/2006/xaml/presentation"
xmlns:x="http://schemas.microsoft.com/winfx/2006/xaml"
Title="WrapPanelSample" Height="300" Width="300">
<WrapPanel>
<Button Content="1" Height="80" />
<Button Content="上寄せ"
Width="80" VerticalAlignment="Top" />
<Button Content="中央"
Width="80" VerticalAlignment="Center" />
<Button Content="下寄せ"
Width="80" VerticalAlignment="Bottom" />
<Button Content="上寄せ"
Width="80" VerticalAlignment="Top" />
<Button Content="中央"
Width="80" VerticalAlignment="Center" />
<Button Content="下寄せ"
Width="80" VerticalAlignment="Bottom" />
</WrapPanel>
</Window>
○DockPanel
DockPanelクラス(System.Windows.Controls名前空間)では、パネルの上下左右に子要素を貼り付ける(ドッキング)ようにレイアウトする。ドッキングする位置はDockPanel.Dock属性(実体は添付プロパティ)によって行う。
List 8にDockPanelの利用例となるXAMLコードを、Movie 4にその実行結果を示す。
<Window x:Class="atmarkit07.Panels.DockPanelSample"
xmlns="http://schemas.microsoft.com/winfx/2006/xaml/presentation"
xmlns:x="http://schemas.microsoft.com/winfx/2006/xaml"
Title="DockPanel" Height="300" Width="300">
<Window.Resources>
<Style TargetType="Button">
<Setter Property="Padding" Value="15" />
</Style>
</Window.Resources>
<DockPanel>
<Button Content="1" DockPanel.Dock="Left"
Background="#ffcccc" />
<Button Content="2" DockPanel.Dock="Top"
Background="#ccffcc" />
<Button Content="3" DockPanel.Dock="Right"
Background="#ccccff" />
<Button Content="4" DockPanel.Dock="Bottom"
Background="#ccffff" />
<Button Content="5" DockPanel.Dock="Left"
Background="#ffffcc" />
<Button Content="6" DockPanel.Dock="Right"
Background="#ffccff" />
<Button Content="7"
Background="#ffffff" />
</DockPanel>
</Window>
○Canvas
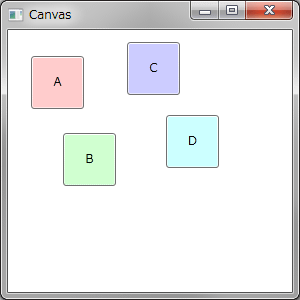
あまり場面は多くないが、どうしても固定レイアウトが必要なときにはCanvasクラス(System.Windows.Controls名前空間)を利用する。配置の指定はCanvas.Left属性やCanvas.Top属性(いずれも実体は添付プロパティ)を用いて行う。
List 9にCanvasの利用例となるXAMLコードを、Figure 3にその実行結果を示す。
<Window x:Class="atmarkit07.Panels.CanvasSample"
xmlns="http://schemas.microsoft.com/winfx/2006/xaml/presentation"
xmlns:x="http://schemas.microsoft.com/winfx/2006/xaml"
Title="Canvas" Height="300" Width="300">
<Canvas>
<Button Canvas.Left="23" Canvas.Top="26" Content="A"
Height="53" Width="53" Background="#ffcccc" />
<Button Canvas.Left="55" Canvas.Top="103" Content="B"
Height="53" Width="53" Background="#ccffcc" />
<Button Canvas.Left="119" Canvas.Top="12" Content="C"
Height="53" Width="53" Background="#ccccff" />
<Button Canvas.Left="158" Canvas.Top="85" Content="D"
Height="53" Width="53" Background="#ccffff" />
</Canvas>
</Window>
○Grid
Gridクラス(System.Windows.Controls名前空間)は、表形式(列位置と行位置の指定)でレイアウトを行う。
Visual Studioのウィンドウのテンプレートで使われているため、目にする機会は多いだろう。ただし、Visual Studioの視覚デザイン・ツールを利用すると、表形式といっても、余白(Margin属性)やサイズ(Width属性とHeight属性)を使った固定的なレイアウトになりがちである。Windowsフォーム時代と同じ感覚でレイアウトができて手軽ではあるものの、多様な表示方法に対応するためには注意が必要である。
表を何行・何列にするかや、各列の幅、各行の高さを決めるために、<Grid>要素のRowDefinitionsプロパティ、および、ColumnDefinitionsプロパティを設定する。列の幅、および、行の高さには、以下のように3種類の指定方法がある。
- 固定値指定: 「Width="100"」というように、数値のみを与えると、固定幅/高さになる。
- 比率指定: 「Width="2*"」というように、数値の後ろにアスタリスクを付けると、比率指定となる。<Grid>要素自身のサイズ変更に応じて、比率を保ったまま行/列のサイズも変化する。
- 自動: 「Width="auto"」というように、「auto」を指定すると、子要素のサイズに応じて行/列のサイズが自動調整される。
また、子要素を何行目・何列目に配置するかを指定するため、Grid.Row属性、および、Grid.Column属性(いずれも実体は添付プロパティ)を設定する。複数行・複数列にまたがる子要素を作るためには、Grid.RowSpan属性およびGrid.ColumnSpan属性を指定する。
List 10にGridの利用例となるXAMLコードを、Movie 5にその実行結果を示す。
<Window x:Class="atmarkit07.Panels.GridSample"
xmlns="http://schemas.microsoft.com/winfx/2006/xaml/presentation"
xmlns:x="http://schemas.microsoft.com/winfx/2006/xaml"
Title="Grid" FontSize="16"
Height="320" Width="480">
<Grid>
<Grid.RowDefinitions>
<RowDefinition Height="*" />
<RowDefinition Height="*" />
<RowDefinition Height="*" />
</Grid.RowDefinitions>
<Grid>
<Grid.RowDefinitions>
<RowDefinition Height="50" />
<RowDefinition Height="50" />
</Grid.RowDefinitions>
<Grid.ColumnDefinitions>
<ColumnDefinition Width="150" />
<ColumnDefinition Width="150" />
<ColumnDefinition Width="150" />
</Grid.ColumnDefinitions>
<Button Content="固定幅"
Background="#ffcccc" />
<Button Content="A" Background="#ccffcc"
Grid.Column="1" />
<Button Content="B" Background="#ccccff"
Grid.Column="2" />
<Button Content="190" Background="#ccffff"
Grid.Row="1" />
<Button Content="190" Background="#ffccff"
Grid.Row="1" Grid.Column="1" />
<Button Content="190" Background="#ffffcc"
Grid.Row="1" Grid.Column="2" />
</Grid>
<Grid Grid.Row="1">
<Grid.RowDefinitions>
<RowDefinition Height="*" />
<RowDefinition Height="*" />
</Grid.RowDefinitions>
<Grid.ColumnDefinitions>
<ColumnDefinition Width="2*" />
<ColumnDefinition Width="3*" />
<ColumnDefinition Width="4*" />
</Grid.ColumnDefinitions>
<Button Content="比率" Background="#ffcccc" />
<Button Content="A" Background="#ccffcc"
Grid.Column="1" />
<Button Content="B" Background="#ccccff"
Grid.Column="2" />
<Button Content="2*" Background="#ccffff"
Grid.Row="1" />
<Button Content="3*" Background="#ffccff"
Grid.Row="1" Grid.Column="1" />
<Button Content="4*" Background="#ffffcc"
Grid.Row="1" Grid.Column="2" />
</Grid>
<Grid Grid.Row="2">
<Grid.RowDefinitions>
<RowDefinition Height="auto" />
<RowDefinition Height="auto" />
</Grid.RowDefinitions>
<Grid.ColumnDefinitions>
<ColumnDefinition Width="auto" />
<ColumnDefinition Width="auto" />
<ColumnDefinition Width="auto" />
</Grid.ColumnDefinitions>
<Button Content="自動"
Background="#ffcccc" />
<Button Content="━━━長いテキスト━━━"
Background="#ccffcc" Grid.Column="1" />
<Button Content="短い"
Background="#ccccff" Grid.Column="2" />
<Button Content="auto"
Background="#ccffff" Grid.Row="1" />
<Button Content="短い"
Background="#ffccff" Grid.Row="1"
Grid.Column="1" />
<Button Content="━━━長いテキスト━━━"
Background="#ffffcc" Grid.Row="1"
Grid.Column="2" />
</Grid>
</Grid>
</Window>
特に、「auto」はフォント・サイズの変更と相性がよい。また、多言語対応によって文字幅が変化した場合にも自動的に対応できる。
Movie 6に例を示そう。この例では、コントロール・キーを押しながらマウス・ホイールを回すとフォント・サイズが変化するコードを記述している。<Grid>要素の行・列のサイズは「auto」を指定してあり、フォント・サイズの変化に、行・列のサイズが追従している。
場合によっては、<Grid>要素の行・列のサイズを動的に変更したい場合もあるだろう。そういう場合、List 11に示すように、<Grid>要素の子に<GridSplitter>要素を配置する。実行結果はMovie 7に示すようになる。
<Window x:Class="atmarkit07.Panels.SplitterSample"
xmlns="http://schemas.microsoft.com/winfx/2006/xaml/presentation"
xmlns:x="http://schemas.microsoft.com/winfx/2006/xaml"
Title="スプリッター" Height="300" Width="300" FontSize="20">
<Grid>
<Grid.RowDefinitions>
<RowDefinition Height="*" />
<RowDefinition Height="auto" />
<RowDefinition Height="*" />
</Grid.RowDefinitions>
<Grid.ColumnDefinitions>
<ColumnDefinition Width="*" />
<ColumnDefinition Width="auto" />
<ColumnDefinition Width="*" />
</Grid.ColumnDefinitions>
<Button Content="A" Background="#ffcccc" />
<Button Content="B" Background="#ccffcc" Grid.Column="2"/>
<Button Content="C" Background="#ccccff" Grid.Row="2" />
<Button Content="D" Background="#ccffff" Grid.Row="2"
Grid.Column="2"/>
<GridSplitter Grid.Row="1" Grid.ColumnSpan="3" Height="5"
HorizontalAlignment="Stretch" VerticalAlignment="Center" />
<GridSplitter Grid.Column="1" Grid.RowSpan="3" Width="5"
HorizontalAlignment="Center" VerticalAlignment="Stretch" />
</Grid>
</Window>
ただし、<GridSplitter>要素を利用する場合、以下のような注意点がある。
- <GridSplitter>要素自体、<Grid>要素のセルを1つ占有する。そのため、一般的には、<GridSplitter>要素を配置するための行・列を「auto」指定で作成しておく
- <GridSplitter>要素は、デフォルトの状態では幅も高さも「0」で不可視となる。HorizontalAlignment属性などを指定して、見えるサイズに調整する必要がある
- 「特定の1行だけ列幅を変えたい」というようなことは、1つの<Grid>要素内では行えない。もしその必要があるなら、<Grid>要素を入れ子にして、内側の<Grid>要素だけに<GridSplitter>要素を追加するなどの工夫が必要になる
○そのほか
そのほかにも、いくつかPanelクラスの派生クラスがある。ここでは2つのクラスを簡単に紹介しておこう(いずれもSystem.Windows.Controls名前空間)。
- UniformGridクラス: すべての行・列が同じサイズの単純な表形式でレイアウトを行う。柔軟性はないものの、描画の性能はよい。
- VirtualizingPanelクラス: 子要素を仮想化する(スクロールされるまで隠れていて見えない子要素を、実際に表示されるタイミングまで、サイズ計測も配置も行わない)ためのパネル。単体で利用するよりは、次回以降で説明するListBoxクラスなどの内部で利用する。
【コラム】パネルに関する補足
●Z順序
レイアウトの仕方によっては、UI要素が重なってしまう場合がある。このとき、特に指定のない場合、後方で(XAMLコード中の下の方で)定義されたUI要素が上に表示される。この順序(慣例的に「Z順序(Z-order)」と呼ばれる。横方向をX、縦方向をYで表すことが多いため、前後関係をZで表現する)を明示的に指定するには、UI要素にPanel.ZIndex添付プロパティを設定する。この添付プロパティの値が大きいほど手前に表示されることになる。
●レイアウト丸め
WPFでは、UI要素の位置を浮動小数点数で正確に位置を計算していて、自動レイアウトの結果、UI要素や文字の描画位置が非整数ドットになる場合がある。この際、デフォルトでは、補間処理によってUI要素が非整数ドット位置にあるかのように描画を行う。
このような動作が好ましい場合ももちろんあるが、補間のせいで境界線や文字がにじんで見えるという問題もある。
そこで、.NET Framework 4では、FrameworkElementクラスにUseLayoutRoundingプロパティが追加され、このプロパティを「true」に設定すれば、描画位置が整数ドットになるように位置の丸め処理を行ってくれるようになった。
次回は主にコントロールについて説明する。
「連載:WPF入門」
Copyright© Digital Advantage Corp. All Rights Reserved.

 Figure 2: 親子間で協調しながらレイアウトを決定
 Figure 3: Canvasの実行例


