iOS 8アプリ開発のこれまで&Swift 1.2への対応、プロパティオブザーバーとwillSetの基本的な使い方、セグエを使った画面遷移:iPhone 6/6 Plusアプリ開発入門(終)(2/6 ページ)
Swift 1.2への対応
Xcode 6.0の時点ではバージョン1.0だったSwiftですが、Xcode 6.3のリリースと共にバージョン 1.2になりました。Swift 1.2の改善点や修正点は以下のSwiftの公式ブログで説明されています。
「PhotoMap」アプリの実装に関係するSwift 1.2の変更は以下の2点です。この変更に関わる部分を修正しましょう。
- ダウンキャストの仕様変更
- let定数の仕様変更
ダウンキャストの仕様変更
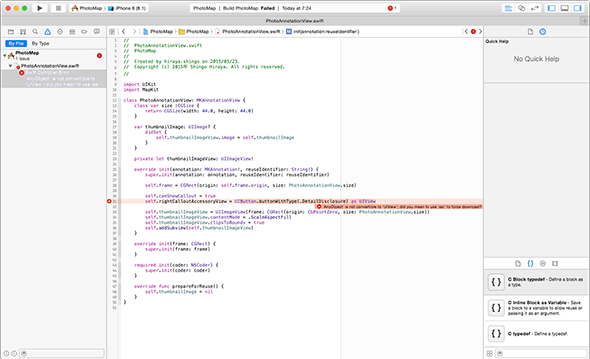
プロジェクトファイル(PhotoMap.xcodeprojファイル)を開きビルド([command]+[B]キー)を行ってください。図2のように、PhotoAnnotationViewクラスのコードが原因でビルドが失敗すると思います。
エラーメッセージは以下の通りです。
'AnyObject' is not convertible to 'UIView'; did you mean to use 'as!' to force downcast?
「AnyObjectはUIViewに変換できない」という内容のエラーメッセージです。
override init(annotation: MKAnnotation!, reuseIdentifier: String!) {
    super.init(annotation: annotation, reuseIdentifier: reuseIdentifier)

    self.frame = CGRect(origin: self.frame.origin, size: PhotoAnnotationView.size)

    self.canShowCallout = true
    self.rightCalloutAccessoryView = UIButton.buttonWithType(.DetailDisclosure) as UIView 	// エラー箇所

    self.thumbnailImageView = UIImageView(frame: CGRect(origin: CGPointZero, size: PhotoAnnotationView.size))
    self.thumbnailImageView.contentMode = .ScaleAspectFill
    self.thumbnailImageView.clipsToBounds = true
    self.addSubview(self.thumbnailImageView)
}
PhotoAnnotationViewクラスのinitメソッド(引数:annotation、reuseIdentifier)で使用している「UIButton」の「buttonWithType」メソッド(7行目)の返却値は「AnyObject」型です。
「AnyObject」型は任意のクラスのインスタンスを表す型であり、Objective-Cのクラスのメソッドの返却値の型などで使われています。「UIButton」といった具体的な型を与えて変換を行うことにより、変換後の型のオブジェクトとして動作させることができます。
これまでは「as」演算子を使用してダウンキャスト(抽象度の高い型から具体的な型への型変換)を行っていましたが、Swift 1.2以降では「as!」演算子を使用してダウンキャストを行う必要があります。以下のように「as!」演算子を使用した記述(7行目)に変更しましょう。
override init(annotation: MKAnnotation!, reuseIdentifier: String!) {
    super.init(annotation: annotation, reuseIdentifier: reuseIdentifier)

    self.frame = CGRect(origin: self.frame.origin, size: PhotoAnnotationView.size)

    self.canShowCallout = true
    self.rightCalloutAccessoryView = UIButton.buttonWithType(.DetailDisclosure) as! UIView 	// 修正箇所

    self.thumbnailImageView = UIImageView(frame: CGRect(origin: CGPointZero, size: PhotoAnnotationView.size))
    self.thumbnailImageView.contentMode = .ScaleAspectFill
    self.thumbnailImageView.clipsToBounds = true
    self.addSubview(self.thumbnailImageView)
}
修正後、再びビルドを行うとダウンキャストを行っている行のエラーは消えると思います。別のエラーが表示されますが、これは次のセクションで修正します。
let定数の仕様変更
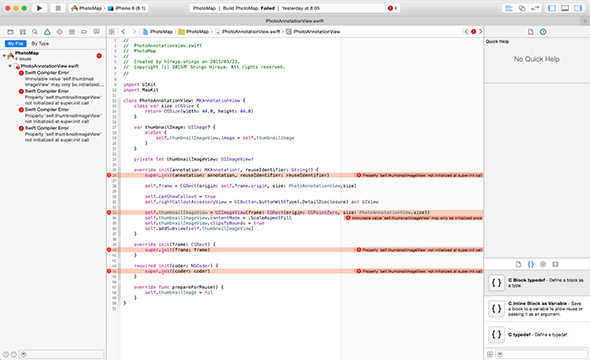
「ダウンキャスト」部分を変更しても、ビルドは失敗してしまい、エラーの指摘がさらに増えるかと思います(図3)。
指摘部分を修正してしまいましょう。表示されているエラーメッセージは以下の2種類です。
Immutable value 'self.thumbnailImageView' may only be initialized once
Property 'self.thumbnailImageView' not initialized at super.init call
「thumbnailImageViewは複数回初期化できない」「thumbnailImageViewはスーパークラスのイニシャライザーを呼ぶ前に初期化されていない」といった内容の指摘です。
private let thumbnailImageView: UIImageView!	// オプショナル型なので初期値nilがセットされる

override init(annotation: MKAnnotation!, reuseIdentifier: String!) {
    super.init(annotation: annotation, reuseIdentifier: reuseIdentifier)

    self.frame = CGRect(origin: self.frame.origin, size: PhotoAnnotationView.size)

    self.canShowCallout = true
    self.rightCalloutAccessoryView = UIButton.buttonWithType(.DetailDisclosure) as! UIView

    self.thumbnailImageView = UIImageView(frame: CGRect(origin: CGPointZero, size: PhotoAnnotationView.size)) // 定数への代入
    self.thumbnailImageView.contentMode = .ScaleAspectFill
    self.thumbnailImageView.clipsToBounds = true
    self.addSubview(self.thumbnailImageView)
}
PhotoAnnotationViewクラスのinitメソッドの例では、以下のようにthumbnailImageView定数に2回値を設定していました。
- 定数の宣言時の初期値設定(オプショナル型なので初期値nilがセットされる)(1行目)
- スーパークラスのイニシャライザー呼び出し後の値の代入(11行目)
このように、定数へ値を与えるタイミングは2回存在していましたが、Swift 1.2からは1回に制限されます。
thumbnailImageViewプロパティはUIImageView!型のままにしておきたいので、定数定義時に初期値を設定するようにして、イニシャライザー内での値の代入は削除します。
修正後のコードは以下の通りです。
private let thumbnailImageView: UIImageView! = UIImageView(frame: CGRect(origin: CGPointZero, size: PhotoAnnotationView.size))

override init(annotation: MKAnnotation!, reuseIdentifier: String!) {
    super.init(annotation: annotation, reuseIdentifier: reuseIdentifier)

    self.frame = CGRect(origin: self.frame.origin, size: PhotoAnnotationView.size)

    self.canShowCallout = true
    self.rightCalloutAccessoryView = UIButton.buttonWithType(.DetailDisclosure) as! UIView

    self.thumbnailImageView.contentMode = .ScaleAspectFill
    self.thumbnailImageView.clipsToBounds = true
    self.addSubview(self.thumbnailImageView)
}
ここまでの修正を終えると、エラー表示は消えると思います。次ページからは、「詳細画面」を実装していきましょう。
関連記事
 アプリは、どうやって動くの? プログラムって何?――初めてiPhoneアプリを作る人向け基礎知識まとめ
本連載では、これからプログラミングやiPhoneアプリ開発を始めてみたい方を対象に、開発に必要な知識を基礎から解説していきます。 iOSアプリにフォトショの機能などを組み込めるCreative SDKの基礎知識とインストール
Photoshopのような写真編集や動画編集、ユーザー管理、描画用デバイス連携などの機能をアプリに追加できるSDKについて概要とインストール方法を解説する。 iPhoneアプリで位置情報と地図を使うための基礎知識
利用が加速するジオメディアを使うための基礎としてCoreLocationとMapKitの2つのフレームワークの使い方を中心に解説します。 開発者視点で見る、あのドデカい「iPhone 6/6 Plus」
開発者は新iPhoneの画面サイズに合わせ、UI全てを作り直さないといけないの? アプリ開発者でもある筆者が、その現状を調べてみた。 【図解】Xcode 4.5の使い方リファレンス超まとめ
Windowsを使っていたけど、iOSアプリを作るためにMacを使い始めた初心者を対象に、開発ツールXcode/iOS SDKを使ってiPhone/iPadアプリを作る方法を、プログラミング言語「Objective-C」の書き方/文法を交えて解説。今回は、iPhone/iPadアプリ開発に必要なiOS SDKの概要や標準開発ツール「Xcode」の画面構成を紹介。iOS SDKはInterface BuilderやInstrumentsなど便利なツールを備えています Android化が進むiOS 7の新機能と開発環境Xcode 5
大きく変化したiOS 7に戸惑う多くの開発者/デザイナのために、役立つブログ記事をまとめて紹介していく、まとめ連載。初回は開発者/デザイナから見たiOS 7の新機能8選と開発環境「Xcode 5」と開発環境構築について。- Cocoaの素、Objective-Cを知ろう
iPhone用アプリケーション開発で注目を集める言語「Objective-C」。C++とは異なるC言語の拡張を目指したこの言語の基本を理解しよう。 - 生産性ガチアゲなオープンソースiOSライブラリ
ゼロからiOS SDK開発を始める新規開発者でも超高速・高品質な開発を可能にするオープンソースのライブラリを目的別に紹介していく連載です。実際にライブラリを組み込みながら技術的な側面も併せて詳細に説明していきます。 - iOSアプリ開発でもCI/継続的デリバリしようぜ
現代の開発現場において欠かせないCI/継続的デリバリを、iOSアプリ開発に適用するためのツールやノウハウを解説する連載。
Copyright © ITmedia, Inc. All Rights Reserved.


