iOS 8アプリ開発のこれまで&Swift 1.2への対応、プロパティオブザーバーとwillSetの基本的な使い方、セグエを使った画面遷移:iPhone 6/6 Plusアプリ開発入門(終)(5/6 ページ)
プロパティオブザーバーの使い方――ImageCellクラスにプロパティを追加
引き続き、ImageCell.swiftファイルに手を加えていきます。
以下のように「UIImage?」型の「assetImage」プロパティを追加し、このプロパティを介してクラス外から画像を設定するようにします(7〜10行目までを追加)。
import UIKit

class ImageCell: UITableViewCell {
    @IBOutlet private weak var assetImageView: UIImageView!

    // ここから
    var assetImage :UIImage? {
        willSet {
            self.assetImageView.image = newValue
        }
    }
    // ここまで追加

    override func awakeFromNib() {
        super.awakeFromNib()
        // Initialization code
    }

    override func setSelected(selected: Bool, animated: Bool) {
        super.setSelected(selected, animated: animated)

        // Configure the view for the selected state
    }
}
assetImageプロパティは格納型プロパティです。assetImageプロパティのコードブロック内の「willSet節」(willSet {...})は値が格納される直前に呼び出されます。
格納型プロパティの値が更新されるときに処理が行われる仕組みは「プロパティオブザーバー」と呼ばれ、willSet節以外にも、値が格納された直後に呼ばれる「didSet節」(didSet {...})があります。
ImageCellの実装例では、willSet節を使用して、画像オブジェクトをUIImageViewに設定しています。また、willSet節の仮引数を省略しているので、格納されようとしている新しい値は「newValue」という名前で取得できます。
以下のように仮引数を指定することもできます。
willSet (newImage) {
    // 処理
    self.assetImageView.image = newImage
}
ImageCell.swiftファイルの修正は以上で完了です。
セルに「Identifier」を設定
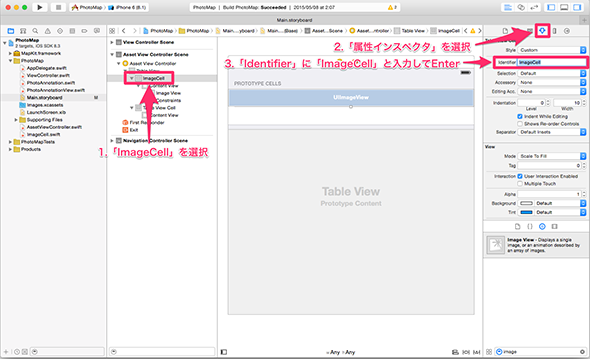
Storyboadの編集に戻ります。Storyboard上の「Asset View Controller」の「ImageCell」を選択して、「Identifier」項目に「ImageCell」と入力します(図32)。
この「Identifier」はAssetViewControllerからCellを扱う際に使用します。
続いて、もう一方の「Address Cell」の設定を行います。「Address Cell」の修正はStoryboad上の操作で完結します。
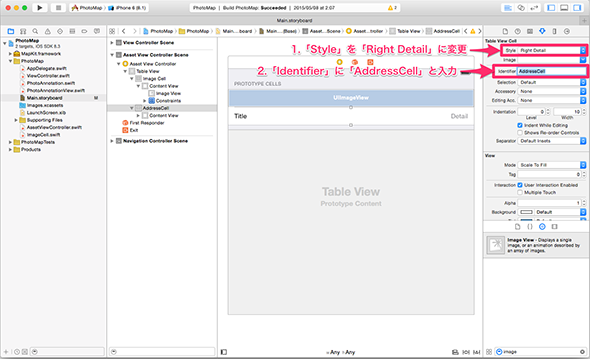
「ImageCell」のと同様に「Identifier」の設定を行います。
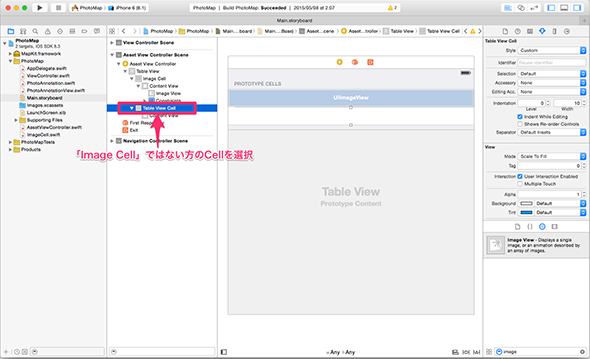
Storyboard上の「Asset View Controller」の二つ目のセルを選択します(図33)。
「Identifier」項目に「AddressCell」と入力します(図34)。
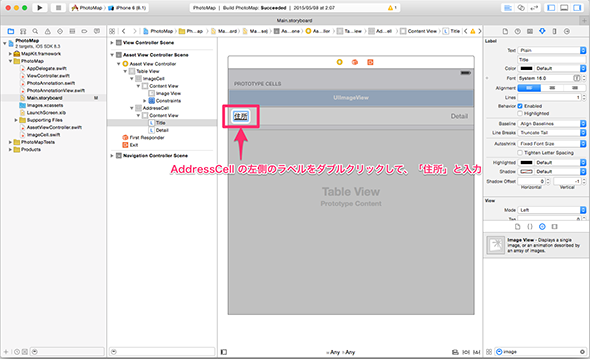
最後に、「Address Cell」の左側のラベルにテキストを設定します(図35)。
Cellの実装は以上で完了です。
AssetViewControllerクラスを実装
実装する内容は以下の通りです。順に説明していきます。
- import文(1〜2行目)
- プロパティ定義(6行目)
- UIViewControllerのライフサイクルに関するメソッド(8〜23行目)
- UITableViewDelegateのメソッド(メソッド(25〜37行目)
- UITableViewDataSourceのメソッド(39〜75行目)
- プライベートなメソッド(77〜90行目)
import UIKit
import Photos

class AssetViewController: UITableViewController {

    var annotation :PhotoAnnotation?

    // MARK: - Life cycle

    override func viewDidLoad() {
        super.viewDidLoad()
        // Uncomment the following line to preserve selection between presentations
        // self.clearsSelectionOnViewWillAppear = false
        // Uncomment the following line to display an Edit button in the navigation bar for this view controller.
        // self.navigationItem.rightBarButtonItem = self.editButtonItem()
    }

    override func didReceiveMemoryWarning() {
        super.didReceiveMemoryWarning()
        // Dispose of any resources that can be recreated.
    }

    // MARK: - Table view delegate

    override func tableView(tableView: UITableView, heightForRowAtIndexPath indexPath: NSIndexPath) -> CGFloat {
        if indexPath.row == 0 {
            return self.imageCellSize().height
        } else {
            return super.tableView(tableView, heightForRowAtIndexPath: indexPath)
        }
    }

    override func tableView(tableView: UITableView, heightForHeaderInSection section: Int) -> CGFloat {
        return 0.01
    }

    // MARK: - Table view data source

    override func tableView(tableView: UITableView, numberOfRowsInSection section: Int) -> Int {
        if let aAnnotation = self.annotation {
            return 2
        } else {
            return 0
        }
    }

    override func tableView(tableView: UITableView, cellForRowAtIndexPath indexPath: NSIndexPath) -> UITableViewCell {

        if indexPath.row == 0 {
            let cell = tableView.dequeueReusableCellWithIdentifier("ImageCell", forIndexPath: indexPath) as! ImageCell
            let cellSize = self.imageCellSize()

            if let aAnnotation = self.annotation {
                PHImageManager().requestImageForAsset(
                    aAnnotation.asset,
                    targetSize: cellSize,
                    contentMode: .AspectFill,
                    options: nil,
                    resultHandler: {(aImage, info) -> Void in
                        if let image = aImage {
                            cell.assetImage = image
                        }
                    }
                )
            }

            return cell
        } else {
            let cell = tableView.dequeueReusableCellWithIdentifier("AddressCell", forIndexPath: indexPath) as! UITableViewCell
            cell.detailTextLabel?.text = self.annotation?.address
            return cell
        }
    }

    // MARK: - private

    private func imageCellSize() -> CGSize {
        if let annotation = self.annotation {
            if let asset = annotation.asset {
                let imageRatio = CGFloat(asset.pixelHeight) / CGFloat(asset.pixelWidth)
                let cellWidth = self.tableView.bounds.size.width
                let cellHeight = cellWidth * imageRatio + (1.0 / UIScreen.mainScreen().scale)
                return CGSize(width: cellWidth, height: cellWidth * imageRatio)
            }
        }
        return CGSizeZero
    }
}
import文(2〜3行目)
Photosフレームワークをimportする記述を追加します。
プロパティ定義(6行目)
「PhotoAnnotation?」型の「annotation」プロパティを追加します。「PhotoAnnotation」は前回の記事で実装したクラスです。
UIViewControllerのライフサイクルに関するメソッド(8〜23行目)
AssetViewController.swiftファイル作成時に自動追加される「viewDidLoad」「didReceiveMemoryWarning」メソッドは、そのまま残します。修正箇所は、ありません。
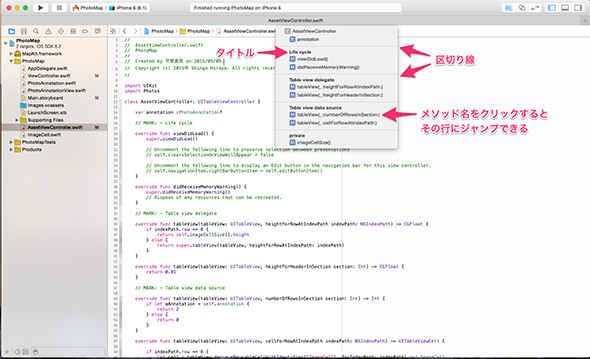
8行目の「// MARK: - Life cycle」というコメントは、メソッドを種類ごとに分類するためのコメントで、AssetViewController.swiftファイルではメソッドの役割ごとに分類しています。このコメントを追加することによってXcodeのエディター上で、分類されたメソッドのリストを表示できるようになります(図36)。
UITableViewDelegateのメソッド(25〜37行目)
UITableViewDelegateのメソッドを実装することによって「UITableViewのセルがタップされたときの処理」や「UITableView のセルやヘッダーの高さの指定」を記述できます。
27〜33行目の「tableView:heightForRowAtIndexPath:」メソッドはセルの高さを指定するためのメソッドです。0番目のセル(ImageCell)の場合は、後ほど説明する「imageCellSize」メソッドで計算した高さを返却します。0番目の以外のセル(AddressCell)場合は、スーパークラス(UITableViewController)の同名のメソッドで返却される値をそのまま返却します。
35〜37行目の「tableView:heightForHeaderInSection:」メソッドはセクションヘッダーの高さを指定するためのメソッドです。
UITableViewDataSourceのメソッド(39〜75行目)
UITableViewDelegateのメソッドを実装することによって「UITableViewの行の数」「UITableViewで使用するセルオブジェクト」などを指定できます。
41〜47行目の「tableView:numberOfRowsInSection:」メソッドでは「行の数」を返却します。
49〜75行目の「tableView:cellForRowAtIndexPath:」メソッドでは「セルオブジェクト」を返却します。
52行目と71行目で使用している「dequeueReusableCellWithIdentifier:forIndexPath:」メソッドは、引数で指定する「識別子」に関連したセルオブジェクトを取得するためのメソッドです。この「識別子」はStoryboard上で設定した「ImageCell」や「AddressCell」のことです。
MKMapViewが管理する注釈ビューと同様に、セルは必要に応じて使い回されます。「dequeueReusableCellWithIdentifier:forIndexPath:」メソッドを使用することで、セルの管理をUITableViewに任せることができます。
プライベートなメソッド(77〜90行目)
「imageCellSize」メソッドはImageCellのサイズを返却するメソッドです。セルのアスペクト比が写真のアスペクト比と等しくなるように計算して返却します。
関連記事
 アプリは、どうやって動くの? プログラムって何?――初めてiPhoneアプリを作る人向け基礎知識まとめ
本連載では、これからプログラミングやiPhoneアプリ開発を始めてみたい方を対象に、開発に必要な知識を基礎から解説していきます。 iOSアプリにフォトショの機能などを組み込めるCreative SDKの基礎知識とインストール
Photoshopのような写真編集や動画編集、ユーザー管理、描画用デバイス連携などの機能をアプリに追加できるSDKについて概要とインストール方法を解説する。 iPhoneアプリで位置情報と地図を使うための基礎知識
利用が加速するジオメディアを使うための基礎としてCoreLocationとMapKitの2つのフレームワークの使い方を中心に解説します。 開発者視点で見る、あのドデカい「iPhone 6/6 Plus」
開発者は新iPhoneの画面サイズに合わせ、UI全てを作り直さないといけないの? アプリ開発者でもある筆者が、その現状を調べてみた。 【図解】Xcode 4.5の使い方リファレンス超まとめ
Windowsを使っていたけど、iOSアプリを作るためにMacを使い始めた初心者を対象に、開発ツールXcode/iOS SDKを使ってiPhone/iPadアプリを作る方法を、プログラミング言語「Objective-C」の書き方/文法を交えて解説。今回は、iPhone/iPadアプリ開発に必要なiOS SDKの概要や標準開発ツール「Xcode」の画面構成を紹介。iOS SDKはInterface BuilderやInstrumentsなど便利なツールを備えています Android化が進むiOS 7の新機能と開発環境Xcode 5
大きく変化したiOS 7に戸惑う多くの開発者/デザイナのために、役立つブログ記事をまとめて紹介していく、まとめ連載。初回は開発者/デザイナから見たiOS 7の新機能8選と開発環境「Xcode 5」と開発環境構築について。- Cocoaの素、Objective-Cを知ろう
iPhone用アプリケーション開発で注目を集める言語「Objective-C」。C++とは異なるC言語の拡張を目指したこの言語の基本を理解しよう。 - 生産性ガチアゲなオープンソースiOSライブラリ
ゼロからiOS SDK開発を始める新規開発者でも超高速・高品質な開発を可能にするオープンソースのライブラリを目的別に紹介していく連載です。実際にライブラリを組み込みながら技術的な側面も併せて詳細に説明していきます。 - iOSアプリ開発でもCI/継続的デリバリしようぜ
現代の開発現場において欠かせないCI/継続的デリバリを、iOSアプリ開発に適用するためのツールやノウハウを解説する連載。
Copyright © ITmedia, Inc. All Rights Reserved.

