Keycloakで外部ユーザーストレージに連携してみよう:Keycloak超入門(6)(2/3 ページ)
ユーザーストレージ連携の設定
●設定の概要
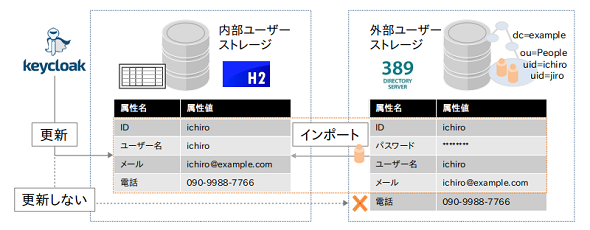
ユーザーストレージ連携の設定は、Keycloakの管理コンソールで行うことができます。今回は、以下の図4の構成になるように設定を変更してみたいと思います。
先ほど説明したストレージモードと編集モードは、それぞれデフォルトの「オン」と「READONLY」に設定し、内部ユーザーストレージもデフォルトのH2を使用します。
●前提条件
この手順を実施するには、ユーザー情報を管理し、Keycloakからアクセス可能なLDAPサーバがあることが前提条件となります。
●事前準備
今回は、OSSのLDAPサーバの1つである「389 Directory Server」(※)を使用します。そのため、389 Directory Serverの初期構築手順についても簡単に説明します。なお、389 Directory ServerはCentOS 7にインストールします。
【※】「389 Directory Server」は、Red Hatの商用製品である「Red Hat Directory Server(RHDS)」のコミュニティー版です。Red Hatが「Netscape Directory Server」を買収し、オープンソースとして公開された「Fedora Directory Server」がさらに改名されて、389 Directory Serverになっています。
ユーザー情報を管理する、既存の動作検証用のLDAPサーバがある場合は、この部分は読み飛ばしていただいても構いません。
まずは、rootユーザーでCentOSにログインし、以下のコマンドで389 Directory Serverをインストールします。
# yum install 389-ds-base
次に、389 Directory Serverのセットアップを行いますが、その前にこのCentOSにFQDN(Fully Qualified Domain Name:完全修飾ドメイン名)でアクセスできるように「/etc/hosts」ファイルに設定を追加します。
172.105.126.60 ds.example.com
「172.105.126.60」の部分はCentOSのIPアドレスです。FQDNを「ds.example.com」のように指定すると、以降で行うセットアップで、「dc=example,dc=com」がBase DNとなります。
以下のコマンドで、対話形式で389 Directory Serverのセットアップを実行します。
# setup-ds.pl
==============================================================================
This program will set up the 389 Directory Server.
It is recommended that you have "root" privilege to set up the software.
Tips for using this program:
- Press "Enter" to choose the default and go to the next screen
- Type "Control-B" or the word "back" then "Enter" to go back to the previous screen
- Type "Control-C" to cancel the setup program
Would you like to continue with set up? [yes]:
==============================================================================
Your system has been scanned for potential problems, missing patches,
etc. The following output is a report of the items found that need to
be addressed before running this software in a production
environment.
389 Directory Server system tuning analysis version 14-JULY-2016.
NOTICE : System is x86_64-unknown-linux3.10.0-693.17.1.el7.x86_64 (2 processors).
Would you like to continue? [yes]:
==============================================================================
Choose a setup type:
1. Express
Allows you to quickly set up the servers using the most
common options and pre-defined defaults. Useful for quick
evaluation of the products.
2. Typical
Allows you to specify common defaults and options.
3. Custom
Allows you to specify more advanced options. This is
recommended for experienced server administrators only.
To accept the default shown in brackets, press the Enter key.
Choose a setup type [2]: 1
==============================================================================
Certain directory server operations require an administrative user.
This user is referred to as the Directory Manager and typically has a
bind Distinguished Name (DN) of cn=Directory Manager.
You will also be prompted for the password for this user. The password must
be at least 8 characters long, and contain no spaces.
Press Control-B or type the word "back", then Enter to back up and start over.
Directory Manager DN [cn=Directory Manager]:
Password:
Password (confirm):
Your new DS instance 'openam1' was successfully created.
Exiting . . .
Log file is '/tmp/setupSZ0ECP.log'
今回は、最も簡単な「Express」モードでセットアップしています。このモードの場合、他に入力を求められるのは以下だけです(表3)。
| 入力項目 | 入力値 |
|---|---|
| Directory Manager DN | cn=Directory Manager(未入力でリターンキーをクリックすると、デフォルトのcn=Directory Managerになります) |
| Password | 適当な値 |
| Password (confirm) | 同上 |
| 表3 「setup-ds.pl」の「Express」モードでの入力値 | |
【※】環境によっては「WARNING」メッセージが表示され、セットアップが中断することがあります。ファイルディスクリプターの上限数や、無通信時のキープアライブパケットの送信間隔などについて設定を変更すべき旨が表示されます。その場合は、内容に応じて、適宜OSの設定などを見直してください。
次に、389 Directory Serverにユーザーを登録します。以下の内容で「users.ldif」ファイルを作成します。
dn: uid=ichiro,ou=People,dc=example,dc=com
cn: Ichiro
sn: Suzuki
givenname: Ichiro
objectclass: top
objectclass: person
objectclass: organizationalPerson
objectclass: inetOrgPerson
ou: People
uid: ichiro
mail: ichiro@example.com
userpassword: p@s2w0rd
dn: uid=jiro,ou=People,dc=example,dc=com
cn: Jiro
sn: Suzuki
givenname: Jiro
objectclass: top
objectclass: person
objectclass: organizationalPerson
objectclass: inetOrgPerson
ou: People
uid: jiro
mail: jiro@example.com
userpassword: p@s2w0rd
そして、「ldapadd」コマンドで389 Directory Serverにユーザーを登録します。
# ldapadd -f "users.ldif" -D 'cn=Directory Manager' -w password -H ldap://localhost
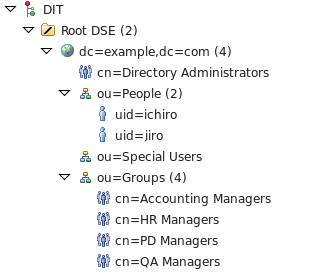
これで事前準備ができました(図5)。
●設定手順
事前準備が完了したら、外部ユーザーストレージ連携を設定してみましょう。まずは、管理者アカウントでKeycloakにログインします。
ログインしたら、画面左上のレルムの表示が「Demo」になっていることを確認してください。「Demo」になっていなければ、レルムの一覧から「Demo」を選択します。次に、画面左のメニューバーの「ユーザーフェデレーション」をクリックします。「プロバイダーの追加」のドロップダウンリストから「ldap」をクリックしてください。
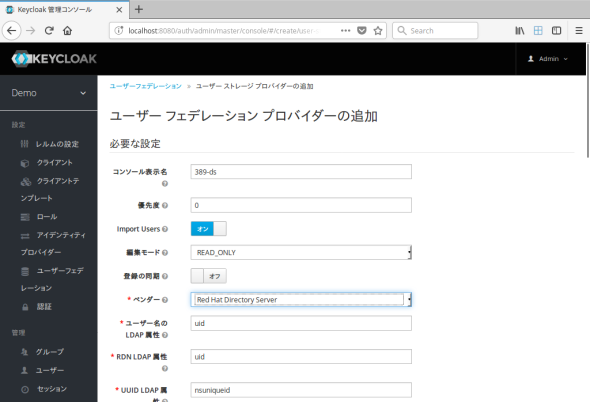
これにより、「ユーザー フェデレ−ション プロバイダーの追加」ページが表示されます(画面1)。
ここでは以下の項目に値を入力します。今回は「事前準備」のセクションで構築した389 Directory Serverと連携するための設定値を入力しますが、既存のLDAPサーバを利用する場合は、それに合わせて設定値を変更してください(表4)。
| 入力項目 | 入力値 |
|---|---|
| コンソール表示名 | 任意の表示名(「389-ds」などの分かりやすい名称) |
| ベンダー | Red Hat Directory Server |
| ユーザー名のLDAP属性 | uid |
| RDN LDAP属性 | uid |
| UUID LDAP属性 | nsuniqueid |
| ユーザーオブジェクトクラス | inetOrgPerson, organizationalPerson |
| 接続URL | ldap://ds.example.com:389 |
| ユーザーDN | ou=People,dc=example,dc=com |
| 表4 「ユーザー フェデレ−ション プロバイダーの追加」画面の入力値(1) | |
「ストレージモード」(画面のラベル表示は「Import Users」となっているフィールドです)と「編集モード」は、デフォルトのままの「オン」と「READ_ONLY」にしておきます。
入力が完了したら、「接続テスト」ボタンをクリックし、LDAPサーバに接続できるかどうかを確認します。接続できない場合は、上記の各値に誤りがないか見直してください。接続できたら、続けて以下の項目に値を入力し、「認証テスト」ボタンをクリックします。入力したBind DNとクレデンシャルで認証できるかが確認できます(表5)。
| 入力項目 | 入力値 |
|---|---|
| Bind DN | cn=Directory Manager |
| Bindのクレデンシャル | setup-ds.plで入力したパスワード |
| 表5 「ユーザー フェデレ−ション プロバイダーの追加」画面の入力値(2) | |
認証できない場合は上記の各値を見直し、そうでない場合は画面最下部の「保存」ボタンをクリックしてください。
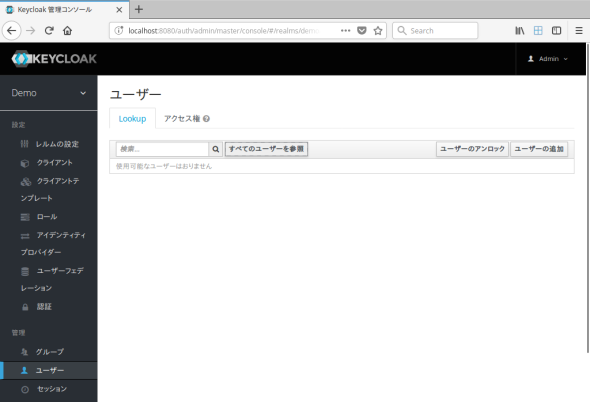
以上で設定は完了ですが、動作検証をする前に、先ほどldapaddで登録した2ユーザーがユーザー一覧画面に表示されるかどうかを確認します。画面右の「ユーザー」をクリックすると、ユーザー一覧画面が表示されるので、「すべてのユーザーを参照」ボタンをクリックします(画面2)。
「すべてのユーザーを参照」ボタンをクリックすると、先ほど登録したユーザーは表示されないはずです。これは、先ほど登録したユーザーが、まだKeycloakによって認証されていないためです。Keycloakによって少なくとも1回は認証され、外部ユーザーストレージからインポートされたユーザーが、ユーザー一覧画面に表示されます。管理者が誤って外部ユーザーストレージに保存されている大量のユーザーをインポートしようとしないように、このような動作になっています。
なお、外部ユーザーストレージの「同期の設定」を有効にすることで、全てのユーザーを内部ユーザーストレージに同期させることもできます。
関連記事
 なぜ「シングルサインオン」が必要なのか?
企業でのWebサービスの実現が具体的になるにつれ、パスワード/IDマネジメントが重視されるようになり、「シングル・サインオン」がますます注目を集めている。この連載では、シングル・サインオンの実践ステップなど具体的な考え方を紹介する。また、メタディレクトリやLDAPなど「ディレクトリ統合」をキーワードとしてシングル・サインオンを実現するための技術を分かりやすく解説する。(編集部) 第1回 もはや企業のID管理で避けては通れない「IDaaS」とは?
これまで社内設置が当たり前だったアイデンティティ(ID)管理/認証システム。でも「クラウド」「モバイル」に代表される激烈な変化に対応できる、と本当に思っていますか? ID管理/シングルサインオンの新たな選択肢「IDaaS」について解説する連載開始! 強力なSSOを実現するXML認証・認可サービス(SAML)
 OpenIG、OpenDJと連携したOpenAMの新機能
今回は、OpenAMの姉妹製品で既存アプリケーションを改修せずにシングルサインオンを可能にする「OpenIG」と、OpenAMのデフォルトデータストアである「OpenDJ」について解説します。
Copyright © ITmedia, Inc. All Rights Reserved.

