iOSからFacebook APIを使ってWallに投稿するには:書籍転載:Facebook SDK for iOSアプリ開発ガイド(2)(1/3 ページ)
Facebookのソーシャルグラフを扱うiOSアプリを作る
「Facebook SDK for iOS」は、iOS(iPhone、iPad、iPod touch)用のSDKで、Objective-Cで書かれています。本企画では、iOSアプリケーションにFacebook連携機能を盛り込むことを想定し、前後編にわたり、以下の方法を解説します。
- iOSアプリを使ったログイン
- Facebook Graph API(以下、Graph API)を利用した情報の取得
- Graph APIを利用した投稿
- Legacy REST APIやFQLの利用
- ダイアログを使った投稿

本企画は、アスキー・メディアワークス刊行の『facebookアプリケーション開発ガイド』のうち「第15章 iOSアプリケーションの開発」の一部を、同社の許可を得て転載するものです。
なお、 Web記事として転載するに当たり、@IT向けに編集し若干表現を変更している点があります。その点ご了承ください。
iOSアプリケーション開発の基礎については、すでに習得済みであることを前提として話を進めます。iOSアプリ開発の基礎については、以下の連載をご覧ください。
- SDKで始めるiPad/iPhoneアプリ開発の勘所
日初めてiPhone/iPadアプリ開発に挑戦する人が、迷わず短時間でアプリを作れるように、数多くの情報の中から要点をグっと絞った開発の勘所を紹介する入門連載です
「Smart & Social」フォーラム - Cocoaの素、Objective-Cを知ろう
iPhone用アプリケーション開発で注目を集める言語「Objective-C」。C++とは異なるC言語の拡張を目指したこの言語の基本を理解しよう
「Coding Edge」フォーラム
Graph APIの利用――Wallに投稿する
前編の「Facebook Graph API活用iPhoneアプリ開発入門」では、Facebook SDK for iOS利用をするための準備を行い、OAuthのAPIを使ってログインし、ログインができたらGraph APIを使ってユーザーのプロフィールを取得するという簡単なアプリケーションを作ってみました。今回は、Graph APIでPOSTを行う例として、自分のWallへの投稿を行います。
まずは、コードをざっとご覧ください。太字の部分が、最初の例からの変更点です。
UITextFieldを設置し、そこに入力した文字を自分のWallに投稿し、投稿に成功したら、作成されたオブジェクトのIDをアラートするというものです。
#import <UIKit/UIKit.h>
#import "Facebook.h"
#import "FBLoginDialog.h"
#import "LoginButton.h"
#import "JSON.h"

@interface HelloFbViewController : UIViewController <FBSessionDelegate, FBRequestDelegate,
UITextFieldDelegate> {

    IBOutlet LoginButton *loginButton;
    IBOutlet UIView *loggedInView;
    IBOutlet UITextField *messageField;

    Facebook *facebook;
}
@property(readonly) Facebook *facebook;

-(IBAction) postMessage: (id) sender;

-(IBAction) login: (id) sender;

@end
#import "HelloFbViewController.h"

@implementation HelloFbViewController
@synthesize facebook;

static NSString* APPLICATION_ID = @"XXXXXXXXXXXX";

- (void)viewDidLoad {
    [super viewDidLoad];
    [loggedInView setHidden:YES]; ////書き込み用のUI群をはじめは隠す
    [messageField setDelegate:self];
    facebook = [[Facebook alloc] initWithAppId: APPLICATION_ID];
    [facebook setSessionDelegate:self];
}

-(IBAction) login: (id) sender {
    if (!loginButton.loggedIn) {
        NSArray *permissions =  [[NSArray arrayWithObjects:
                              @"read_stream",@"publish_stream",nil] retain];
        [facebook authorize:permissions delegate:self];
    } else {
        [facebook logout:self];

    }
}
- (void)fbDidLogin {
    NSLog(@"HelloFbViewController.fbDidLogin");
    [loginButton setLoginStatus:YES];
    [loggedInView setHidden:NO];
}

- (void)fbDidNotLogin:(BOOL)cancelled {
    [loginButton setLoginStatus:NO];
    [loggedInView setHidden:YES];
}

- (void)fbDidLogout {
    NSLog(@"HelloFbViewController.fbDidLogout");
    [loginButton setLoginStatus:NO];
    [loggedInView setHidden:YES];
}

//キーボードを隠す
- (BOOL)textFieldShouldReturn:(UITextField *)textField {
    [messageField resignFirstResponder];
    return YES;
}

-(IBAction) postMessage: (id) sender {

    NSDictionary *privacy = [[[NSDictionary alloc] initWithObjectsAndKeys:
                              @"CUSTOM",@"value",
                              @"SELF",@"friends",
                              nil]autorelease];

    NSMutableDictionary* params = [NSMutableDictionary dictionaryWithObjectsAndKeys:
                                   messageField.text,  @"message",
                                   [privacy JSONRepresentation], @"privacy",
                                   nil];
    [facebook requestWithGraphPath:@"/me/feed"
            andParams:params
            andHttpMethod:@"POST"
            andDelegate:self];
}

- (void)request:(FBRequest *)request didReceiveResponse:(NSURLResponse *)response {
    NSLog(@"HelloFbViewController.didReceiveResponse");
};

- (void)request:(FBRequest *)request didLoad:(id)result {
    NSLog(@"HelloFbViewController.didLoad");
    UIAlertView *alert = [[UIAlertView alloc]
                          initWithTitle:@"Success"
                          message:[NSString stringWithFormat:@"id=%@",
                                  [result objectForKey:@"id"]]
                          delegate:self
                          cancelButtonTitle:@"OK"
                          otherButtonTitles: nil];
    [alert show];
    [alert release];
    [messageField setText:@""];
}

- (void)request:(FBRequest *)request didFailWithError:(NSError *)error {
    NSLog(@"HelloFbViewController.didFailWithError %@", error);
};

- (void)dealloc {
    [messageField release];
    [loginButton release];
    [super dealloc];
}

@end
HelloFbViewController.xibをInterface Builderで開き、UIのデザインを編集します。
UIViewを追加し、アウトレットloggedInViewと接続。ここに投稿用のUIを乗せ、ログイン中とそうでない場合で表示・非表示を切り替えます。
loggedInViewの上にUITextField(テキストボックス)を追加し、アウトレットmessageFieldと接続します。
loggedInViewの上にUIButtonを追加。Touch Up Insideを、アクションpostMessageと接続します。
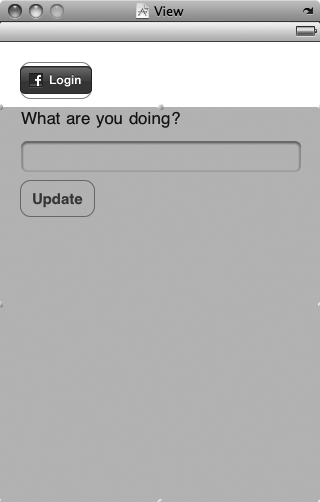 図1 投稿用のユーザーインターフェイスの追加
これで、投稿を行えるアプリケーションができました。次ページでは、各部分を見ていきましょう。
Copyright © ITmedia, Inc. All Rights Reserved.
アイティメディアからのお知らせ


注目のテーマ

編集部からのお知らせ
![]() ITmediaはアイティメディア株式会社の登録商標です。
ITmediaはアイティメディア株式会社の登録商標です。