MEANスタックで家電制御アプリを作るための設計・準備と温度湿度センサーからのデータ読み取り:Arduinoで始めるWeb技術者のためのIoT入門(5)(3/3 ページ)
» 2014年10月16日 18時00分 公開
[岩永義弘,株式会社インターネットイニシアティブ]
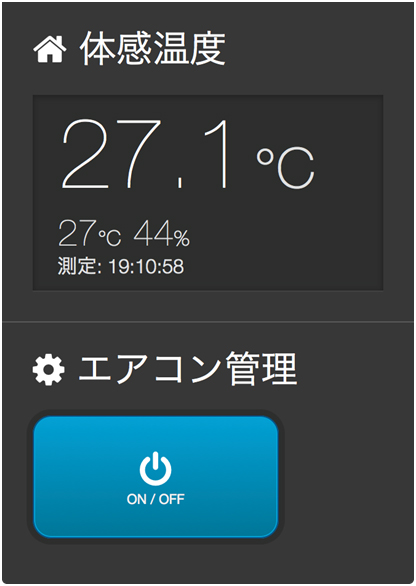
家電制御アプリ画面設計
画面のデザインを決めるに当たって、人間の思考順序や情報の重要度を整理します。
- 重要な情報、操作
- 体感温度
画面を開いたときに真っ先に知りたいのが、エアコンを操作する必要があるかどうか。よって、画面の上側に体感温度を表示する。これは人間が画面を見るとき、上側を先に見る習性があるため - エアコン操作ボタン
体感温度を見てエアコンの電源を入れようと判断したら、ボタンをタップするだけで操作できるようにする。体感温度の下にボタンを設置する
- 体感温度
- 補助的な情報
- 体感温度の計算に使った温度と湿度
- 温度と湿度を測定した時刻
以上を基に、次のような画面にします。
generator-angular-fullstackのセットアップとひな型生成
全体の設計が出そろったので、いよいよ実装に取り掛かります。まずはangular-fullstackジェネレーターを使えるようにします。そのままアプリケーションの骨組みまで作ります。
【1】MongoDBをインストール
MacでHome Brewをインストールしている場合は下記の通りです。
brew update
brew install mongodb
【2】GRUNTをインストール
npm install -g grunt-cli
【3】Bowerをインストール
npm install -g bower
【4】generator-angulr-fullstackをインストール
npm install -g generator-angular-fullstack
【5】ディレクトリ、リポジトリ作成
mkdir hemsjs && cd $_ && git init
【6】アプリケーションのひな型を生成
yo angular-fullstack hemsjs
? What would you like to write scripts with?
JavaScript
? What would you like to write markup with?
HTML
? What would you like to write stylesheets with?
CSS
? What Angular router would you like to use?
uiRouter
? Would you like to include Bootstrap?
n
? Would you like to use mongoDB with Mongoose for data modeling?
Y
? Would you scaffold out an authentication boilerplate?
Y
? Would you like to include additional oAuth strategies?
Twitter
? Would you like to use socket.io?
Y
現在のディレクトリにコードが生成されます。
【7】温度湿度リソースを生成
yo angular-fullstack:endpoint thermoHygroHistory
【8】エアコン操作で使うファイルを生成
yo angular-fullstack:endpoint airConditioner
【9】UIの体感温度コンポーネントを生成
yo angular-fullstack:route heatIndex
【10】UIのエアコン操作コンポーネントを生成
yo angular-fullstack:route airConditioner
これで下準備が完了しました。
次回は、AngularJSやMongoDBを使って、UI作成とDBのモデル定義
アプリケーションの骨組みが生成されましたが、まだArduinoとシリアル通信をする部分、データベースのモデル定義、UIができていません。
次回はAngularJSやMongoDBの解説も交えて、アプリケーションを完成させます。お楽しみに。
著者プロフィール
岩永 義弘(いわなが よしひろ)
株式会社インターネットイニシアティブ
データ分析とワインが好物。通信アノマリ検知システムや地震速報配信システムの開発と運用を経た後、Webアプリのフロントエンドに手を伸ばし、図らずもフルスタックな道を突き進んでいる。最近は趣味でHTTP/2の実装を楽しんでいる。
Twitter:@y_iwanaga_
Bot:@quake_alert @WeatherAlertJP
関連記事
 三国大洋の箸休め(26):忘れずに手を洗おう……ビッグデータとIoTの活用例
張り紙に頼る代わりに、センサーとInternet of Things(IoT)、ビッグデータといった技術を活用して手洗い忘れ防止を実現したケースを紹介する。 Database Watch(2014年2月版):確定不能なデータたち――IoT時代を受け止めるOracle NoSQL、JSON Anywhere
エンタープライズを指向するOracle NoSQL、マルチデバイスでのデータハンドリングのための環境を整備するCouchbase、適用用途は異なるものの、IoT時代を見据えた開発を進める2つの非RDBをウォッチした。 ATが影響、ただし「将来的には元凶となる恐れ」:冷蔵庫は「無実」――シマンテックがスパム発信元を調査
「インターネットにつながったスマート家電から75万通以上のスパムメールが発信された」という報道に関して、シマンテックは2014年1月27日、実際に感染していたのは同じホームネットワーク内のWindows搭載PCであり、冷蔵庫は「無実だ」とするブログを公開した。 「俺たちのJavaは、まだまだこれからだ」未来の鍵はInternet of Thingsにあり?〜JavaOne 2013まとめレポート(前編)
Java開発者の年次カンファレンス、JavaOne 2013がサンフランシスコで9月22〜26日に開催された。3つの基調講演、そして400を超えるセッションが行われるなど、圧巻のボリュームは、まさに「Java開発者の祭典」といえる。基調講演と主なセッション、全体の雰囲気を前中後編に分けてレポートする。 Microsoft Azure情報アップデート:IoTをクラウドで管理、「Microsoft Azure Intelligent Systems Service」プレビュー公開
米マイクロソフトは2014年4月15日、デバイスやセンサーといった「モノのインターネット」(IoT)からのデータを収集し、ビジネスインテリジェンスツールと結び付けて分析する「Microsoft Azure Intelligent Systems Service」の限定パブリックプレビューを公開した。
Copyright © ITmedia, Inc. All Rights Reserved.
SpecialPR
アイティメディアからのお知らせ
スポンサーからのお知らせPR
SpecialPR
システム開発ノウハウ 【発注ナビ】PR
あなたにおすすめの記事PR


