Silverlightのリッチなグラフィックス描画サンプル集:.NETを知らない人でも分かるSilverlight入門(3)(3/3 ページ)
■ PathGeometryオブジェクトでベジェ曲線も思いのまま!
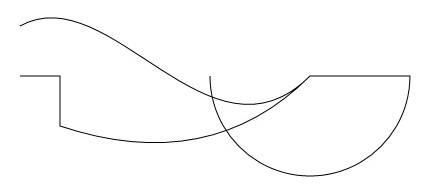
PathGeometryオブジェクトは、線、弧、カーブから成る複数の複雑な数字を記述する方法を提供します。PathGeometryオブジェクトは中心にPathFigureオブジェクトのコレクションを持ち、PathFigureオブジェクト自体も1つ以上のPathSegmentオブジェクトから構成されます。
PathFigureオブジェクトは、開始位置だけを持ち、実質はPathSegmentオブジェクトで描画しています。PathSegmentオブジェクトには描画方法によっていくつかのタイプがあり、それが以下の表3になります。
| セグメントタイプ | 詳細 | |
|---|---|---|
| ArcSegment | 2つのポイント間で楕円上の弧を生成 | |
| BezierSegment | 2つのポイント間で3次ベジェ曲線を生成 | |
| LineSegment | 2つのポイント間で直線を生成 | |
| PolyBezierSegment | 一連の3次ベジェ曲線を生成 | |
| PolyLineSegment | 一連の直線を生成 | |
| PolyQuadraticBezierSegment | 一連の2次ベジェ曲線を生成 | |
| QuadraticBezierSegment | 2次ベジェ曲線を生成 | |
 図12 PathGeometryオブジェクトサンプル実行例の画像(実際にSilverlightで見たい場合は画像をクリック!)※サンプルを動かすには、事前に実行環境のインストールが必要です。→ダウンロードページ
| ソース10 PathGeometryオブジェクトサンプル |
<Canvas
xmlns="http://schemas.microsoft.com/client/2007" |
画像を自由自在に変化させるトランスフォーム!
本稿の最後となる解説は、次回説明するアニメーションに最も深く関連するトランスフォームについてです。トランスフォームはその名のとおり、2D図形を変形させることで、それによって拡大・縮小、回転、傾斜、平行移動など多くの動作を図形に与えることができます。Silverlightでサポートするトランスフォームは以下の表4のとおりです。
| クラス | 詳細 | |
|---|---|---|
| RotateTransform | 指定されたAngleによって要素を回転 | |
| ScaleTransform | 指定されたScaleXとScaleYの値によって要素を拡大・縮小 | |
| SkewTransform | 指定されたAngleXとAngleYの値によって要素に傾斜を与える | |
| TranslateTransform | 指定されたXとYの値によって要素を移動 | |
トランスフォームは、オブジェクトのTransformationプロパティに指定することで作用させることができますが、その作用するプロパティは以下の表5のとおりです。
| タイプ | Transformationプロパティ | |
|---|---|---|
| Brush | Transform、RelativeTransform | |
| Geometry | Transform | |
| UIElement | RenderTransform | |
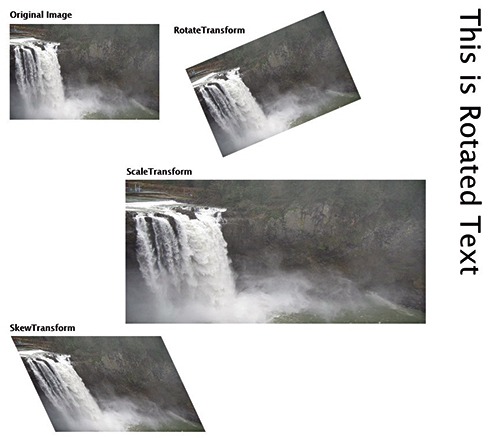
トランスフォーム機能が発揮できる状態はアニメーションを使用するときですので、詳しい紹介や実行例は次回に譲ることにしますが、今回はトランスフォームを行うことでオブジェクトがどのように変形されるかのイメージをつかむために簡単なサンプルを以下に示します。
 図13 トランスフォームサンプル実行例の画像(実際にSilverlightで見たい場合は画像をクリック! 写真の撮影は筆者)※サンプルを動かすには、事前に実行環境のインストールが必要です。→ダウンロードページ
| ソース11 トランスフォームサンプル |
<Canvas
xmlns="http://schemas.microsoft.com/client/2007" |
Silverlightを支える重要な機能を身に付けよう
さて、今回は機能的な説明上、グラフィックス編ということで次回と併せて前後編となるうちの前編を解説しました。
Silverlightはユーザーエクスペリエンスを向上させる最先端のRIAテクノロジーとして生まれてきたため、グラフィックス機能については多くの機能と自由度を持っております。このグラフィックス機能はSilverlightを支える重要な機能になるため、その全体像を把握してフルに活用いただけるようにするために分かりやすく書いたつもりです。
次回の後編は、今回の内容を踏まえたアニメーション機能の解説をし、連載第2回で紹介した、動画を再生するグローアップ・アプリケーションに機能を追加します。前後編併せて皆さんのお力になれることを心より願っております。
今回のサンプルすべてのソースコードはこちらになります。
関連記事
- Silverlightは次世代のJavaScriptフレームワーク?
ついに正式リリース! いまこそ知りたい!! どの環境でも動くマイクロソフトのRIA技術Silverlightについて、実際に動く2つのサンプルを見ながら、その特徴と技術を解説 - Silverlightと株価ビジュアライゼーション
連載:Flash観測所(2) マイクロソフト発の新動画再生技術のSilverlightと、複雑な株価データを効果的に見せるFlashアプリサービスを紹介する - XAMLの基礎知識
.NET Framework 3.0のWindowsアプリ構築フレームワーク「WPF」においてGUI記述を担うXAML(ザムル)。この新言語を基礎のキソから学ぶ - ・第1回 Hello Worldとテキスト・エディタで始めるXAML
- ・第2回 XAMLとWPFの関係
- 北米で話題のFlash動画アプリケーションサービス
連載:Flash観測所(1) 北米で話題のFlashによる動画サイト。UGC的ビデオ共有サイトの動画に付加価値を加えたり、ユーザーが編集できる話題のサービスを紹介する - JavaScriptプログラミング再入門
Ajax全盛のいま、オブジェクト指向ベースのJavaScript知識は不可欠。過去を振り返りつつ、まずは最新開発事情をチェック - ・第1回 JavaScriptの復権
- ・第2回 JavaScriptの関数をマスターしよう
- ・第3回 JavaScriptにおける変数の宣言とスコープ
- ・最終回 JavaScriptでオブジェクト指向プログラミング
Copyright © ITmedia, Inc. All Rights Reserved.


