Knife-ZeroでCookbookの作成/実行/削除&git cloneコマンドでCookbookの取得:サーバー管理者のためのChef超入門(2)(2/2 ページ)
いまさら聞けないGitとは
Git(ギット)は、プログラムのソースコードなどの変更履歴を記録、追跡するための分散型バージョン管理システムです。もともとはLinuxカーネルのソースコード管理のために開発されたシステムですが、今では多くのプロジェクトでバージョン管理にGitが採用されています。
ChefのCookbookがGitHub(Gitを使用したソースコード共有Webサービス)で公開されている場合、Cookbookの取得にもGitのコマンドを使用するため、本記事ではchef-repoのバージョン管理にもGitを用いる前提で解説を進めていきます。
なおGitについて知りたい方は、記事「ガチで5分で分かる分散型バージョン管理システムGit」も、併せてご一読ください。
それでは、Cookbook開発環境にGitを導入していきます。
Cookbook開発環境にGitを導入
まず、Gitをインストールします。
$ sudo yum install git

$ cd ~/chef-repo
$ git init
Initialized empty Git repository in /home/{username}/chef-repo/.git/
Gitでは、リポジトリを作成する→管理したいファイル/ディレクトリをインデックスに登録する→インデックスに追加された対象をコミットする、という流れでバージョン管理を行います。
「~/chef-repo」配下のファイル全てをインデックスに登録します。
$ git add .
インデックスに登録したファイルをコミットします。
$ git commit -m "first commit"
「-m」オプションの後ろの「"〜"」で囲まれた文字列はコミットする際のコメントです。変更した内容などを記載します。また「-m」オプションを付けずに実行するとエディターが開いてコメントを入力することもできます。
git cloneコマンドでCookbookを取得し、実行
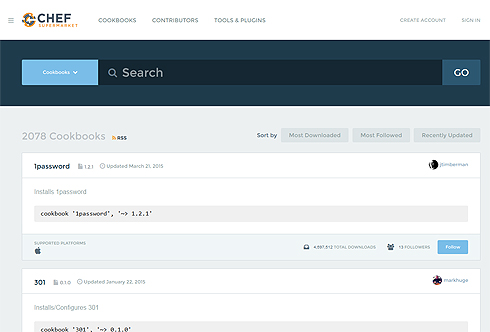
Chef社のサイトでは、公開されているCookbookの検索ができます。
git cloneコマンドでCookbookを取得
今回は、「epel」リポジトリを追加するCookbookを取得して実行してみましょう。
$ cd ~/chef-repo/cookbooks
$ git clone git://github.com/chef-cookbooks/yum-epel
Initialized empty Git repository in /home/{username}/chef-repo/cookbooks/yum-epel/.git/
remote: Counting objects: 335, done.
remote: Total 335 (delta 0), reused 0 (delta 0), pack-reused 335
Receiving objects: 100% (335/335), 68.13 KiB, done.
Resolving deltas: 100% (179/179), done.
取得したCookbookの実行
Cookbookを実行します。
$ knife zero chef_client 'name: {ノードのhostname}' --attribute ipaddress --ssh-password {SSHパスワード} ?sudo
xxx.xxx.xxx.xxx Starting Chef Client, version 12.0.3
xxx.xxx.xxx.xxx resolving cookbooks for run list: ["yum-epel"]
xxx.xxx.xxx.xxx Synchronizing Cookbooks:
xxx.xxx.xxx.xxx   - yum-epel
xxx.xxx.xxx.xxx   - yum
xxx.xxx.xxx.xxx Compiling Cookbooks...
xxx.xxx.xxx.xxx Converging 1 resources
xxx.xxx.xxx.xxx Recipe: yum-epel::default
xxx.xxx.xxx.xxx   * yum_repository[epel] action create
xxx.xxx.xxx.xxx     * template[/etc/yum.repos.d/epel.repo] action create
xxx.xxx.xxx.xxx       - create new file /etc/yum.repos.d/epel.repo
xxx.xxx.xxx.xxx       - update content in file /etc/yum.repos.d/epel.repo from none to b89733
xxx.xxx.xxx.xxx       --- /etc/yum.repos.d/epel.repo       2015-03-02 11:51:01.796066746 +0900
xxx.xxx.xxx.xxx       +++ /tmp/chef-rendered-template20150302-17812-a5op29 2015-03-02 11:51:01.796066746 +0900
xxx.xxx.xxx.xxx       @@ -1 +1,12 @@
xxx.xxx.xxx.xxx       +# This file was generated by Chef
xxx.xxx.xxx.xxx       +# Do NOT modify this file by hand.
xxx.xxx.xxx.xxx       +
xxx.xxx.xxx.xxx       +[epel]
xxx.xxx.xxx.xxx       +name=Extra Packages for Enterprise Linux 6 - $basearch
xxx.xxx.xxx.xxx       +enabled=1
xxx.xxx.xxx.xxx       +failovermethod=priority
xxx.xxx.xxx.xxx       +gpgcheck=1
xxx.xxx.xxx.xxx       +gpgkey=http://dl.fedoraproject.org/pub/epel/RPM-GPG-KEY-EPEL-6
xxx.xxx.xxx.xxx       +mirrorlist=http://mirrors.fedoraproject.org/mirrorlist?repo=epel-6&arch=$basearch
xxx.xxx.xxx.xxx       +sslverify=true
xxx.xxx.xxx.xxx       - change mode from '' to '0644'
xxx.xxx.xxx.xxx     * execute[yum-makecache-epel] action run
xxx.xxx.xxx.xxx       - execute yum -q makecache --disablerepo=* --enablerepo=epel
xxx.xxx.xxx.xxx     * ruby_block[yum-cache-reload-epel] action create
xxx.xxx.xxx.xxx       - execute the ruby block yum-cache-reload-epel
xxx.xxx.xxx.xxx     * execute[yum-makecache-epel] action nothing (skipped due to action :nothing)
xxx.xxx.xxx.xxx     * ruby_block[yum-cache-reload-epel] action nothing (skipped due to action :nothing)
xxx.xxx.xxx.xxx
xxx.xxx.xxx.xxx
xxx.xxx.xxx.xxx Running handlers:
xxx.xxx.xxx.xxx Running handlers complete
xxx.xxx.xxx.xxx Chef Client finished, 4/4 resources updated in 18.899885098 seconds
ノードへのepelリポジトリの追加が完了しました。このように、すでに用意されているCookbook使って設定を自動化することも可能です。
また、「run_list」には、ノードに対して複数のCookbookを同時に適用させることができるので、自作のCookbookと組み合わせてサーバーの構成管理を行うことが可能になっています。
Cookbookのサイトで既存のCookbookを検索できる
下記サイトではCookbookを検索できます。こちらでは、knifeコマンドなどを使ってCookbookを取得する手順が記載されています。
Chefの活用においてGitを使う利点
今回は、Cookbookの作成と実行を行い、すでに用意されているCookbook使って設定を自動化する方法を紹介しましたが、いかがでしたでしょうか。
Chefの活用においてGitを使う利点をまとめると、下記の2点があります。
- chef-repoのバージョン管理を行える
- GitHubなど外部のGitリポジトリからCookbookを取得できる
次回からは、実例を交えてChefを構成する要素やCookbookを作成するためのポイントについて解説していきます。
- WordPress環境構築におけるMySQLの設定とChef上達のポイント
- WordPressのダウンロード/配置とバーチャルホスト設定で見るChefの変数とAttributeの書き方の基本&Template活用
- Apache、PHP、MySQLパッケージのインストールで見るChefのRecipeの基本的な書き方
- WordPress構築で学ぶ、サーバー構築作業をChefのCookbookとして記述するためのポイント
- Knife-ZeroでCookbookの作成/実行/削除&git cloneコマンドでCookbookの取得
- エンタープライズでもInfrastructure as Code――Chef 12/Chef-Zero/Knife-Zeroの基礎知識とインストール
関連記事
 環境構築自動化の手順と評価検証、Puppetの基礎知識
サーバー構築の自動化で利用される技術、自動化ツールとして「Kickstart」「Puppet」を紹介し、構築から運用まで、システムライフサイクル全体にわたる運用管理の自動化についても解説する連載。 OpenStackで激変するシステム開発・運用 “抽象化”が実現する「究極の自動化」とは
前回はOpenStackの活用ポイントと、今後のシステム開発・運用に与える影響――特に自動化にフォーカスして紹介した。今回は日本OpenStackユーザ会 会長の中島倫明氏が、「OpenStackによる自動化の仕組みと実施法」を分かりやすく解説する。 PowerShell Desired State Configuration(DSC)とは(前編)
Windows OSの設定や構成を変更する場合、GUIの管理ツールを使うのが一般的である。だが台数が多かったり、構成変更や以前の構成への復旧などが頻繁だったりするとGUIでは非常に面倒だし、間違いもしやすくなる。こんな場合はPowerShell DSCを使ってインフラ構築作業を自動化するとよい。 アプリ開発者もインフラ管理者も知っておきたいDockerの基礎知識
オープンソースのコンテナー管理ソフトウェアDockerについて主な機能と特徴、使用技術、動作環境などを紹介。ハイパーバイザー型とコンテナー型の仮想化の違いも解説します。
Copyright © ITmedia, Inc. All Rights Reserved.


