結局のところ、T3 Stackを採用するメリットとは何なのか?:フルスタックフレームワーク、T3 Stack入門(終)(2/3 ページ)
チュートリアル(Tainwind & RSC)
さて、今回もT3 StackでTailwind CSSを活用するサンプルコードのチュートリアルを準備してみました。全体はこちらのGitHubリポジトリにあります。また、これまでの連載ではサンプルコードに「Next.js」のPages Routerを選択したコード例を示していましたが、今回はApp Routerでやっていきます。
ステップ1:Create T3 Appで初期プロジェクトを作成する
[create-t3-app]を使って新しいプロジェクトのひな型を作成します。プロジェクトを作成するディレクトリに移動し、コマンドラインから以下のコマンドを実行してください。なお、以下では[create-t3-app@7.38.1]で実行していますが、最新版で作成したい場合には[create-t3-app@latest]を指定してください。
> npx create-t3-app@7.38.1 t3-todo-app-router
Need to install the following packages:
create-t3-app@7.32.0
Ok to proceed? (y) y
   ___ ___ ___   __ _____ ___   _____ ____    __   ___ ___
  / __| _ \ __| /  \_   _| __| |_   _|__ /   /  \ | _ \ _ \
 | (__|   / _| / /\ \| | | _|    | |  |_ \  / /\ \|  _/  _/
  \___|_|_\___|_/~~\_\_| |___|   |_| |___/ /_/~~\_\_| |_|
│
◇  Will you be using TypeScript or JavaScript?
│  TypeScript
│
◇  Will you be using Tailwind CSS for styling?
│  Yes
│
◇  Would you like to use tRPC?
│  Yes
│
◇  What authentication provider would you like to use?
│  None
│
◇  What database ORM would you like to use?
│  Prisma
│
◇  Would you like to use Next.js App Router?
│  Yes
│
◇  What database provider would you like to use?
│  SQLite (LibSQL)
│
◇  Should we initialize a Git repository and stage the changes?
│  Yes
│
◇  Should we run 'npm install' for you?
│  Yes
│
◇  What import alias would you like to use?
│  ~/
Using: npm
 t3-todo-app-router scaffolded successfully!
Adding boilerplate...
 Successfully setup boilerplate for prisma
 Successfully setup boilerplate for tailwind
 Successfully setup boilerplate for trpc
 Successfully setup boilerplate for envVariables
 Successfully setup boilerplate for eslint
Installing dependencies...
 Successfully installed dependencies!
Initializing Git...
 Successfully initialized and staged git
Next steps:
  cd t3-todo-app-router
  npm run db:push
  npm run dev
  git commit -m "initial commit"
上記でデフォルト以外を選択しているのはORMの選択をNoneからPrismaに指定していることのみです。なお、上記ではDBに「SQLite」を選択していますが、「MySQL」もしくは「Postgres」を選択した場合、スクリプト「start-database.sh」が作成され、Dockerコンテナ内でDBを起動できるようになります。
ステップ2:必要なパッケージのインストール
必要なパッケージをインストールします。tailwind-variantsパッケージをインストールします。
> cd t3-todo-app-router
> npm install tailwind-variants
ステップ3:DBの初期化
SQLiteデータベースを初期化します。
> npm run db:push
> t3-todo-app-router@0.1.0 db:push
> prisma db push
Environment variables loaded from .env
Prisma schema loaded from prisma/schema.prisma
Datasource "db": SQLite database "db.sqlite" at "file:./db.sqlite"
SQLite database db.sqlite created at file:./db.sqlite
  Your database is now in sync with your Prisma schema. Done in 23ms
 Generated Prisma Client (v5.22.0) to ./node_modules/@prisma/client in 102ms
ステップ4: アプリケーションの実行確認
プロジェクトディレクトリで、以下のコマンドを実行してアプリケーションを起動します。
> npm run dev
> t3-todo-app-router@0.1.0 dev
> next dev --turbo
   ▲ Next.js 15.0.3 (Turbopack)
   - Local:        http://localhost:3000
   - Environments: .env
  Starting...
  Ready in 5.2s
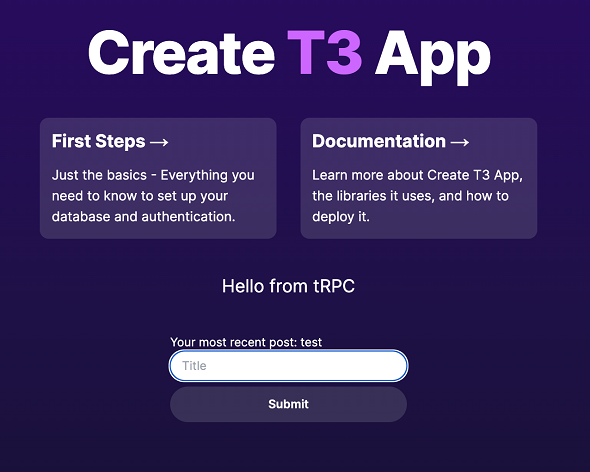
初期状態でWebアプリが実行されます。Webブラウザでhttp://localhost:3000にアクセスし、デフォルトの表示である以下が確認できればOKです。
ステップ5:初期生成ファイルのうち不要なファイルを削除する
このチュートリアルでは不要になる以下のファイルを削除しておきます。
> rm src/server/api/routers/post.ts
> rm src/app/_components/post.tsx
ステップ6:Prismaのデータベーススキーマを修正する
以下のようにprisma/schema.prismaに修正を加えます。
-model Post {
-    id        Int      @id @default(autoincrement())
-    name      String
-    createdAt DateTime @default(now())
-    updatedAt DateTime @updatedAt
-
-    @@index([name])
- }
+model Todo {
+    id        String   @id @default(cuid())
+    done      Boolean
+    text      String
+    createdAt DateTime @default(now())
+    updatedAt DateTime @updatedAt
+ }
スキーマを変更したのでPrisma Clientを再生成し、またDB内のスキーマも更新します。
> npm run db:push
ステップ7:tRPCルーター定義(サーバサイド)
以下の内容でsrc/server/api/routers/todo.tsを作成します。
import { z } from "zod";
import { createTRPCRouter, publicProcedure } from "~/server/api/trpc";
export const todoRouter = createTRPCRouter({
  getAll: publicProcedure.input(z.void()).query(async ({ ctx }) => {
    return ctx.db.todo.findMany({ orderBy: [{ createdAt: "desc" }] });
  }),
  add: publicProcedure
    .input(
      z.object({
        text: z.string(),
      }),
    )
    .mutation(async ({ ctx, input }) => {
      const { text } = input;
      return ctx.db.todo.create({
        data: {
          done: false,
          text,
        },
      });
    }),
  delete: publicProcedure
    .input(z.object({ id: z.string() }))
    .mutation(({ ctx, input }) => {
      const { id } = input;
      return ctx.db.todo.delete({ where: { id } });
    }),
  done: publicProcedure
    .input(z.object({ id: z.string(), done: z.boolean() }))
    .mutation(({ ctx, input }) => {
      const { id, done } = input;
      console.log(`id=`, id, ` done=`, done);
      return ctx.db.todo.update({ where: { id }, data: { done } });
    }),
});
これに合わせて以下のようにsrc/server/api/root.tsを修正します。
- import { postRouter } from "~/server/api/routers/post";
+ import { todoRouter } from "~/server/api/routers/todo";
  import { createCallerFactory, createTRPCRouter } from "~/server/api/trpc";
  /**
   * This is the primary router for your server.
   */
  export const appRouter = createTRPCRouter({
-   post: postRouter,
+   todo: todoRouter,
  });
  // export type definition of API
 :
ステップ8: Tailwind.CSSの設定
以下の修正をtailwind.config.tsに加えます。これで画像のような影付きの効果を与えたshadow-neonというユーティリティークラスが指定できるようになります。
       fontFamily: {
         sans: ["var(--font-sans)", ...fontFamily.sans],
       },
+      boxShadow: {
+        neon: "0 0 2px #fff, inset 0 0 3px #fff, 0 0 5px #787, 0 0 15px #787, 0 0 30px #787",
+      },
     },
   },
   plugins: [],
ステップ9:UIを作成する(1)
以下の内容でsrc/app/page.tsxを置き換えます。App Routerでのトップページであるサーバコンポーネントです。
import { type NextPage } from "next";
import TodoList from "~/app/_components/TodoList";
const TodoApp: NextPage = async () => {
  return (
    <main className="min-h-screen bg-slate-950 p-2">
      <div className="container mx-auto flex flex-col p-4">
        <h1 className="border-2 border-amber-500 p-3 text-center text-4xl font-bold text-amber-500 shadow-neon">
          Todoアプリ
        </h1>
        <br />
        <TodoList />
      </div>
    </main>
  );
};
export default TodoApp;
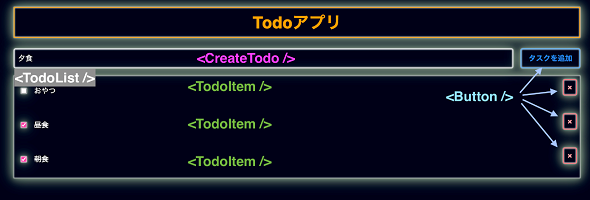
以降、使用する以下のReactコンポーネント群をsrc/_components配下に作成していきます。全てクライアントコンポーネントとして定義します。
- src/app/_components/TodoList.tsx
- src/app/_components/TodoItem.tsx
- src/app/_components/CreateTodo.tsx
- src/app/_components/Button.tsx
これらのコンポーネントを使用した画面構成は以下の通りです。
ステップ10:UIを作成する(2)
src/app/_components/TodoList.tsxを以下の内容で作成します。画面下部のタスク一覧を表示するクライアントコンポーネントです。今回はSupense配下で実行するためにuseSuspenseQueryを呼び出します。
"use client";
import { api } from "~/trpc/react";
import TodoItem from "./TodoItem";
import CreateTodo from "./CreateTodo";
export default function TodoList() {
  const [todos] = api.todo.getAll.useSuspenseQuery();
  return (
    <>
      <CreateTodo />
      <ul id="taskList" className="list-inside list-disc shadow-neon">
        {todos?.map((todo) => (
          <li
            key={todo.id}
            className="mb-2 flex items-center rounded p-2 text-white"
          >
            <TodoItem todo={todo} />
          </li>
        ))}
      </ul>
    </>
  );
}
ステップ11:UIを作成する(3)
src/app/_components/TodoItem.tsxを作成します。これはタスク一覧の要素であるタスクを表示するクライアントコンポーネントです。
"use client";
import { type RouterOutputs, api } from "~/trpc/react";
import { Button } from "./Button";
type Props = {
  todo: RouterOutputs["todo"]["getAll"][0];   //(1)
};
export default function TodoItem({ todo }: Props) {
  const utils = api.useUtils();
  const { mutateAsync: todoDeleteAsync } = api.todo.delete.useMutation({
    onSettled: () => {
      void utils.todo.invalidate();
    },
  });
  const { mutateAsync: todoDoneAsync } = api.todo.done.useMutation({
    onSettled: () => {
      void utils.todo.invalidate();
    },
  });
  function handleDeleteTodo(id: string) {
    void todoDeleteAsync({ id });
  }
  function handleDoneTodo(id: string, done: boolean) {
    void todoDoneAsync({ id, done });
  }
  return (
    <>
      <input
        type="checkbox"
        className="ml-2 mr-4 accent-pink-500 shadow-neon"
        checked={todo.done}
        onChange={() => handleDoneTodo(todo.id, !todo.done)}
      />
      <span className={todo.done ? "line-through" : ""}>{todo.text}</span>
      <Button
        variant={"danger"}
        size={"sm"}
        className={"ml-auto"}
        onClick={() => handleDeleteTodo(todo.id)}
      >
        ×
      </Button>
    </>
  );
}
コンポーネントのpropsであるtodoの型はtRPCのtRPCのルーター定義から取得します。(1)のRouterOutputsはCreate T3 Appが定義しているユーティリティー型であり、tRPCのプロシージャの返り値の型を得ることができます。
ステップ12:UIを作成する(4)
src/app/_components/CreateTodo.tsxを以下の内容で作成します。画面上部のタスク入力のためのクライアントコンポーネントです。
"use client";
import type { FormEvent } from "react";
import { api } from "~/trpc/react";
import { Button } from "./Button";
export default function CreateTodo() {
  const utils = api.useUtils();
  const { mutateAsync: todoAddAsync } = api.todo.add.useMutation({
    onSettled: () => {
      void utils.todo.invalidate();
    },
  });
  function handleAddTodo(e: FormEvent) {
    e.preventDefault();
    const form = e.target as HTMLFormElement;
    const formData = new FormData(form);
    const formJson = Object.fromEntries(formData.entries());
    form.reset();
    void todoAddAsync(formJson as { text: string });
  }
  return (
    <form className="flex" onSubmit={handleAddTodo}>
      <input
        className="shadow-neon mb-4 mr-4 flex-grow rounded border-2 bg-slate-950 p-2 text-white"
        type="text"
        name="text"
        placeholder="新しいタスクを入力"
      />
      <Button type="submit">タスクを追加</Button>
    </form>
  );
}
ステップ13:UIを作成する(5)
src/app/_components/Button.tsxを以下の内容で作成します。各部のボタンのための共通コンポーネントです。ボタン種別を表すvariantとして、primaryかdangerを選択できます。また、大きさはsm、md、lgの3種類が指定できます。
この設定によってTailwind CSSのユーティリティークラスの指定を切り替えますが、切り替え処理にTailwind Variantsを使用しています。このコンポーネントはclassName propsを取り、補足的に任意のクラス指定を追加することもできます。
import React, { type ComponentProps } from "react";
import { tv, type VariantProps } from "tailwind-variants";
export const button = tv({
  base: `shadow-neon rounded bg-slate-950 font-bold border-2 mb-4 `,
  variants: {
    variant: {
      primary: `border-blue-400 text-blue-500 hover:bg-blue-700`,
      danger: `border-red-400 text-red-300 hover:bg-red-700"`,
    },
    size: {
      sm: `px-2 py-1`,
      md: `px-4 py-2`,
      lg: `px-6 py-4`,
    },
  },
  defaultVariants: {
    variant: "primary",
    size: "md",
  },
});
type ButtonProps = ComponentProps<"button"> &
  VariantProps<typeof button> & {
    children: React.ReactNode;
  };
export const Button = React.forwardRef<HTMLButtonElement, ButtonProps>(
  (
    { className, variant, size, children, disabled, type = "button", ...props },
    ref,
  ) => {
    return (
      <button
        type={type}
        className={button({ variant, className, size })}
        ref={ref}
        disabled={disabled}
        {...props}
      >
        {children}
      </button>
    );
  },
);
Button.displayName = "Button";
ステップ14:動作確認
ここでいったん[Ctr]+[C]キーを押下してアプリを終了し、再起動します。
^C
> npm run dev
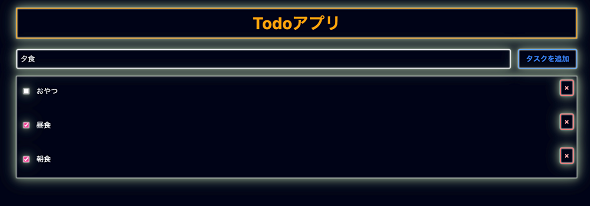
以下の画面が表示され、Todoタスクの追加や削除操作ができることを確認します。
サーバサイドtRPCの活用
ここまでは、トップレベル以外は全てクライアントコンポーネントとして定義してきており、今回選択したApp Routerの主要機能の一つであるReact Server Component(RSC)は使用していませんでした。ここではRSCからtRPCを呼び出すように拡張してみます。
方針は以下の通りです。
- Todoタスク一覧をあらかじめサーバサイドで生成して、初期表示を高速化する
- tRPCのgetAll()をサーバ内で呼び出してタスク一覧を生成するサーバコンポーネントTodoListSC.tsxを定義する
- SuspenseのフォールバックとしてTodoListSCの結果を表示するように指定する
- クライアントコンポーネントでtRPCのgetAll()をリモートで呼び出す
- 呼び出しの結果が結果が返るまでは上記フォールバックを表示し、取得完了後に最新取得した一覧に置き換える(Suspenseの機能)
ステップ15:コード修正
先の方針に従い、src/app/page.tsxに以下の修正を反映します。
import { type NextPage } from "next";
+ import TodoListSC from "~/app/_components/TodoListSC";
import TodoList from "~/app/_components/TodoList";
+ import { Suspense } from "react";
const TodoApp: NextPage = async () => {
  return (
    <main className="min-h-screen bg-slate-950 p-2">
      <div className="container mx-auto flex flex-col p-4">
        <h1 className="border-2 border-amber-500 p-3 text-center text-4xl font-bold text-amber-500 shadow-neon">
          Todoアプリ
        </h1>
        <br />
-        <TodoList />
+        <Suspense fallback={<TodoListSC />}>
+          <TodoList />
+        </Suspense>
      </div>
    </main>
  );
};
export default TodoApp;
ステップ16:TodoListSC.tsxの作成
src/app/_components/TodoListSC.tsxを以下の内容で作成します。
import { api } from "~/trpc/server";
import TodoItem from "~/app/_components/TodoItem";
import CreateTodo from "./CreateTodo";
export default async function TodoListSC() {
  const todos = await api.todo.getAll();
  return (
    <>
      <CreateTodo />
      <ul
        id="taskList"
        className="list-inside list-disc bg-blue-800 shadow-neon"
      >
        {todos.map((todo) => (
          <li
            key={todo.id}
            className="mb-2 flex items-center rounded p-2 text-white"
          >
            <TodoItem todo={todo} />
          </li>
        ))}
      </ul>
    </>
  );
}
Copyright © ITmedia, Inc. All Rights Reserved.

