MediaPlayerのリモート操作
Activity上でMediaPlayerを制御する方法が理解できたところで、今度はリモートで操作する方法を解説していきます。
MediaPlayerをリモートで操作できるようになると、Activityを閉じても再生し続けられ、Activity以外からも操作ができるようになり、音楽プレイヤーとしてかなり実用的になります。
この場合、音楽プレイヤーの中心となるのは連載第4回「常駐アプリが作成できるAndroidの“サービス”とは」で取り上げた「Service」クラスです。
この「Service」クラスのクライアントはActivity、ロック画面、Notificationと3つもあります。そして、それぞれServiceに対して処理の要求方法が異なります。
Serviceのライフサイクルは、連載第4回で説明したとおり、非常にシンプルです。
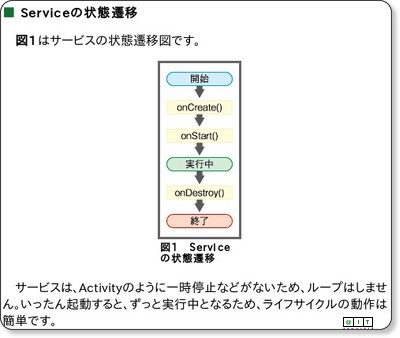
複数回「Context#startService(Intent)」を行っても、「Service#onCreate()」を1度しか呼び出さないのに対し、「Service#onStartCommand(Intent, int, int)」は複数回呼び出され、ずっと実行中であるという特徴があります(なお、連載第4回で解説した「Service#onStart(Intent, int)」は「deprecated」な仕様になっているので、現在は「Service#onStartCommand(Intent, int, int)」を使用することが推奨されています)。
【1】Activityクライアントの制御方法
以下は、MusicPlayerRemoteControlActivityのボタンタップイベント処理をシンプルにしたものです。
@Override
public void onClick(View v) {
    if (v == mButtonPlayPause) {
        if (ボタンが再生マークなら) {
            startService(new Intent(MusicPlayerService.ACTION_PLAY));
        } else {
            startService(new Intent(MusicPlayerService.ACTION_PAUSE));
        }
    } else if (v == mButtonSkip) {
        startService(new Intent(MusicPlayerService.ACTION_SKIP));
    } else if (v == mButtonRewind) {
        startService(new Intent(MusicPlayerService.ACTION_REWIND));
    } else if (v == mButtonStop) {
        startService(new Intent(MusicPlayerService. ACTION_STOP));
    }
}
すべてのボタン処理で、単にサービスを起動しているだけです。
受け取ったサービス側も、以下のように単に起動アクションで処理を分けることができるので、サービスにバインドしない形でサービスを使用するのは、この方法が最も簡単だと思います。
@Override
public int onStartCommand(Intent intent, int flags, int startId) {
    String action = intent.getAction();
    if (action.equals(ACTION_PLAYPAUSE)) {
        processTogglePlaybackRequest();
    } else if (action.equals(ACTION_PLAY)) {
        processPlayRequest();
    } else if (action.equals(ACTION_PAUSE)) {
        processPauseRequest();
    } else if (action.equals(ACTION_SKIP)) {
        processSkipRequest();
    } else if (action.equals(ACTION_STOP)) {
        processStopRequest();
        if (intent.getBooleanExtra("cancel", false)) {
            mNotificationManager.cancel(NOTIFICATION_ID);
        }
    } else if (action.equals(ACTION_REWIND)) {
        processRewindRequest();
    } else if (action.equals(ACTION_REQUEST_STATE)) {
        sendPlayerState();
    }
    return START_NOT_STICKY;
}
BroadcastReceiverの使い方
「Context#startService(Intent)」は、指示を出しっぱなしです。サービスからの再生状況のフィールドバックを受けるには、Activityにも、サービスが送信するIntentを受け取る「BroadcastReceiver(ブロードキャストレシーバ)」が必要です。
以下のコードではいろいろと処理を行っていますが、Intentに含まれている情報を基に表示を更新しているだけです。
private BroadcastReceiver mReceiver = new BroadcastReceiver() {
    @Override
    public void onReceive(Context context, final Intent intent) {
        mHandler.post(new Runnable() {
            public void run() {
                mTextViewArtist.setText(intent.getStringExtra("artist"));
                mTextViewAlbum.setText(intent.getStringExtra("album"));
                mTextViewTitle.setText(intent.getStringExtra("title"));
                String state = intent.getStringExtra("state");
                mCurrentPosition = intent.getIntExtra("currentPosition", 0);
                mChronometer.setBase(SystemClock.elapsedRealtime() -
                    mCurrentPosition);
                if (state.equals(MusicPlayerService.State.Playing.toString())) {
                    playing();
                } else if (state.equals(MusicPlayerService.State.Paused.toString())) {
                    paused();
                } else if (state.equals(MusicPlayerService.State.Stopped.toString())) {
                    stopped();
                }
            }
        });
    }
};
このブロードキャストはMediaPlayerの状態が変わるたびに、サービスから送られてきます。どのようなタイミングで送られているかはサービスのソースコードを参照してみてください。
【2】ロック画面クライアントからの制御方法
ロック画面からサービスの制御の方法を説明する前に、ロック画面にオーディオリモコンを表示させる方法を説明します。
mPlayer = new MediaPlayer();
// setWakeModeを以下のように呼び出す
mPlayer.setWakeMode(getApplicationContext(),
    PowerManager.PARTIAL_WAKE_LOCK);

// Intent.ACTION_MEDIA_BUTTONのブロードキャストを受け取る
// BroadcastReceiverでComponentNameを生成
mMediaButtonReceiverComponent =
    new ComponentName(this, MusicPlayerReceiver.class); // ※
// AudioManagerにComponentNameを登録
mAudioManager.registerMediaButtonEventReceiver(mMediaButtonReceiverComponent);

// Intent.ACTION_MEDIA_BUTTONをアクションに持つIntentを生成
Intent intent = new Intent(Intent.ACTION_MEDIA_BUTTON);
// ComponentNameをIntentに設定
intent.setComponent(mMediaButtonReceiverComponent);
// RemoteControlClientを生成
mRemoteControlClient = new RemoteControlClient(
    PendingIntent.getBroadcast(this, 0 , intent, 0));
// AudioManagerにRemoteControlClientを登録
mAudioManager.registerRemoteControlClient(mRemoteControlClient);

// リモコンの状態を設定
mRemoteControlClient.setPlaybackState(RemoteControlClient.PLAYSTATE_PLAYING);
// リモコン上で扱える操作を設定
mRemoteControlClient.setTransportControlFlags(
    RemoteControlClient.FLAG_KEY_MEDIA_PLAY
    | RemoteControlClient.FLAG_KEY_MEDIA_PAUSE
    | RemoteControlClient.FLAG_KEY_MEDIA_NEXT
    | RemoteControlClient.FLAG_KEY_MEDIA_STOP);

// リモコン上の曲情報を更新
mRemoteControlClient.editMetadata(true)
    .putString(MediaMetadataRetriever.METADATA_KEY_ARTIST, playingItem.artist)
    .putString(MediaMetadataRetriever.METADATA_KEY_ALBUM, playingItem.album)
    .putString(MediaMetadataRetriever.METADATA_KEY_TITLE, playingItem.title)
    .putLong(MediaMetadataRetriever.METADATA_KEY_DURATION, playingItem.duration)
    .putBitmap(RemoteControlClient.MetadataEditor.BITMAP_KEY_ARTWORK, mDummyAlbumArt).apply();
以上のような手続きでロック画面上にオーディオリモコンを表示できるようになります。

ロック画面を操作するには、「AndroidManifest.xml」に以下のパーミッションが必要ですので、忘れずに付けてください。
<uses-permission android:name="android.permission.WAKE_LOCK" />
このロック画面上のコントロールを操作すると、ソースコードの※で設定したBroadcastReceiverにブロードキャストが飛んできます。そして、以下のように適切に「Context#StartService(Intent)」を呼び出すことで、サービスにイベントを通知します。
switch (keyEvent.getKeyCode()) {
case KeyEvent.KEYCODE_HEADSETHOOK:
case KeyEvent.KEYCODE_MEDIA_PLAY_PAUSE:
    context.startService(new Intent(MusicPlayerService.ACTION_PLAYPAUSE));
    break;
case KeyEvent.KEYCODE_MEDIA_PLAY:
    context.startService(new Intent(MusicPlayerService.ACTION_PLAY));
    break;
case KeyEvent.KEYCODE_MEDIA_PAUSE:
    context.startService(new Intent(MusicPlayerService.ACTION_PAUSE));
    break;
case KeyEvent.KEYCODE_MEDIA_STOP:
    context.startService(new Intent(MusicPlayerService.ACTION_STOP));
    break;
case KeyEvent.KEYCODE_MEDIA_NEXT:
    context.startService(new Intent(MusicPlayerService.ACTION_SKIP));
    break;
case KeyEvent.KEYCODE_MEDIA_PREVIOUS:
    context.startService(new Intent(MusicPlayerService.ACTION_REWIND));
    break;
}
オーディオリモコンは要所要所でステータスや曲情報を更新しなければなりません。サービス全体で管理しているMediaPlayerの状態管理と密接に結び付いているので、詳しくはサービスのソースコードを参照してください。
【3】Notificationクライアントからの制御方法
Notificationからの制御方法の前に、やはりNotificationを表示させる説明をします。
Intent intent;

// Notificationがタップされたら開くActivityを指定する
intent = new Intent(this, MusicPlayerRemoteControlActivity.class);
// PendingIntentをgetActivityで生成
PendingIntent pi =
    PendingIntent.getActivity(this, 0,
    intent, PendingIntent.FLAG_UPDATE_CURRENT);
// RemoteViewsをレイアウトから生成
RemoteViews views =
    new RemoteViews(getPackageName(), R.layout.remote_control);
// Notificationを生成・初期化
mNotification = new Notification();
mNotification.icon = R.drawable.playing;
mNotification.contentView = views;
// 音楽再生中は常駐するようにする
mNotification.flags =
    Notification.FLAG_ONGOING_EVENT
    | Notification.FLAG_NO_CLEAR;
mNotification.contentIntent = pi;

// 以下、各ボタンにgetBoradcastで生成したPendingIntentを割り当て
intent = new Intent(ACTION_REWIND);
PendingIntent piRewind =
    PendingIntent.getService(this, R.id.rewind,
    intent, PendingIntent.FLAG_UPDATE_CURRENT);
views.setOnClickPendingIntent(R.id.rewind, piRewind);

intent = new Intent(ACTION_PLAYPAUSE);
PendingIntent piPlayPause =
    PendingIntent.getService(this, R.id.playpause,
    intent, PendingIntent.FLAG_UPDATE_CURRENT);
views.setOnClickPendingIntent(R.id.playpause, piPlayPause);

intent = new Intent(ACTION_SKIP);
PendingIntent piSkip =
    PendingIntent.getService(this, R.id.skip,
    intent, PendingIntent.FLAG_UPDATE_CURRENT);
views.setOnClickPendingIntent(R.id.skip, piSkip);

intent = new Intent(ACTION_STOP);
PendingIntent piStop =
    PendingIntent.getService(this, R.id.stop,
    intent, PendingIntent.FLAG_UPDATE_CURRENT);
views.setOnClickPendingIntent(R.id.stop, piStop);
「PendingIntent」のインスタンスを生成するには、Activityを受け取るIntentの場合は「PendingIntent#getActivity(……)」で、BroadcastReceiverが受け取るIntentの場合は「PendingIntent#getBroadcast(……)」で、それぞれ生成しなければなりません。今回は、Serviceで受け取るので「PendingIntent#getService(……)」で生成しています。
ここで生成したNotificationを以下のように現在の曲情報で更新して通知します。
private void updateNotification() {
    boolean playing = mState == State.Playing;

    mNotification.icon = playing ? R.drawable.playing : R.drawable.pausing;
    int playPauseRes =
        playing ? R.drawable.media_pause_s : R.drawable.media_play_s;
    mNotification.contentView.setImageViewResource(R.id.playpause, playPauseRes);

    Item playingItem = mItems.get(mIndex);
    mNotification.contentView.setTextViewText(R.id.artist, playingItem.artist);
    mNotification.contentView.setTextViewText(R.id.album, playingItem.album);
    mNotification.contentView.setTextViewText(R.id.title, playingItem.title);
    long current;
    if (mState == State.Stopped) {
        current = 0;
    } else {
        current = mPlayer.getCurrentPosition();
    }
    mNotification.contentView.setChronometer(
        R.id.chronometer, SystemClock.elapsedRealtime() - current, null, playing);

    mNotificationManager.notify(NOTIFICATION_ID, mNotification);
}
これで、現在再生中の曲情報がNotificationに反映され、以下のように表示されます。
重要なのは、常に同じIDで「NotificationManager#notify(int, Notification)」をすることです。
このメソッドもMediaPlayerの状態が変わるタイミングで都度呼び出されます。どのようなタイミングで呼び出されるかはサービスのソースコードを参照してみてください。
また、Notificationの基本を学びたい方は前回の解説を参照してみてください。
そして、Androidのサービスの深層へ……
今回は、前回に引き続きNotificationとMediaPlayerとロック画面上のオーディオリモコンの制御方法について説明しました。
説明し切れなかったですが、常時表示させているNotificationをActivityの停止ボタンで取り消したり、音楽プレイヤーが停止している状態なら、サービスが10分で自動的に終了したり、一時停止中にNotificationのアイコンが変わったり、細かい制御が施されています。これらもMediaPlayerで音楽プレイヤーを作る際の参考になれば幸いです。
なお、Notification上にボタンなどを配置して、そのボタンのクリックイベントを受け取る今回のような使用方法は、Android 3.0から可能です。Android 2.3.x以前では、RemoteViewsは設定でき、かつPendingIntentも設定できるのですが、肝心のイベントは機能しません。
NotificationはAndroid 1.0からある機能ですが、「RemoteViewsで自在なレイアウトを配置し、自在なイベントを発生できるようになったAndroid 3.0以降が本当のNotificationの活躍の場になる」と筆者は感じています。
次回は、連載第4回で一度取り上げたAndroidの「サービス」を、今度は深層に触れるところまで紹介します。
- グーグルのAPIを使うときに欠かせないGoogle OAuthの作り方と使い方
- 細か過ぎて伝わってないけど開発者が知っておきたいAndroid Mの新機能まとめ
- 腕時計から電話をかけるAndroid Wearアプリの作り方
- Android Wear用アプリの花形、時計アプリ「Watch Face」の基本的な作り方
- Android 5.0発表&スマホと連動する音声認識Android Wearアプリの作り方
- ウェアラブル端末用Android Wearアプリ開発の基礎知識
- 変わらないと生き残れないAndroid Lの新機能まとめ
- Android WearやIoTで注目のAndroidセンサー機能8選
- ウェアラブル時代に見直したいAndroidの加速度/重力センサー、ジャイロスコープ
- あなたの知らないAndroid SDKの便利tools、14選まとめ
- Android 4.4のメモリ使用状況を把握する3つのツールの使い方
- Androidでリアルタイムマルチプレーゲームを開発するには
- 低性能端末でも使えるか? Android 4.4 KitKatの新機能39選
- もはや無料BaaS。ゲーム以外でも使いたくなるGoogle Play Game Servicesのデータ管理機能
- アプリにGoogle+のソーシャルグラフを持ち込めるGoogle Play Game Servicesの基礎知識
- あなたのアプリはクラウドにデータをバックアップできますか?
- Eclipse ADTに代わるIDEとなるか? Android Studioの基礎知識
- ActionBarで、アプリのUIはこんなにスマートになる
- Android 4.x時代のアプリにないと残念なActionBarとは
- 動的クラスローディングでAndroidアプリ“裏”開発
- Android 4.xのAndroidビームをアプリに組み込むには
- AndroidアプリでNFCタグを読み書きするための基礎知識
- 新タブレット時代を見据えるAndroid 4.2の新機能9選
- Androidからイヤフォンやヘルス機器とBluetooth通信するには
- Bluetoothを使ってAndroidアプリ同士で通信するには
- Androidアプリをアプリ内購読に対応してもうける方法
- 開発者が知らないと残念過ぎるAndroid 4.1の新機能36選
- Androidのプロセス間通信を自由自在にするAIDL
- Android 4.0のサービス/プロセス間通信の基本
- Androidアプリでマルチメディアを扱うための基礎知識
- Androidのウィジェットにノーティフィケーションするには
- Android 4.0で注目の顔認識をアプリに組み込むには
- Android 4.0でアプリ開発を始めるための環境構築
- 開発者が知らないと損するAndroid 4.0の新機能44選
- Android Compatibility packageで2.x系でもマルチサイズ対応
- Androidの画面の大きさの違いを解決するFragments
- Android 3.0の新APIで簡単ドラッグ&ドロップ実装
- 開発者が知って得するAndroid 2.3の新機能18選
- アニメーションでAndroidに独創的な画面エフェクトを
- Androidアプリで“アニメーション”するための基礎知識
- XMLレイアウトでAndroidアプリに“設定画面”を追加
- 開発者が知っておきたいAndroid 2.2の新機能12連発
- もはやケータイに必須のカメラをAndroidで制御しよう
- 地図/位置情報/GPSを使うAndroidアプリを作るには
- Android NDKでJNIを使用してアプリを高速化するには
- Android 2.1の新機能「Live Wallpaper」で作る、美しく燃える“待ち受け”
- iPhoneより多彩なAndroidのセンサをアプリで操作
- SurfaceViewならAndroidで高速描画ゲームが作れる
- Android 1.6のジェスチャーとテキスト読み上げを使う
- Androidのホーム画面に常駐するアプリを作るには
- Netbookにも広まるAndroidで、かつてないWeb体験を
- アプリを国際化してAndroid Marketから世界へ発信
- 常駐アプリが作成できるAndroidの“サービス”とは
- AndroidでSQLiteのDB操作をするための基礎知識
- Androidアプリの使いやすさを左右する5つのレイアウト
- 簡単でワクワクするAndroidウィジェット10連発!
- ブラウザや地図、ストリートビューの基、Intentとは?
- Androidアプリ作成の基本“Activity”とは何か?
- Android Market配布を目指しEclipseでHelloWorld!
Copyright © ITmedia, Inc. All Rights Reserved.