Xamarin.Forms:プラットフォームに依存する処理を書くには?:.NET TIPS
プラットフォームに固有の処理を記述するには、DependencyServiceクラスを利用して、PCLでインタフェースを、個々のプロジェクトでその実装を定義するとよい。
対象:Visual Studio 2015以降
Xamarin.FormsのPCLプロジェクトでプラットフォームに依存するコードを書きたいときは、どうすればよいだろうか? 共通に使えるAPI呼び出しだけであれば、OnPlatformで切り分ける方法が使える。しかし、プラットフォームに固有のAPI呼び出しはPCL内では不可能なのだ。
本稿では、Xamarin.Formsアプリで、プラットフォームに依存するコードを書く方法を解説する。
プラットフォームに依存する処理を書くには?
DependencyServiceクラス(Xamarin.Forms名前空間)を使えばよい。
DependencyServiceクラスは一種のDIコンテナであり、プラットフォームごとに実装したオブジェクトをPCL内から利用できる。DependencyServiceクラスを使うコーディングの手順は、次のようになる。
- インタフェースをPCLプロジェクトに定義する
- プラットフォームごとに、インタフェースを実装するクラスを記述する。そのクラスには、Dependency属性(Xamarin.Forms名前空間)を付ける
- PCLプロジェクト内で、DependencyServiceクラスのGetメソッドを使い、プラットフォームに依存するオブジェクトを得る
なお、DependencyServiceクラスのGetメソッドは、既定ではシングルトンを返す。引数にDependencyFetchTarget.NewInstance(Xamarin.Forms名前空間)を指定すると、その都度新しいインスタンスが作られる。
実際の例
実際の例として、DependencyServiceクラスを使う簡単なアプリを作ってみよう(次の画像)。
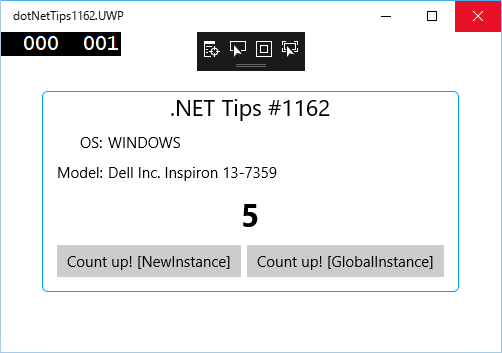 本TIPSで作るアプリ(Windows 10で実行)
OSの情報(Windows 10では「WINDOWS」という名前だけ)と、デバイスのモデル名が表示される。下のボタンをクリックすると、その上にある数字がカウントアップされる(2つのボタンの動作の詳細は後述)。
このアプリは、プラットフォームに依存するAPIを呼び出して、デバイスのOSとモデルの情報を取得して表示するものだ。また、DependencyServiceクラスのGetメソッドに渡す引数の効果を確かめるために、数値をカウントアップする2つのボタンを持たせている。
なお、これから説明するコードはAndroid/iOS/UWPの3つだけとする(Windows Phone 8.x/Windows 8.xは省略する)。
それでは、まずXamarin.Formsのプロジェクトを用意しよう。
ソリューションを新しく作るときに[Blank Xaml App (Xamarin.Forms Portable)]を選ぶ。以下ではソリューション名(=PCLプロジェクトの名前)は「dotNetTips1162」としている。
インタフェースを定義する
最初に行うことは、プラットフォームごとに実装するクラスのインタフェースを、PCLプロジェクトに定義することだ。
PCLプロジェクトに「IPlatformInfo」インタフェースを追加し、次のコードのように記述する。実際のプロジェクトでは、このインタフェース名は自由に決めてよい。
namespace dotNetTips1162
{
// DependencyServiceで使うインタフェース
public interface IPlatformInfo
{
// モデル名を取得するメソッド
string GetModel();
// OSのバージョン文字列を返すプロパティ(読み取り専用)
string OsVersion { get; }
// 数値のプロパティ(読み書き可能)…インスタンスの検証用
int Count { get; set; }
}
}
PCLプロジェクトに記述する。
プラットフォームごとにインタフェースを実装する
上で定義したインタフェースの実装を、プラットフォームごとに行う。
まずは、Androidのプロジェクトからだ。「PlatformInfo」クラスをAndroidのプロジェクトに追加し、以下のコードのように実装する。
IPlatformInfoインタフェースを実装するだけでなく、冒頭にDependency属性の指定も必要だ。このDependency属性の記述は、「このアセンブリには、DependencyServiceで使うPlatformInfoクラスがありますよ」といった意味である。
[assembly: Xamarin.Forms.Dependency(typeof(dotNetTips1162.Droid.PlatformInfo))]
namespace dotNetTips1162.Droid
{
// DependencyServiceで使う実装(Android)
public class PlatformInfo : IPlatformInfo
{
public int Count { get; set; }
public string OsVersion
{
get
{
return Android.OS.Build.VERSION.Release;
}
}
public string GetModel()
{
string manufacturer = Android.OS.Build.Manufacturer;
string model = Android.OS.Build.Model;
return $"{manufacturer} {model}";
}
}
}
Androidのプロジェクトに記述する。
Android.OS名前空間のBuildクラスを使って情報を取得している。このクラスは、Androidに固有のもので、PCL内に記述できない。
次に、iOSでの実装だ。同じようにiOSのプロジェクトに「PlatformInfo」クラスを追加して、次のコードのように書き換える。
[assembly: Xamarin.Forms.Dependency(typeof(dotNetTips1162.iOS.PlatformInfo))]
namespace dotNetTips1162.iOS
{
// DependencyServiceで使う実装(iOS)
public class PlatformInfo : IPlatformInfo
{
public int Count { get; set; }
public string OsVersion
{
get
{
var device = UIKit.UIDevice.CurrentDevice;
return $"{device.SystemName} {device.SystemVersion}";
}
}
public string GetModel()
{
return UIKit.UIDevice.CurrentDevice.Model;
}
}
}
iOSのプロジェクトに記述する。
UIKit名前空間のUIDeviceクラスを使って情報を取得している。このクラスは、iOSに固有のもので、PCL内に記述できない。
最後に、UWPでの実装だ。次のコードのように実装する。
using Windows.Security.ExchangeActiveSyncProvisioning; // EasClientDeviceInformation
[assembly: Xamarin.Forms.Dependency(typeof(dotNetTips1162.UWP.PlatformInfo))]
namespace dotNetTips1162.UWP
{
// DependencyServiceで使う実装(UWP)
public class PlatformInfo : IPlatformInfo
{
public int Count { get; set; }
EasClientDeviceInformation devInfo = new EasClientDeviceInformation();
public string OsVersion
{
get
{
return devInfo.OperatingSystem;
}
}
public string GetModel()
{
return $"{devInfo.SystemManufacturer} {devInfo.SystemProductName}";
}
}
}
UWPのプロジェクトに記述する。
Windows.Security.ExchangeActiveSyncProvisioning名前空間のEasClientDeviceInformationクラスを使って情報を取得している。このクラスは、UWPに固有のもので、PCL内に記述できない。
画面を作る
以上で準備は整った。あとはPCLプロジェクト内で、DependencyServiceクラスのGetメソッドを使ってプラットフォームに依存する実装を得て使うだけだ。
その前に、画面を作っておこう。
PCLプロジェクトにあるMainPage.xamlファイルの内容を次のように変更する。
<?xml version="1.0" encoding="utf-8" ?>
<ContentPage xmlns="http://xamarin.com/schemas/2014/forms"
xmlns:x="http://schemas.microsoft.com/winfx/2009/xaml"
xmlns:local="clr-namespace:dotNetTips1162"
x:Class="dotNetTips1162.MainPage">
<!--<Label Text="Welcome to Xamarin Forms!"
VerticalOptions="Center"
HorizontalOptions="Center" />-->
<ContentPage.Padding>
<OnPlatform x:TypeArguments="Thickness" iOS="0,20,0,0" />
</ContentPage.Padding>
<ContentPage.Resources>
<ResourceDictionary>
<Style TargetType="Label">
<Setter Property="VerticalOptions" Value="Center" />
</Style>
</ResourceDictionary>
</ContentPage.Resources>
<Grid HorizontalOptions="Center" VerticalOptions="Center"
ColumnSpacing="5" RowSpacing="10" >
<Grid.ColumnDefinitions>
<ColumnDefinition Width="10" />
<ColumnDefinition Width="Auto" />
<ColumnDefinition Width="Auto" />
<ColumnDefinition Width="10" />
</Grid.ColumnDefinitions>
<Grid.RowDefinitions>
<RowDefinition Height="Auto" />
<RowDefinition Height="Auto" />
<RowDefinition Height="Auto" />
<RowDefinition Height="Auto" />
<RowDefinition Height="Auto" />
<RowDefinition Height="5" />
</Grid.RowDefinitions>
<Frame OutlineColor="#00a2e8" HasShadow="True"
Grid.ColumnSpan="4" Grid.RowSpan="6" BackgroundColor="Transparent" />
<Label Text=".NET Tips #1162" FontSize="Medium" VerticalOptions="Center"
HorizontalOptions="Center" Grid.ColumnSpan="4" />
<Label Text="OS:" Grid.Row="1" Grid.Column="1" HorizontalOptions="End" />
<Label x:Name="LabelOS" Grid.Row="1" Grid.Column="2" />
<Label Text="Model:" Grid.Row="2" Grid.Column="1" HorizontalOptions="End" />
<Label x:Name="LabelModel" Grid.Row="2" Grid.Column="2" />
<Label x:Name="LabelCount" Text="0" Grid.Row="3" Grid.ColumnSpan="4"
HorizontalOptions="Center" FontSize="Large" FontAttributes="Bold" />
<StackLayout Grid.Row="4" Grid.Column="1" Grid.ColumnSpan="2"
Orientation="Horizontal" HorizontalOptions="Center">
<Button Clicked="Button1_Clicked" Text="Count up! [NewInstance]" />
<Button Clicked="Button2_Clicked" Text="Count up! [GlobalInstance]" />
</StackLayout>
</Grid>
</ContentPage>
自動生成されたLabelコントロールをコメントアウトし、<ContentPage.Padding>要素以降を追加した。
少々長いコードであるが、必須なのは名前を付けた3つのLabelコントロールと、イベントハンドラーを設定した2つのButtonコントロールだけである。
なお、イベントハンドラーをまだ実装していないので、この時点ではビルドできない。
DependencyServiceクラスを使う
PCLプロジェクトの「MainPage.xaml.cs」ファイルを開いて、次のように編集する。
public partial class MainPage : ContentPage
{
public MainPage()
{
InitializeComponent();
// DependencyServiceから、IPlatformInfoオブジェクトを取得する
IPlatformInfo platformInfo = DependencyService.Get<IPlatformInfo>();
// 取得したオブジェクトを使う
LabelOS.Text = platformInfo.OsVersion;
LabelModel.Text = platformInfo.GetModel();
}
// NewInstanceを指定してオブジェクトを取得する
void Button1_Clicked(object sender, EventArgs args)
{
IPlatformInfo platformInfo
= DependencyService.Get<IPlatformInfo>(DependencyFetchTarget.NewInstance);
// オブジェクトが保持する数値をカウントアップし、ラベルに表示する
LabelCount.Text = (++platformInfo.Count).ToString();
}
// GlobalInstance(既定)を指定してオブジェクトを取得する
// Getメソッドに引数を与えなかったときも同じ結果になる
void Button2_Clicked(object sender, EventArgs args)
{
IPlatformInfo platformInfo
= DependencyService.Get<IPlatformInfo>(DependencyFetchTarget.GlobalInstance);
// オブジェクトが保持する数値をカウントアップし、ラベルに表示する
LabelCount.Text = (++platformInfo.Count).ToString();
}
}
PCLの「MainPage.xaml.cs」ファイルのクラス定義部分をこのように書き換える。
アプリ起動時には、コンストラクタ内でOSとモデルの情報を取得してラベルに表示する。DependencyServiceクラスのGetメソッドには、取得したいオブジェクトのインタフェース(ここではIPlatformInfo)を型引数として与える。
左のボタンのイベントハンドラー(=Button1_Clickedメソッド)では、NewInstanceを指定してオブジェクトを取得し、オブジェクトが保持している数値をカウントアップしてから、ラベルに表示している。
右のボタンのイベントハンドラー(=Button2_Clickedメソッド)も同様だが、オブジェクトを取得するときにGlobalInstanceを渡すところが異なる。
以上で完成だ。
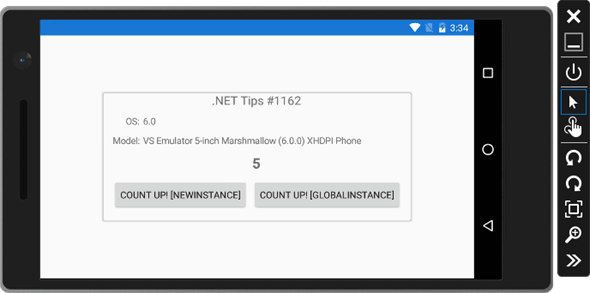
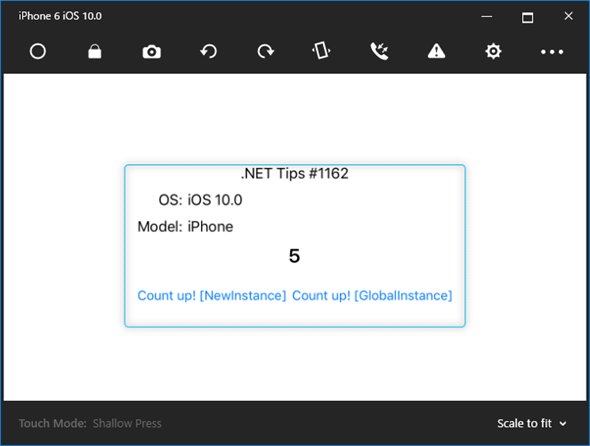
これで実行してみると、次の画像のようになる。
左のボタン(イベントハンドラー「Button1_Clicked」)を1回クリックすると、数字は「1」になる。しかしその後は、何回クリックしても数字は「1」のままである。NewInstanceを指定してオブジェクトを取得すると、そのたびに新しいインスタンスが生成されるためだ。
右のボタン(イベントハンドラー「Button2_Clicked」)は、クリックするごとに数字が1ずつ増えていく。GlobalInstanceを指定して(あるいは引数を省略して)オブジェクトを取得する場合は、最初の呼び出しでインスタンスが生成され、2回目以降はそのインスタンスが返されるためだ。アプリでグローバルなシングルトンになっているのである。
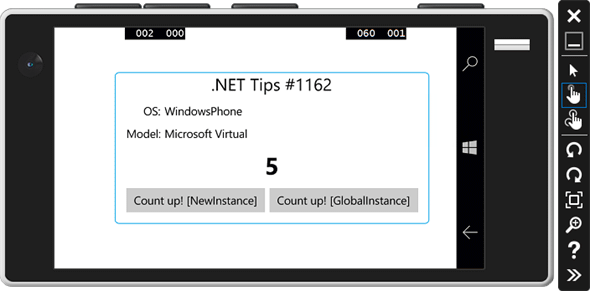 実行結果
実行結果右のボタンを5回タップした状態である。
上はVisual Studio Emulator for Androidでの実行結果。中はiOS Simulator for Windowsでの実行結果。下はMobile Emulator(Windows 10)での実行結果。なお、iOS Simulator for Windowsは本稿執筆段階でプレビュー段階となっている。使用方法については「XamarinアプリのMacでのビルドとiOS Simulator for Windows」を参照されたい。
まとめ
PCL内でプラットフォームに依存するコードが必要なときは、DependencyServiceクラスを利用する。
コーディングの手順は、PCL内にインタフェースを定義し、プラットフォームごとにそのインタフェースの実装クラスを書き、最後にPCL内でDependencyServiceクラスのGetメソッドを使ってインスタンスを取得する。このインスタンスは、既定ではシングルトンである。
プラットフォームごとの実装クラスには、Dependency属性を付ける必要がある。付け忘れるとDependencyServiceクラスが実装クラスを見つけられなくなるので、注意しよう。
利用可能バージョン:Visual Studio 2015以降
カテゴリ:Xamarin 処理対象:Xamarin.Forms
関連TIPS:Xamarin.Forms:プロジェクトにXamlページを追加するには?
関連TIPS:Xamarin.Forms:プラットフォームに応じて画面の一部を変えるには?
関連記事
Copyright© Digital Advantage Corp. All Rights Reserved.


 Xamarin.Forms:ユーザーデータを保存するには?
 Xamarin.Forms:プラットフォームに応じて画面の一部を変えるには?
 Xamarin.Forms:画面を横スライドで切り替えるには?
 Xamarin.Forms:プロジェクトにXamlページを追加するには?
 Xamarin.Forms:アプリのリソースを指定して画像を表示するには?

