既存のAWSリソースをTerraformの管理下に置く方法:「AWS」×「Terraform」で学ぶクラウド時代のインフラ管理入門(7)
インフラ自動化ツールの一つである「Terraform」について、これから学ぼうという方、使っていきたい方を対象に、Terraformの導入方法や基本的な使い方を紹介していく本連載。今回は、以前から利用しているクラウドリソースをTerraformで管理する方法について。
この記事は会員限定です。会員登録(無料)すると全てご覧いただけます。
インフラ自動化ツールの一つである「Terraform」について、Terraformの導入方法や基本的な使い方を紹介していく本連載。前回まで、Terraformを利用して新たにクラウドリソースを作成および管理する方法を紹介してきました。
自動化の恩恵を得るためにTerraformの利用を進めていくと、既存のクラウドリソースもTerraformで管理したくなるでしょう。そこで今回は、既存のクラウドリソースをTerraformの管理下に置く機能の使い方を紹介します。
既存のクラウドリソースをTerraformで管理する方法
既存のクラウドリソースをTerraform管理下に置くイメージをつかむために、手作業で作成した「Amazon Elastic Compute Cloud(Amazon EC2)」のインスタンス(以下、EC2インスタンス)をTerraformで管理できるようにしましょう。
まず、以下の要領でEC2インスタンスを手作業で作成します。
| 設定項目 | 設定値 |
|---|---|
| インスタンス名 | test |
| Amazonマシンイメージ(AMI)名 | Amazon Linux 2023 AMI |
| アーキテクチャ | 64bit(x86) |
| インスタンスタイプ | t2.micro |
| キーペア | キーペアなしで続行 |
| セキュリティグループ | 既存のセキュリティグループを選択(default) |
| ルートボリュームサイズ | 8 GiB |
| ルートボリュームタイプ | gp2 |
作成したEC2インスタンスをTerraformで管理する準備をします。まずは対象のインスタンス IDとAMI IDが必要ですので、それぞれ控えておきます。
続いて、EC2インスタンスをTerraform管理下に置くため、まずは以下のようなTerraformコードを作成します。amiの部分には先ほど控えたAMI IDを入力してください。
resource "aws_instance" "test" {
  ami           = "ami-0dfa284c9d7b2adad"
  instance_type = "t2.micro"
}
次に、以下のコマンドを実行して、EC2インスタンスをTerraformの管理下に置きます。
$ terraform import aws_instance.test i-xxxxxxxxxxxxxxxxx
aws_instance.test: Importing from ID "i-xxxxxxxxxxxxxxxxx"...
aws_instance.test: Import prepared!
  Prepared aws_instance for import
aws_instance.test: Refreshing state... [id=i-xxxxxxxxxxxxxxxxx]
Import successful!
The resources that were imported are shown above. These resources are now in
your Terraform state and will henceforth be managed by Terraform.
コマンドの実行結果を見て気付いた人もいると思いますが、リソースをTerraformの管理下に置くことを「インポートする」と呼びます。そのため、実行するコマンドもimportになっています。コマンドのパラメーターとして、インポート先となるTerraform上のリソース名を指定し、その後ろにインポート元のリソース IDを指定しています。
インポートは完了しましたが、このままではTerraformコードとリソースの状態が一致していません。そのため、以下のコマンドを実行して差異を確認します。
$ terraform plan
aws_instance.test: Refreshing state... [id=i-xxxxxxxxxxxxxxxxx]
Terraform used the selected providers to generate the following execution plan.
Resource actions are indicated with the following symbols:
  ~ update in-place
Terraform will perform the following actions:
  # aws_instance.test will be updated in-place
  ~ resource "aws_instance" "test" {
        id                                   = "i-xxxxxxxxxxxxxxxxx"
      ~ tags                                 = {
          - "Name" = "test" -> null
        }
      ~ tags_all                             = {
          - "Name" = "test"
        } -> (known after apply)
      + user_data_replace_on_change          = false
        # (29 unchanged attributes hidden)
        # (8 unchanged blocks hidden)
    }
Plan: 0 to add, 1 to change, 0 to destroy.
───────────────────────────────────────────────────────────────────────────────
Note: You didn't use the -out option to save this plan, so Terraform can't
guarantee to take exactly these actions if you run "terraform apply" now.
コマンドの出力結果から、差異が発生しているのはtagsとuser_data_replace_on_changeの2つだと分かります。tagsは、EC2インスタンス名を設定する内容ですが、user_data_replace_on_changeが何を示すのか分かりません。
Terraformのドキュメントを確認すると、このパラメーターはデフォルト値がfalseで、Terraformが管理する際のデフォルト値を設定するだけのように見えます。
従って、リソースの状況とTerraformコードを一致させるには、tagsを設定すればよさそうです。早速、Terraformコードを以下のように修正しましょう。
resource "aws_instance" "test" {
  ami           = "ami-0dfa284c9d7b2adad"
  instance_type = "t2.micro"
  tags = {
    Name = "test"
  }
}
次に、差異が解消されたかどうかを確認するため、先ほどと同じようにterraform planコマンドを実行して確認します。
$ terraform plan
aws_instance.test: Refreshing state... [id=i-xxxxxxxxxxxxxxxxx]
No changes. Your infrastructure matches the configuration.
Terraform has compared your real infrastructure against your configuration and
found no differences, so no changes are needed.
なぜかuser_data_replace_on_changeの差異も消えましたが、無事にリソースの状況とTerraformコードが一致しました。このように、既存のリソースをTerraformの管理下に置くには、対応するTerraformコードを作成した上でインポート作業を実施し、差異を埋めていく必要があります。
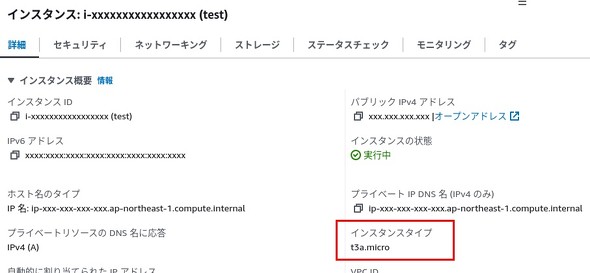
では、このリソースがTerraformの管理下にあることを確認するために、Terraformコードを編集してterraform applyコマンドを実行し、変更が適用されたかどうかを確認しましょう。今回は以下のようにインスタンスタイプをt2.microからt3a.microに変更します。
resource "aws_instance" "test" {
  ami           = "ami-0dfa284c9d7b2adad"
  instance_type = "t3a.micro"
  tags = {
    Name = "test"
  }
}
次に、変更を適用するためにterraform applyコマンドを実行します。
$ terraform apply
aws_instance.test: Refreshing state... [id=i-xxxxxxxxxxxxxxxxx]
Terraform used the selected providers to generate the following execution plan.
Resource actions are indicated with the following symbols:
  ~ update in-place
Terraform will perform the following actions:
  # aws_instance.test will be updated in-place
  ~ resource "aws_instance" "test" {
        id                                   = "i-xxxxxxxxxxxxxxxxx"
      ~ instance_type                        = "t2.micro" -> "t3a.micro"
        tags                                 = {
            "Name" = "test"
        }
      + user_data_replace_on_change          = false
        # (29 unchanged attributes hidden)
        # (8 unchanged blocks hidden)
    }
Plan: 0 to add, 1 to change, 0 to destroy.
Do you want to perform these actions?
  Terraform will perform the actions described above.
  Only 'yes' will be accepted to approve.
  Enter a value: yes
aws_instance.test: Modifying... [id=i-xxxxxxxxxxxxxxxxx]
aws_instance.test: Still modifying... [id=i-xxxxxxxxxxxxxxxxx, 10s elapsed]
aws_instance.test: Still modifying... [id=i-xxxxxxxxxxxxxxxxx, 20s elapsed]
aws_instance.test: Still modifying... [id=i-xxxxxxxxxxxxxxxxx, 30s elapsed]
aws_instance.test: Still modifying... [id=i-xxxxxxxxxxxxxxxxx, 40s elapsed]
aws_instance.test: Modifications complete after 42s [id=i-xxxxxxxxxxxxxxxxx]
Apply complete! Resources: 0 added, 1 changed, 0 destroyed.
Terraformコマンド上は変更が完了したようですので、マネジメントコンソール画面で見てみると、正しく変更が反映されていることが確認できました。
EC2インスタンス以外のリソースをインポートするには?
一般的に、Amazon Web Services(AWS)を使って構築された環境はEC2インスタンス以外にもさまざまなクラウドリソースが存在すると思います。これらのクラウドリソースをTerraformの管理下に置く場合は、前述した通りインポート作業が必要になります。importコマンドに指定するものは、クラウドリソースごとに細かく異なります。
ここでは「Amazon Elastic Block Store(Amazon EBS)」「AWS Identity and Access Management(IAM)」「Amazon Simple Storage Service(Amazon S3)」リソースをインポートする際に必要な情報を幾つか紹介します。
| クラウドリソース | コマンドに指定する識別子 | コマンド例 |
|---|---|---|
| EC2インスタンス | i-から始まるインスタンス ID | terraform import aws_instance.example i-xxxxxxxxxxxxxxxxx |
| EBSボリューム | vol-から始まるボリューム ID | terraform import aws_ebs_volume.example vol-xxxxxxxxxxxxxxxxx |
| IAM ユーザー | IAM ユーザー名 | terraform import aws_iam_user.example user-name |
| S3 バケット | S3 バケット名 | terraform import aws_s3_bucket.example bucket-name |
インポートする上でどのような情報を指定すればよいのかもっと知りたい人は、Terraformのドキュメントも参照してみてください。
Terraformを使う前に手作業で作成していたクラウドリソースも、Terrafromで管理できます。「実運用に入っているので自動化の恩恵を受けられない……」と諦める必要はありません。ぜひ、本記事を参考に既存のクラウドリソースもTerraformで管理してみてください。
筆者紹介
鎌田啓佑
サイオステクノロジー所属。OSS よろず相談室でサポート対応をしているテクニカルサポートエンジニア。Ansible に出会ってから自動化に取り憑かれ、自身の業務やプライベートであらゆるものの自動化に取り組む。プライベートでは Java でちょっとしたツールの開発を趣味にしている。
Copyright © ITmedia, Inc. All Rights Reserved.


