人体感知センサー×Webカメラで「サーバルーム簡易監視&防犯システム」を作る:ラズパイ3&Toradex、Windows 10 IoT Coreで楽しみながら検証するIoT実践入門(3)(3/4 ページ)
人体感知センサー×Webカメラアプリを使い、「サーバルーム簡易監視&防犯システム」を作る
今回のWebカメラアプリを応用し、どんなことができるだろう。例えば、PIR(Passive Infra-Red:赤外線感知)センサーモジュールとWebカメラを組み合わせた「サーバルーム簡易監視&防犯システム」などはいかがだろう。
PIRセンサーは、人体感知センサーや人体赤外線感知素子などとも呼ばれ、生物が発生する赤外線放射の変化を感知することで、動きを検出できる。身近なものでは、人が近づいたら自動的に点灯する家庭用照明に使われている。今回は、「人体赤外線感知素子(KP-IR412)」(約1080円)を使って、人を検出したらWebカメラが動作するシステムを作ってみる。この他に、ジャンパーワイヤー(メス×メス)も必要なので別途用意してほしい。
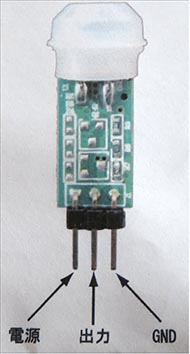
PIRセンサーからは3本の端子が出ている。それぞれ、電源、出力、GND(グラウンド/アース)である(図9)。
この3本の端子をジャンパーワイヤー(メス×メス)を経由して、Raspberry Pi 3/Toradexとつなぐ。
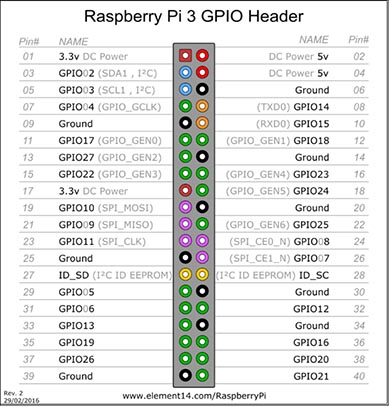
3.5V以上の電圧が必要な電源端子には、Raspberry Pi 3のGPIOピンでは、2番ピンの「DC Power 5v」が適当だ。出力端子は29番ピンの「GPIO 05」へ、GND端子は39番ピンの「Ground」へ接続する。
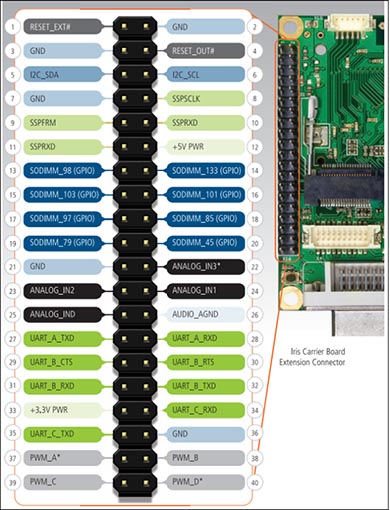
ToradexのGPIOピンには、Raspberry Pi 3で指定した「GPIO 05」がないので、代わりにToradexでは「SODIMM_97(GPIO)」を使う。コードの一部を書き換えれば対処できる。
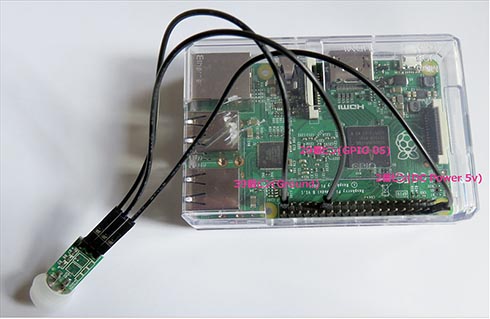
実際にPIRセンサーをRaspberry Pi 3に接続すると、図12のようになる。
PIRセンサーを使うために「MainPage.xaml.vb」のコードを修正する
作成した「MainPage.xaml.vb」のコードをベースに、PIRセンサーが活用できるようコードを修正する。
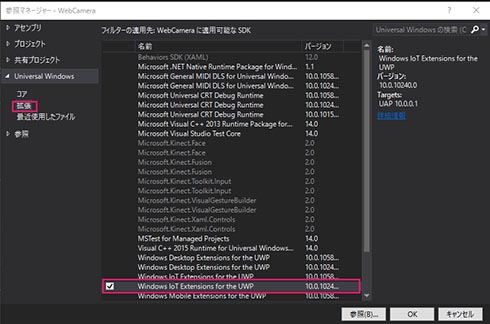
ソリューションエクスプローラーの「参照」で右クリック→「参照の追加」を選択する。表示される、参照マネージャから、「Universal Windows」→「拡張」→「WebCameraに運用可能なSDK」メニューで、「Windows IoT Extension for the UWP 10.0.10240.0」を選択する(図13)。選んだAPIがソリューションエクスプローラーの「参照」内に追加される。
名前空間の追加
Importsメニューへ、「Windows Devices Gpio」という名前空間を追加する。この名前空間には、ユーザーモードの汎用入出力であるGPIOピンを使用するためのクラスが含まれている。
メンバー変数の追加
以下の変数を追加する。
Private Const GPIO_PI As Integer = 5
Private pin As GpioPin
今回、Raspberry Pi 3では、RIPセンサーの出力端子との接続に「GPIO 05」を使うので、整数型の定数メンバー変数である「GPIO_PIN」を宣言して、「5」で初期化している。Toradexの場合は、ここを「79」にする。そして、GpioPinクラス型のメンバー変数pinを宣言しておく。
ページが読み込まれたPage_Loadedイベント内に「initGpio」プロシージャを追加し、initGpio内で、GPIOの初期化処理を行う
Private Async Function initGpio() As Task
        Dim gpio = GpioController.GetDefault
        If gpio Is Nothing = True Then
            Exit Function
        End If
GPIO入力の設定を行う
        pin = gpio.OpenPin(GPIO_PI)
        If pin.IsDriveModeSupported(GpioPinDriveMode.InputPullUp) Then
            pin.SetDriveMode(GpioPinDriveMode.InputPullUp)
        Else
            pin.SetDriveMode(GpioPinDriveMode.Input)
        End If
        Await Task.Delay(1000)
イベントの登録を行う
        AddHandler pin.ValueChanged, AddressOf Pin_ValueChanged
    End Function
PIRセンサーが反応したときの処理を記述する
  Private Async Sub Pin_ValueChanged(sender As GpioPin, e As GpioPinValueChangedEventArgs)
        If e.Edge = GpioPinEdge.RisingEdge Then
            Await myMediaCapture.StartPreviewAsync
        End If
        If e.Edge = GpioPinEdge.FallingEdge Then
            Await myMediaCapture.StopPreviewAsync
        End If
    End Sub
これで、入力用のGPIOピンの状態が変化するたびに実行される。
「GpioPinEdge.RisingEdge」になった、つまり、センサーからの入力信号がオンになったときに、「Await myMediaCapture.StartPreviewAsync」と記述して、Webカメラを作動させる制御をする。そして、センサーからの入力信号がオフになったら「Await myMediaCapture.StopPreviewAsync」と記述することで、Webカメラの動作を停止させられる。
PIRセンサーの処理を追加した全コード「MainPage.xaml.vb」は以下の通りだ。
Imports Windows.Devices.Enumeration
Imports Windows.Devices.Gpio  '' PIRセンサー使用のために追加した名前空間
Imports Windows.Media.Capture
Imports Windows.UI.Popups
Public NotInheritable Class MainPage
    Inherits Page
    Private myMediaCapture As MediaCapture
    Private myCamera As DeviceInformationCollection
    Private Const GPIO_PI As Integer = 5  '' PIRセンサー使用のために追加したメンバー定数変数
    Private pin As GpioPin  '' PIRセンサー使用のために追加したメンバー変数
    Private Async Sub MainPage_Loaded(sender As Object, e As RoutedEventArgs) Handles Me.Loaded
        Await DataShow()
        Await initGpio()  '' PIRセンサー使用のために追加したプロシージャを読み込む
    End Sub
    Private Async Function DataShow() As Task
        Try
            ComboBox1.Items.Clear()
            myCamera = Await DeviceInformation.FindAllAsync(DeviceClass.VideoCapture)
            For i As Integer = 0 To myCamera.Count - 1
                Dim CameraInfo As DeviceInformation = myCamera(i)
                ComboBox1.Items.Add(CameraInfo.Name)
            Next
            ComboBox1.SelectedIndex = 0
            myMediaCapture = New MediaCapture
            Await myMediaCapture.InitializeAsync()
            CaptureElement1.Source = myMediaCapture
            ''Await myMediaCapture.StartPreviewAsync
        Catch ex As Exception
            ErrorShow()
        End Try
    End Function
'' PIRセンサー使用のためにGPIOの初期化処理
    Private Async Function initGpio() As Task
        Dim gpio = GpioController.GetDefault
        If gpio Is Nothing = True Then
            Exit Function
        End If
        pin = gpio.OpenPin(GPIO_PI)
        If pin.IsDriveModeSupported(GpioPinDriveMode.InputPullUp) Then
            pin.SetDriveMode(GpioPinDriveMode.InputPullUp)
        Else
            pin.SetDriveMode(GpioPinDriveMode.Input)
        End If
        Await Task.Delay(1000)
        AddHandler pin.ValueChanged, AddressOf Pin_ValueChanged
    End Function
'' PIRセンサーが反応したときの処理
    Private Async Sub Pin_ValueChanged(sender As GpioPin, e As GpioPinValueChangedEventArgs)
        If e.Edge = GpioPinEdge.RisingEdge Then
            Await myMediaCapture.StartPreviewAsync
        End If
        If e.Edge = GpioPinEdge.FallingEdge Then
            Await myMediaCapture.StopPreviewAsync
        End If
    End Sub
    Private Async Sub ErrorShow()
        Dim message As New MessageDialog("カメラが装備されておりません")
        Await message.ShowAsync
        Exit Sub
    End Sub
End Class
関連記事
 「Raspberry Pi 3」で早速チェック──「IoTハードウェア」を準備する
ITエンジニアに向け、「ビジネスに貢献するIoT活用」の第一歩を踏み出す「今後のひらめき」を得てもらうための本連載。初回は、登場間もない「Raspberry Pi 3」を中心に、IoTハードウェアとWindows 10 IoT Coreを準備するまでを解説する。 「Raspberry Pi 3」が登場。Windows 10 IoT Coreは早速サポートを表明
無線通信モジュール付きのRaspberry Pi 3が登場。搭載チップの性能も向上している。マイクロソフトは発売当日にWindows 10 IoT Coreでのサポートを表明している。 第1回 Windows IoTを始めよう
見聞きしない日はないほど流行している「IoT」。でも、どうやったら使えるのか? 本連載では読者諸氏が慣れ親しんだWindowsのIoT版を使って、IoTを実践してみる。まずは概要とインストールから始めよう。
Copyright © ITmedia, Inc. All Rights Reserved.

